Introduction
Struggling with your new 3-button garage door opener? You’re not alone. Many homeowners face confusion when trying to figure out how to wire a 3-button garage door opener correctly. Whether you’re replacing an old unit or installing a brand-new system, proper wiring is crucial for safety and functionality. This comprehensive guide will walk you through every step, ensuring your garage door operates smoothly and reliably.
Understanding Your 3-Button Garage Door Opener System
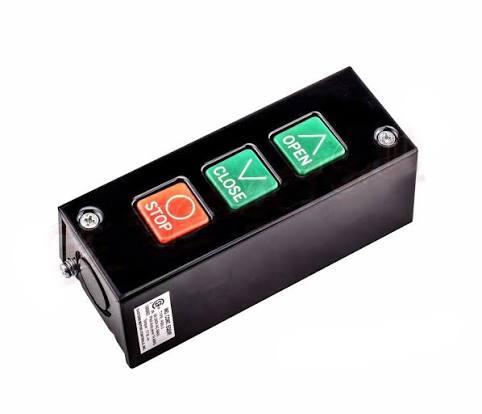
Before diving into the wiring process, it’s essential to understand what makes a 3-button garage door opener unique. Unlike single-button remotes that only open and close the door, a 3-button system typically controls:
- Main garage door (primary button)
- Secondary door or gate (second button)
- Light control or auxiliary function (third button)
This multi-functionality requires careful attention to wiring connections to ensure each button performs its designated task correctly.
Key Components You’ll Need
| Component | Purpose | Typical Specification |
|---|---|---|
| Control Board | Central processing unit | 12V DC power supply |
| Wall Console | Indoor control panel | 3-button configuration |
| Wiring Harness | Connection cables | 18-22 gauge stranded wire |
| Power Supply | Electrical source | 120V AC to 12V DC converter |
| Safety Sensors | Obstruction detection | Infrared beam sensors |
Safety First: Essential Precautions Before Wiring
Never attempt electrical work without proper safety measures. According to the U.S. Consumer Product Safety Commission, improper garage door installation contributes to thousands of injuries annually.
Critical Safety Steps:
- Disconnect power completely – Unplug the garage door opener from the electrical outlet
- Verify power is off – Use a voltage tester to confirm no electrical current
- Wear protective gear – Safety glasses and insulated gloves are mandatory
- Work in dry conditions – Moisture increases electrocution risk significantly
- Follow manufacturer specifications – Each brand has unique wiring requirements
Expert Tip: “Always treat garage door wiring as live until proven otherwise. Even disconnected units can retain residual charge in capacitors.” – National Association of Garage Door Professionals
Step-by-Step Guide: How to Wire a 3-Button Garage Door Opener
Step 1: Prepare Your Workspace
Gather all necessary tools before beginning:
- Phillips and flathead screwdrivers
- Wire strippers and cutters
- Electrical tape
- Voltage tester
- Ladder (if working with ceiling-mounted units)
- Manufacturer’s wiring diagram
Clear the area around your garage door opener motor unit. Ensure adequate lighting and ventilation.
Step 2: Identify Terminal Connections
Locate the terminal block on your garage door opener motor. Most 3-button systems feature these standard terminals:
- COM (Common) – Shared connection point
- NO (Normally Open) – Activates when button pressed
- NC (Normally Closed) – Deactivates when button pressed
- GND (Ground) – Safety grounding connection
- LIGHT – Controls garage lighting
- AUX – Auxiliary function for third button
Note: Terminal labels may vary by manufacturer. Always consult your specific model’s manual.
Step 3: Connect the Wall Console Wiring
The wall console is your primary indoor control station. Here’s how to wire it properly:
- Run the cable from the motor unit to your desired wall location
- Use 18-gauge stranded wire for distances up to 50 feet
- For longer runs, upgrade to 16-gauge wire to prevent voltage drop
- Strip wire ends approximately 1/2 inch using wire strippers
- Be careful not to nick the copper strands
- Twist exposed wires tightly to prevent fraying
- Connect to terminals following this pattern:
- Button 1 (Main Door): Connect to COM and NO terminals
- Button 2 (Secondary): Connect to COM and AUX terminals
- Button 3 (Light/Auxiliary): Connect to LIGHT and COM terminals
- Secure connections using terminal screws
- Tighten firmly but don’t overtighten
- Ensure no loose strands extend beyond terminals
Step 4: Wire the Remote Control Receiver
Modern 3-button garage door openers use radio frequency (RF) technology. The receiver board must be properly connected:
- Locate the receiver module (usually near the motor unit)
- Connect the antenna wire securely
- Verify the dip switches match between remote and receiver
- Test signal strength before finalizing installation
For detailed information about RF technology in garage door systems, visit Wikipedia’s article on Radio-frequency identification.
Step 5: Install Safety Sensors
Safety sensors are non-negotiable for modern garage door systems:
- Mount sensors 6 inches above floor level on both sides
- Align infrared beams precisely – indicator lights should be solid
- Wire sensors to designated SENSOR terminals on motor unit
- Test reversal function – door should reverse when beam is interrupted
Step 6: Connect Power and Test
Once all wiring is complete:
- Double-check all connections against your wiring diagram
- Restore power to the garage door opener
- Program your 3-button remote controls
- Test each button individually:
- Button 1: Opens/closes main door
- Button 2: Operates secondary door/gate
- Button 3: Controls lights or auxiliary function
- Verify safety features work correctly
- Adjust travel limits if necessary
Common Wiring Mistakes to Avoid
Even experienced DIYers make these critical errors:
| Mistake | Consequence | Solution |
|---|---|---|
| Reversed polarity | System malfunction | Verify + and – connections |
| Loose wire connections | Intermittent operation | Tighten all terminal screws |
| Wrong gauge wire | Voltage drop, poor performance | Use recommended wire gauge |
| Skipping ground wire | Safety hazard | Always connect GND terminal |
| Misaligned sensors | Door won’t close | Realign until LED indicators are solid |
Troubleshooting Your 3-Button Garage Door Opener
Problem: One Button Doesn’t Work
Possible Causes:
- Loose wiring connection
- Incorrect terminal assignment
- Dead battery in remote
Solution: Check wiring continuity with multimeter. Replace remote batteries. Reprogram if necessary.
Problem: All Buttons Malfunction
Possible Causes:
- Power supply issue
- Control board failure
- Main fuse blown
Solution: Verify 12V DC output at control board. Check circuit breaker. Inspect fuse rating.
Problem: Door Reverses Unexpectedly
Possible Causes:
- Misaligned safety sensors
- Excessive force setting
- Obstructed door track
Solution: Clean and realign sensors. Adjust force settings per manufacturer specifications. Clear track obstructions.
When to Call a Professional
While many homeowners successfully complete DIY installations, certain situations require professional assistance:
- Complex multi-door systems with integrated smart home features
- Electrical code compliance concerns in your jurisdiction
- Persistent malfunction after following troubleshooting steps
- Older homes with outdated electrical systems
- Warranty preservation – some manufacturers void warranties for DIY installations
According to industry statistics, approximately 30% of DIY garage door installations require professional correction within the first year. Investing in professional installation initially may save money long-term.
FAQ Section
Q1: Can I wire a 3-button garage door opener myself without experience?
A: Yes, if you follow instructions carefully and take proper safety precautions. However, basic electrical knowledge is recommended. If you’re uncomfortable working with electrical components, hire a licensed technician. Always disconnect power before starting any wiring work.
Q2: What wire gauge should I use for my 3-button garage door opener?
A: Use 18-gauge stranded wire for runs up to 50 feet. For distances between 50-100 feet, upgrade to 16-gauge wire. Never use solid-core wire as it breaks easily with vibration. Stranded wire provides better flexibility and durability for garage door applications.
Q3: Why won’t my third button work after wiring?
A: The third button typically controls auxiliary functions like lights or a second door. Check that you’ve connected it to the correct terminals (usually LIGHT or AUX). Verify the feature is enabled in your opener’s programming menu. Some models require specific programming sequences to activate all three buttons.
Q4: How do I program multiple 3-button remotes to one opener?
A: Most modern openers support 10-20 remotes. Press the “Learn” button on your motor unit until the LED blinks. Within 30 seconds, press and hold the desired button on your remote until the opener’s lights flash. Repeat for additional remotes. Consult your manual for model-specific instructions.
Q5: Is it safe to bypass safety sensors during wiring?
A: Absolutely not. Safety sensors are legally required in the United States since 1993. Bypassing them creates serious injury risks and violates federal law. Always install and properly align safety sensors. If sensors malfunction, repair or replace them rather than bypassing.
Q6: How often should I check my garage door opener wiring?
A: Inspect wiring connections annually for signs of corrosion, looseness, or damage. Check after severe weather events. Look for frayed wires, burnt smells, or unusual noises. Regular maintenance prevents 80% of common garage door problems. Consider professional inspection every 2-3 years.
Conclusion
Learning how to wire a 3-button garage door opener doesn’t have to be intimidating. By following this step-by-step guide, prioritizing safety, and taking your time with each connection, you can successfully install or replace your garage door system. Remember to test thoroughly, maintain regularly, and never compromise on safety features.
Did you find this guide helpful? Share it with friends and family who might be tackling their own garage door projects! Follow us on social media for more DIY home improvement tips and tutorials.
Stay safe, work smart, and enjoy the convenience of your properly wired 3-button garage door opener!



Leave a Reply