Garage door openers are designed with safety as a top priority. One of the most important safety features is the safety sensor system, which prevents the door from closing if something obstructs its path. If your Chamberlain garage door opener stops functioning correctly or the door refuses to close, the issue often lies with the sensors. That’s where the Chamberlain Garage Door Opener Replacement Safety Sensors 2 Pack comes in.
This comprehensive guide will explain what these sensors do, why they’re essential, and how to replace them properly. By the end, you’ll have a clear understanding of how the Chamberlain Garage Door Opener Replacement Safety Sensors 2 Pack can restore safety and functionality to your garage system.
Read too: Door and Garage Door Companies: Choosing the Right Partner for Your Needs
What Are Safety Sensors and Why Do They Matter?
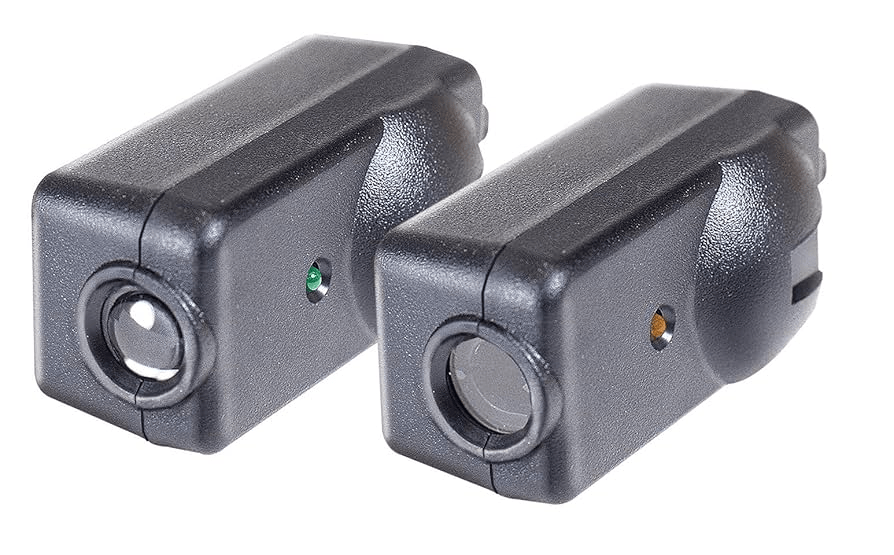
Safety sensors, sometimes called photo-eye sensors, are small devices installed on both sides of the garage door near the floor. They project an invisible infrared beam across the door’s opening.
If something interrupts that beam—like a pet, child, or object—the garage door will stop closing and automatically reverse. This system prevents serious accidents, injuries, and property damage.
Chamberlain safety sensors are:
- Required by law – Since 1993, all garage door openers in the U.S. must include safety sensors.
- Child- and pet-safe – Protect loved ones from accidents.
- Reliable – Keep your garage door functioning as intended.
Signs You Need Chamberlain Garage Door Opener Replacement Safety Sensors 2 Pack
Over time, safety sensors may become misaligned, dirty, or damaged. Common signs that you may need replacements include:
- Flashing lights on the garage door opener indicating sensor issues.
- Garage door won’t close unless you press and hold the wall control button.
- Visible damage such as cracked housings or frayed wires.
- Frequent false triggers even when the doorway is clear.
If cleaning and realigning the sensors doesn’t fix the issue, it’s time to consider the Chamberlain Garage Door Opener Replacement Safety Sensors 2 Pack.
Features of Chamberlain Garage Door Opener Replacement Safety Sensors 2 Pack
These replacement sensors are designed specifically for Chamberlain openers and compatible brands like LiftMaster and Craftsman (depending on the model).
Key features include:
- Genuine OEM parts – Built for reliability and compatibility.
- Infrared beam system – Detects obstacles instantly.
- Easy wiring – Color-coded wires simplify installation.
- Universal fit – Works with many Chamberlain openers made after 1997.
- 2-pack convenience – Includes both sending and receiving sensors for a complete replacement.
Chamberlain Garage Door Opener Replacement Safety Sensors 2 Pack: Installation Guide
Replacing safety sensors is a straightforward process, even for DIY beginners. Follow these steps:
Step 1: Gather Tools and Materials
You’ll need:
- Chamberlain Garage Door Opener Replacement Safety Sensors 2 Pack
- Screwdriver
- Adjustable wrench
- Ladder (if needed)
- Electrical tape or wire connectors
Step 2: Disconnect Power
Always unplug your garage door opener before working on electrical components. This ensures your safety.
Step 3: Remove Old Sensors
- Locate the sensors near the bottom of each garage door track.
- Unscrew the brackets and carefully detach the old sensors.
- Disconnect the wiring.
Step 4: Install New Sensors
- Mount the new sensors from your 2 pack onto the existing brackets or the ones provided.
- Ensure both sensors face each other directly across the doorway.
- Connect the wires: typically white to white, and white/black striped to black.
Step 5: Align the Sensors
- Use the indicator lights on the sensors. A steady green light usually indicates proper alignment.
- Adjust the angle until both sensors show solid lights.
Step 6: Restore Power and Test
- Plug the opener back in.
- Test by closing the garage door.
- Wave an object across the sensors—the door should stop and reverse.
Troubleshooting After Installation
Even with new sensors, issues may still occur. Common troubleshooting tips:
- No light on one sensor: Check wiring connections and power.
- Blinking light: Sensors may be misaligned—adjust until the light is steady.
- Door still won’t close: Ensure nothing is blocking the beam and wires aren’t damaged.
If problems persist, consult the Chamberlain manual or contact support.
Benefits of Choosing the Chamberlain Garage Door Opener Replacement Safety Sensors 2 Pack
- Peace of mind: Restores critical safety features to your garage door system.
- Cost-effective: A small investment compared to potential accidents or damage.
- Long-term durability: Designed to last for years under normal conditions.
- DIY-friendly: Simple installation without needing professional help in most cases.
Tips for Maintaining Safety Sensors
To extend the life of your replacement sensors:
- Keep lenses clean – Wipe with a soft cloth regularly.
- Avoid impact damage – Don’t place items near the base of garage tracks.
- Check alignment periodically – Especially after moving large items in the garage.
- Inspect wiring annually – Replace frayed or worn wires promptly.
Frequently Asked Questions
1. Are all Chamberlain safety sensors the same?
No, but the Chamberlain Garage Door Opener Replacement Safety Sensors 2 Pack is compatible with most Chamberlain openers made after 1997.
2. Can I replace only one sensor?
It’s best to replace both since they work as a pair. That’s why the 2 pack is recommended.
3. How high should sensors be mounted?
Typically 4–6 inches from the floor for effective detection.
4. What if my opener is very old?
Older models may require different sensors. Always check compatibility before purchasing.
Final Thoughts
The Chamberlain Garage Door Opener Replacement Safety Sensors 2 Pack is a must-have solution when your existing sensors stop working properly. These devices protect your family, pets, and property by ensuring the garage door doesn’t close on obstructions. With simple installation, affordable pricing, and reliable performance, replacing your sensors is one of the smartest maintenance steps you can take for your garage door system.
By keeping your safety sensors in good working order, you maintain both security and peace of mind every time you use your garage.


Leave a Reply