Garage door openers provide convenience and added security to homeowners. However, many people don’t realize that one crucial element to maintaining that security is periodically updating the remote’s access code. If you’ve moved into a new home, given out access to service providers, or suspect someone else might have your garage code, it’s time to take action.
Changing the code on a Clicker garage door opener is a smart, simple step to secure your home. This guide will walk you through everything you need to know about resetting your Clicker remote or keypad system—whether it’s a universal remote or a model-specific device. We’ll provide clear instructions, troubleshooting tips, and security best practices to keep your garage access under control.
Read too: Why Your Liftmaster Garage Door Won’t Stay Closed and How to Fix It? Troubleshooting Tips
Why You Should Consider Changing The Code On A Clicker Garage Door Opener
Most homeowners rarely think about their garage door opener’s security after the initial installation. But situations change:
- You give temporary access to a neighbor or contractor.
- You move into a house and don’t know who else had the code.
- The Clicker remote has been lost or stolen.
- You experience strange behavior like the door opening unexpectedly.
For any of these scenarios, changing the code on a Clicker garage door opener helps prevent unauthorized access and gives you peace of mind.
Understanding How a Clicker Garage Door Opener Works
Before we get into the step-by-step process, it’s helpful to understand how your Clicker system operates.
Clicker is a universal garage door remote made by Chamberlain Group. It’s designed to work with a wide range of garage door openers including brands like LiftMaster, Genie, Chamberlain, Craftsman, and others.
The remote stores your garage opener’s access code and transmits it wirelessly. Many modern systems use rolling code technology, which means the access code changes with every use, making them more secure.
Changing the code on your Clicker remote or keypad typically involves reprogramming the device to sync with your opener using the “learn” button.
Step-by-Step Guide to Changing The Code On A Clicker Garage Door Opener
Let’s walk through the process for reprogramming a Clicker remote or keypad. The steps can vary slightly depending on the model of your garage door opener and the Clicker device you are using.
What You’ll Need:
- Your Clicker remote or keypad
- A ladder (if your garage door opener’s learn button is mounted high)
- Access to your garage door opener motor unit
Step 1: Locate the Learn Button on the Opener
Most garage door openers have a “Learn” or “Program” button located near the antenna wire. It might be behind a light cover.
- Common button colors:
- Yellow
- Purple
- Red/orange
- Green
Each color may represent a different programming method or code frequency, so check your manual or the manufacturer’s site for model-specific info.
Step 2: Clear Old Codes (Optional but Recommended)
If you’re concerned someone else might have access:
- Press and hold the “Learn” button on the opener motor until the indicator light turns off (usually takes 6–10 seconds).
- This will erase all previously programmed remotes and keypads.
Note: This step ensures only remotes you reprogram afterward will work with your opener.
Step 3: Program the Clicker Remote
Follow these steps to reprogram the remote:
- Press and release the “Learn” button on your garage door opener motor.
- You’ll have 30 seconds to complete the next step.
- On your Clicker remote, press and hold the button you want to use.
- Hold until the garage door opener lights flash or you hear a click.
- Release the button.
Test the remote by pressing the button again to ensure the door opens or closes.
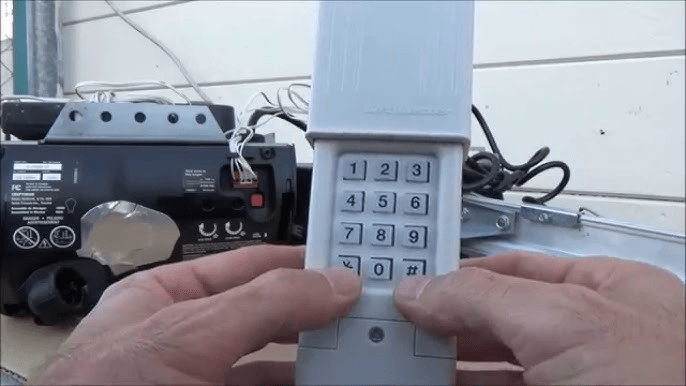
Step 4: Program the Clicker Keypad (If Applicable)
For Clicker keypads, changing the code means assigning a new 4-digit PIN.
- Press the “Learn” button on your opener.
- Within 30 seconds, enter your chosen 4-digit PIN on the keypad.
- Press and hold the “Enter” button until the opener’s lights flash or you hear a click.
Try your new code. If the door opens or closes successfully, programming is complete.
Tips to Keep in Mind When Changing The Code On A Clicker Garage Door Opener
- Use unique codes: Don’t reuse old PINs or sequences like 1234 or 0000.
- Write down your new code: Keep it somewhere safe (but not on the garage wall).
- Limit who knows the code: Avoid sharing it unless necessary.
- Change it periodically: Especially if you’ve given temporary access.
- Battery check: Weak remote batteries can cause programming to fail.
Troubleshooting Common Issues When Changing The Code On A Clicker Garage Door Opener
| Issue | Possible Cause | Solution |
|---|---|---|
| Door won’t respond | Wrong button or PIN entered | Retry steps carefully |
| Remote not syncing | Weak battery | Replace with fresh batteries |
| Keypad not lighting up | Dead battery or loose wire | Replace battery or inspect wiring |
| Flashing light but no movement | Obstruction sensor triggered | Clear path and try again |
| Code accepted but random opening | Rolling code confusion | Reset all remotes and reprogram |
Understanding Rolling Code Security
Clicker remotes are compatible with Security+ and rolling code systems, which enhance garage security by changing the code with every use. This prevents “code grabbers” from intercepting your signal.
When you reprogram the code, you’re essentially resyncing the remote with a fresh rolling code seed, ensuring past stolen signals are no longer valid.
When to Contact a Professional
While changing the code on a Clicker garage door opener is typically a DIY task, there are cases when professional help is beneficial:
- You have an older unit without a “learn” button
- Multiple remotes or keypads are out of sync
- You’re installing a new remote for a commercial or multi-door setup
- You suspect tampering or mechanical issues
Garage door specialists can quickly diagnose and fix connectivity or programming issues, and ensure the system remains safe and secure.
Preventing Unauthorized Access After Code Change
- Remove old remotes: If someone loses a Clicker remote, erase all and reprogram.
- Use a secure keypad location: Avoid placing it where it’s visible from the street.
- Disable remote access if traveling: Some systems let you shut off remote access for vacations.
- Enable lockout mode: Many openers have a “vacation lock” button that disables remotes.
Maintenance Tips for Clicker Garage Door Openers
- Replace batteries in remotes and keypads yearly
- Check for firmware updates if using a smart garage controller
- Test the door safety reverse function monthly
- Clean keypads to ensure button responsiveness
- Secure loose mounting or exposed wires
Conclusion
Changing the code on a Clicker garage door opener is a simple yet powerful way to protect your home and control who has access to your garage. Whether you’re responding to a lost remote, moving into a new house, or just being proactive about home security, reprogramming your Clicker device is a must.
By following the step-by-step instructions outlined above, you can ensure your garage is secure and only accessible to those you trust. Don’t wait until a breach happens—update your code regularly and test your system for optimal peace of mind.


Leave a Reply