A malfunctioning garage door opener can be frustrating, especially if it’s due to a worn-out drive gear. The Craftsman 1/2 HP garage door opener drive gear replacement is a common repair that homeowners can do themselves with the right tools and guidance. This article will walk you through the process, helping you save money on professional repair services.
Why You Need a Craftsman 1/2 HP Garage Door Opener Drive Gear Replacement
If your Craftsman 1/2 HP garage door opener is making a grinding noise but the door isn’t moving, the drive gear is likely worn out. This plastic gear inside the motor unit deteriorates over time due to friction and stress. Replacing the drive gear is necessary to restore your garage door opener’s functionality.
Read too: Door and Garage Door Companies: Choosing the Right Partner for Your Needs
Common Symptoms of a Worn-Out Drive Gear
Before jumping into the replacement process, confirm that the drive gear is the issue. Here are some telltale signs:
- The garage door opener motor runs, but the door doesn’t move.
- A grinding or clicking noise comes from the motor unit.
- You notice white plastic shavings inside the garage door opener.
- The chain or belt moves, but the door doesn’t open.
If you experience any of these problems, it’s time to replace the drive gear.
Tools and Materials Needed
Before starting, gather the following tools and replacement parts:
Required Tools
- Flathead screwdriver
- Phillips screwdriver
- 1/4-inch nut driver or socket wrench
- Needle-nose pliers
- Hammer (optional)
- Step ladder
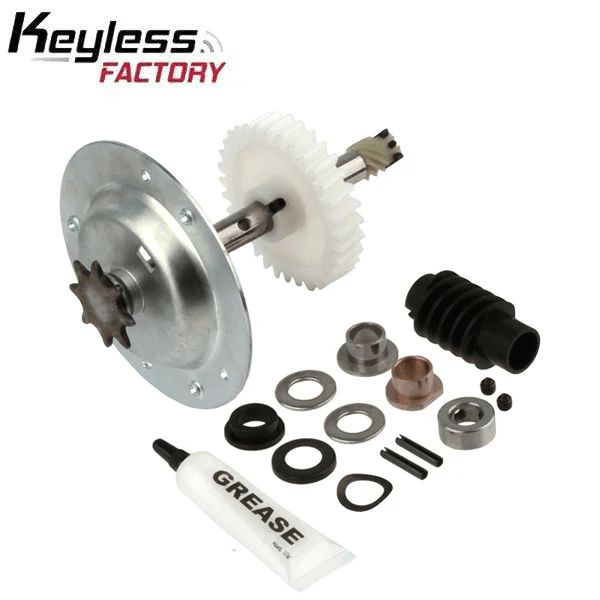
Replacement Parts
- Craftsman 1/2 HP garage door opener drive gear kit (includes the gear and washers)
- Grease for lubrication
- Cleaning cloth
You can find these parts at hardware stores or online retailers. Ensure the replacement gear is compatible with your specific Craftsman 1/2 HP garage door opener model before purchasing.
How to Replace the Craftsman 1/2 HP Garage Door Opener Drive Gear
Now that you’ve identified the problem and gathered the necessary tools, follow these step-by-step instructions:
1: Disconnect Power to the Opener
Safety comes first. Unplug the garage door opener from the power outlet. If your unit is hardwired, turn off the breaker supplying power to the opener.
2: Remove the Garage Door Opener Cover
- Use a Phillips screwdriver to remove the screws securing the motor housing cover.
- Carefully lift the cover and set it aside.
3: Locate the Drive Gear
Inside the motor unit, you’ll see the white plastic drive gear attached to the motor shaft. This is the part that needs to be replaced.
4: Remove the Chain or Belt
- If your opener uses a chain, loosen the tension by adjusting the chain tension nut.
- Remove the chain or belt from the sprocket to access the drive gear.
5: Detach the Drive Gear
- Use a flathead screwdriver to remove the retaining clip and washers securing the drive gear.
- Carefully slide the worn-out gear off the shaft.
- Clean any debris or plastic shavings from the area.
6: Install the New Drive Gear
- Slide the replacement drive gear onto the motor shaft.
- Secure it with the washers and retaining clip.
- Apply grease to the new gear for smooth operation.
7: Reassemble the Opener
- Reattach the chain or belt to the sprocket and adjust the tension.
- Reinstall the motor housing cover and secure it with screws.
8: Restore Power and Test the Opener
- Plug the opener back in or turn the breaker on.
- Operate the garage door opener to ensure smooth movement.
If the door moves without grinding noises, the repair is successful!
Tips for Extending the Life of Your Drive Gear
To prevent frequent replacements, follow these maintenance tips:
- Lubricate Moving Parts Regularly
- Apply grease to the drive gear, chain, and other moving components every six months.
- Inspect for Wear and Tear
- Check for signs of wear on the drive gear and sprocket annually.
- Adjust the Chain or Belt Tension
- Overly tight chains or belts put extra stress on the drive gear, causing premature wear.
- Keep the Opener Clean
- Remove dust and debris from the motor housing to prevent buildup.
By maintaining your Craftsman 1/2 HP garage door opener, you can extend the lifespan of its components and avoid frequent repairs.
Frequently Asked Questions (FAQs)
1. How long does a Craftsman 1/2 HP garage door opener drive gear last?
On average, the drive gear lasts 8-12 years, depending on usage and maintenance. Regular lubrication can help extend its lifespan.
2. Can I replace the drive gear without professional help?
Yes! With basic tools and following the steps outlined above, most homeowners can replace the drive gear themselves.
3. How much does it cost to replace the drive gear?
A replacement drive gear kit typically costs between $15 and $30. If you hire a professional, expect to pay $100-$150 for parts and labor.
4. What if my opener still doesn’t work after replacing the drive gear?
If the problem persists, check other components like the motor, limit switch, or circuit board for faults.
5. Where can I buy a replacement drive gear for my Craftsman 1/2 HP garage door opener?
You can find replacement gears online (Amazon, eBay, or hardware store websites) or at local home improvement stores.
Conclusion
Replacing the Craftsman 1/2 HP garage door opener drive gear is a cost-effective way to restore your garage door opener’s functionality. By following this step-by-step guide, you can complete the repair yourself and extend the life of your garage door opener. Regular maintenance, including lubrication and chain tension adjustments, will help prevent future issues.
If you’ve successfully replaced your drive gear, share your experience in the comments!
Leave a Reply