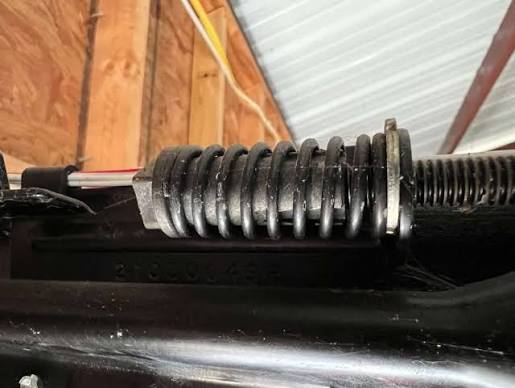
Is your Chamberlain garage door opener making unusual noises or struggling to open smoothly? A loose drive belt is often the culprit behind these frustrating issues. Learning how to tighten belt on Chamberlain garage door opener can save you hundreds of dollars in repair costs and restore quiet, reliable operation to your garage door system.
Garage door openers are essential components of modern homes, providing convenience and security. However, like any mechanical system, they require periodic maintenance to function optimally. The belt-driven models from Chamberlain, one of America’s leading garage door opener manufacturers, are particularly known for their quiet operation—but only when properly maintained. According to the International Door Association, approximately 30% of garage door service calls relate to drive mechanism issues, with belt tension being a common factor.
Why Does Your Chamberlain Belt Become Loose?
Before diving into the tightening process, understanding why belts loosen helps prevent future problems. Several factors contribute to belt slack over time:
- Normal wear and tear: Rubber and reinforced belts naturally stretch with repeated use
- Temperature fluctuations: Extreme heat or cold affects belt material elasticity
- Improper initial installation: Incorrect tension during setup accelerates loosening
- Heavy usage: Frequent daily operations increase stress on the belt system
Chamberlain belt-drive openers typically last 7-10 years with proper maintenance. The belt itself should be inspected every six months and adjusted as needed. Regular attention prevents premature wear on other components like the motor and trolley assembly.
Tools You’ll Need for Belt Adjustment
Gathering the right tools before starting ensures a smooth, safe repair process:
- Adjustable wrench or socket set (typically 7/16″ or 1/2″)
- Screwdriver (Phillips and flathead)
- Ladder (stable, appropriate height for your opener)
- Flashlight (for better visibility)
- Work gloves (to protect hands)
- Measuring tape (optional, for precise measurements)
Having these tools ready eliminates unnecessary interruptions and reduces the risk of accidents during the adjustment process.
Step-by-Step Guide: How to Tighten Belt on Chamberlain Garage Door Opener
Step 1: Safety First—Disconnect Power
Never work on a garage door opener while it’s connected to power. Locate the power cord and unplug it from the outlet, or switch off the circuit breaker controlling the opener. This critical safety step prevents accidental activation that could cause serious injury.
Verify the opener is completely powered down by attempting to operate it using the wall button or remote control. The unit should not respond.
Step 2: Access the Belt Mechanism
Most Chamberlain belt-drive openers feature a protective cover over the rail and belt assembly. Remove this cover by:
- Locating the screws or clips securing the cover
- Using your screwdriver to remove fasteners
- Carefully lifting the cover away from the rail
Set aside the cover and screws in a safe location. Take note of how the cover attaches for easier reassembly later.
Step 3: Inspect the Belt Condition
Before adjusting tension, examine the belt thoroughly:
- Look for cracks, fraying, or visible damage
- Check for glazing (shiny, hardened surfaces indicating excessive wear)
- Verify the belt sits properly in the pulley grooves
- Ensure no debris obstructs the belt path
If the belt shows significant wear or damage, replacement is safer than adjustment. A compromised belt can snap unexpectedly, potentially damaging other components or creating safety hazards.
Step 4: Locate the Tension Adjustment Mechanism
Chamberlain openers use different tensioning systems depending on the model:
Motor-end tensioning: Found on most residential models, this system adjusts tension at the motor unit end of the rail.
Trolley-end tensioning: Some commercial-grade models adjust tension near the trolley assembly.
Consult your owner’s manual to identify your specific model’s adjustment point. If unavailable, Chamberlain provides comprehensive manuals online for most models.
Step 5: Adjust the Belt Tension
For motor-end tensioning systems:
- Locate the adjustment bolt(s) on the motor mounting bracket
- Loosen the locking nuts slightly (do not remove completely)
- Turn the adjustment bolt clockwise to increase tension
- Make small adjustments—approximately quarter-turn increments
- Check tension after each adjustment
For trolley-end tensioning systems:
- Find the tension adjustment mechanism near the trolley
- Follow similar incremental adjustment procedures
- Ensure the trolley remains aligned with the rail
Step 6: Test Proper Belt Tension
Correct belt tension is crucial—too loose causes slipping and noise; too tight strains the motor and bearings. Use these methods to verify proper tension:
The Deflection Test: Press firmly on the belt midpoint between pulleys. Proper tension allows approximately 1/2 inch to 3/4 inch of deflection. More than 1 inch indicates insufficient tension; less than 1/4 inch suggests overtightening.
The Sound Test: Reconnect power temporarily and operate the door. Listen for:
- Smooth, quiet operation (correct tension)
- Squealing or slipping sounds (too loose)
- Strained motor noise or vibration (too tight)
The Visual Test: Observe the belt during operation. It should run smoothly without jumping teeth or excessive vibration.
Step 7: Secure and Reassemble
Once optimal tension is achieved:
- Tighten all locking nuts securely
- Double-check that adjustment bolts haven’t shifted
- Replace the protective cover
- Secure all screws and clips
- Clean up tools and workspace
Step 8: Final Testing
Reconnect power and perform comprehensive testing:
- Operate the door through 3-5 complete cycles
- Listen for unusual noises
- Observe smooth opening and closing
- Test safety reversal features
- Verify remote control functionality
If problems persist, reconsider belt condition or consult a professional technician.
Common Mistakes to Avoid
| Mistake | Consequence | Prevention |
|---|---|---|
| Overtightening the belt | Motor strain, bearing failure, premature wear | Use deflection test; make small adjustments |
| Ignoring belt damage | Sudden belt failure, potential injury | Inspect thoroughly before adjusting |
| Working with power connected | Serious injury risk | Always disconnect power first |
| Skipping safety tests | Undetected problems, unsafe operation | Complete full testing protocol |
| Using incorrect tools | Damaged components, stripped bolts | Use properly sized wrenches and sockets |
When to Call a Professional
While belt adjustment is a manageable DIY task, certain situations warrant professional assistance:
- Persistent problems after proper adjustment
- Unusual noises from motor or gear assembly
- Visible damage to rails, trolley, or mounting hardware
- Electrical issues or intermittent operation
- Safety sensor malfunctions
Professional garage door technicians possess specialized tools and expertise for complex repairs. The average service call costs $150-$300, but prevents costly mistakes from improper DIY repairs.
Frequently Asked Questions
How often should I tighten my Chamberlain garage door belt?
Inspect belt tension every six months and adjust as needed. Most belts require adjustment once or twice yearly under normal usage conditions. Heavy-use scenarios may require more frequent attention.
Can I tighten the belt myself, or do I need a professional?
Belt tension adjustment is a straightforward DIY task for most homeowners with basic mechanical skills. However, if you’re uncomfortable working with mechanical systems or encounter complications, hiring a professional ensures safe, correct adjustment.
What happens if the belt is too tight?
Excessive tension creates multiple problems: increased motor strain, accelerated bearing wear, higher energy consumption, and potential belt breakage. Overtightened belts also generate more noise—the opposite of the quiet operation belt-drive systems promise.
How long does a Chamberlain garage door belt last?
With proper maintenance, Chamberlain belts typically last 7-10 years. Regular inspection, appropriate tension, and clean operating conditions maximize belt lifespan. Environmental factors like extreme temperatures or humidity may reduce longevity.
Why is my garage door opener belt squeaking?
Squeaking usually indicates either insufficient tension causing belt slip or worn belt surfaces. First check and adjust tension. If squeaking persists after proper tensioning, the belt likely needs replacement. Lubrication isn’t recommended for belt-drive systems as it attracts debris.
Is it better to replace or tighten an old belt?
If the belt shows visible wear, cracking, or glazing, replacement is safer and more cost-effective than repeated adjustments. New belts cost $20-$50 and provide reliable performance for years. Tightening severely worn belts risks sudden failure.
Conclusion
Learning how to tighten belt on Chamberlain garage door opener empowers you to maintain quiet, efficient garage door operation while avoiding expensive service calls. Regular maintenance—checking tension every six months, inspecting for wear, and making careful adjustments—extends your opener’s lifespan and ensures reliable performance.
Remember the key principles: always disconnect power first, make small incremental adjustments, test thoroughly, and prioritize safety above all else. With proper care, your Chamberlain belt-drive opener will provide years of dependable, whisper-quiet service.
Found this guide helpful? Share it with friends and family who own Chamberlain garage door openers. Your share might save someone from an inconvenient breakdown or costly repair bill. Bookmark this page for future reference, and don’t hesitate to return whenever maintenance questions arise.



Leave a Reply