Is your Chamberlain garage door opener making unusual noises or struggling to lift your door? A loose chain is one of the most common issues homeowners face, but learning how to tighten chain on Chamberlain garage door opener can save you hundreds in repair costs. This comprehensive guide will walk you through the entire process safely and effectively.
Garage door openers are essential components of modern homes, providing convenience and security. However, like any mechanical system, they require regular maintenance to function optimally. According to the International Association of Certified Home Inspectors, approximately 70% of garage door problems stem from improper maintenance, with chain tension being a leading culprit.
Why Does Your Chamberlain Chain Become Loose?
Before diving into the solution, understanding why chains loosen helps prevent future issues. Chamberlain garage door openers use a chain-drive mechanism that naturally stretches over time due to constant tension and movement.
Several factors contribute to chain loosening:
- Normal wear and tear: Metal chains expand slightly with each operation cycle
- Temperature fluctuations: Heat causes metal expansion, while cold contracts it
- Improper initial installation: Chains installed too loosely from the start
- Heavy door weight: Oversized doors put additional strain on the chain
- Lack of lubrication: Dry chains experience more friction and wear faster
The typical Chamberlain chain should have about ¼ to ½ inch of slack when properly tensioned. Anything beyond this indicates your chain needs adjustment.
Tools You’ll Need for Chain Adjustment
Gathering the right tools before starting ensures a smooth process. Here’s what you’ll need:
- Adjustable wrench (preferably 7/16-inch or 1/2-inch)
- Socket set with extension
- Step ladder (stable and rated for your weight)
- Safety glasses to protect your eyes
- Work gloves for better grip and protection
- Flashlight for better visibility
- Measuring tape to check proper slack
- Garage door lubricant (silicone-based recommended)
Having these tools ready prevents mid-project trips to the hardware store and keeps your workflow efficient.
Step-by-Step Guide: How to Tighten Chain on Chamberlain Garage Door Opener
Step 1: Safety First – Disconnect Power
Never attempt chain adjustments with the power connected. Locate your garage door opener’s power source and unplug it from the electrical outlet. If hardwired, turn off the circuit breaker controlling the garage.
This crucial step prevents accidental activation during adjustment, which could cause serious injury. The Consumer Product Safety Commission reports thousands of garage door-related injuries annually, many preventable with proper safety precautions.
Step 2: Identify the Tension Adjustment Mechanism
Chamberlain openers feature different tensioning systems depending on the model:
- Bolt-and-nut system: Common in older models
- Spring-loaded tensioner: Found in newer units
- Adjustable bracket: Mid-range models
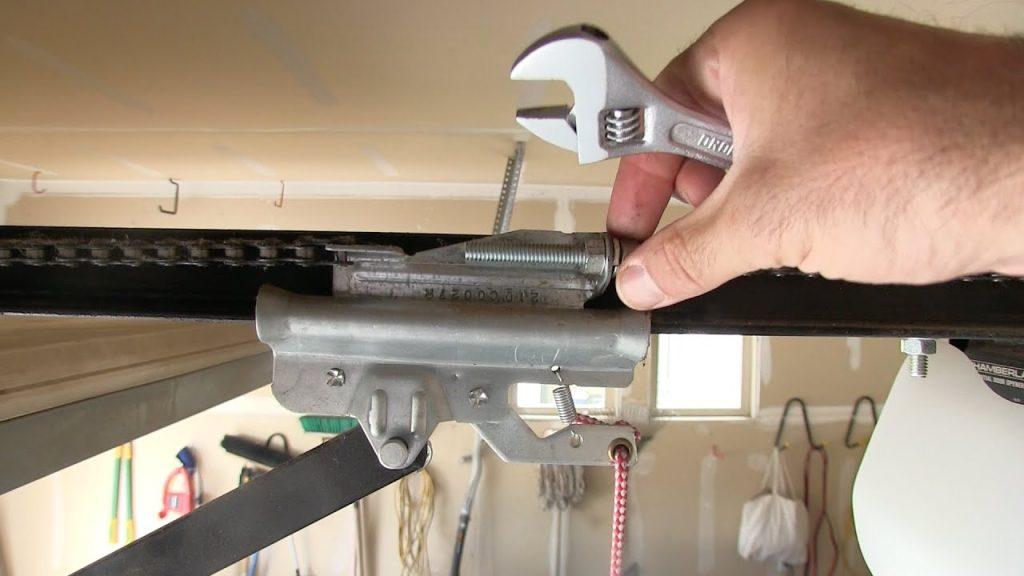
Locate the adjustment bolt near the motor unit where the chain connects. You’ll typically find two nuts – one locking nut and one adjustment nut.
Step 3: Loosen the Locking Nut
Using your adjustable wrench, carefully loosen the locking nut by turning it counterclockwise. Don’t remove it completely; just loosen it enough to allow the adjustment nut to move freely.
Pro tip: Apply penetrating oil if the nut appears rusted or stuck. Let it sit for 5-10 minutes before attempting to loosen.
Step 4: Adjust the Chain Tension
Turn the adjustment nut clockwise to tighten the chain. Make small adjustments – quarter turns work best. After each adjustment:
- Check the chain slack by pressing down gently at the midpoint
- Measure the deflection – aim for ¼ to ½ inch
- Ensure the chain runs smoothly without binding
Important: Avoid overtightening, which can damage the motor, sprocket, or chain itself. An overly tight chain creates excessive wear and may cause premature failure.
Step 5: Secure the Locking Nut
Once you’ve achieved proper tension, hold the adjustment nut in place while tightening the locking nut clockwise. This prevents the adjustment from slipping during operation.
Use moderate force – you want it secure but not stripped. If available, use a torque wrench set to 15-20 foot-pounds for consistent results.
Step 6: Test the System
Reconnect power and test your garage door opener:
- Operate the door through several complete cycles
- Listen for unusual noises
- Watch for smooth, consistent movement
- Check that the chain doesn’t skip or jump
If problems persist, recheck your tension measurement or consult a professional.
Common Mistakes to Avoid
Many DIY enthusiasts make these errors when adjusting garage door chains:
| Mistake | Consequence | Solution |
|---|---|---|
| Overtightening | Motor strain, premature wear | Use measuring tape for accuracy |
| Ignoring lubrication | Increased friction, noise | Apply silicone lubricant after adjustment |
| Skipping safety steps | Injury risk | Always disconnect power first |
| Adjusting while door moves | Dangerous situation | Wait for complete stop before adjusting |
| Using wrong tools | Stripped nuts, damaged components | Use properly sized wrenches |
When to Call a Professional
While chain adjustment is generally straightforward, certain situations require professional assistance:
- Chain replacement needed: If links appear stretched, worn, or damaged
- Motor issues: Unusual sounds suggesting internal problems
- Repeated loosening: Indicates underlying alignment or installation issues
- Older units: Models over 15 years may need comprehensive inspection
- Uncertainty: If you’re uncomfortable with any step
According to Wikipedia’s garage door opener article, modern openers include safety features that professionals can properly calibrate during maintenance visits.
Preventive Maintenance Tips
Extend your Chamberlain opener’s lifespan with these maintenance practices:
Monthly checks:
- Visual chain inspection for wear
- Lubrication application to chain and rollers
- Safety sensor alignment verification
Quarterly maintenance:
- Complete chain tension check
- Hardware tightening (bolts, brackets)
- Track cleaning and alignment
Annual service:
- Professional inspection recommended
- Spring tension evaluation
- Complete system lubrication
Regular maintenance reduces unexpected failures by up to 80%, according to industry studies.
FAQ Section
How often should I tighten my Chamberlain garage door chain?
Check chain tension every 3-6 months, or whenever you notice increased slack. Heavy usage or extreme temperatures may require more frequent adjustments. Most homeowners adjust their chains 1-2 times yearly.
What happens if my garage door chain is too loose?
A loose chain can slip off the sprocket, causing the door to stop working entirely. It also creates excessive noise, reduces efficiency, and may damage other components. In severe cases, the door could fall unexpectedly, creating safety hazards.
Can I use WD-40 to lubricate my garage door chain?
No, avoid using WD-40 as it attracts dust and debris, creating more problems. Instead, use silicone-based or lithium grease specifically designed for garage doors. These lubricants provide long-lasting protection without attracting contaminants.
How do I know if my chain needs replacement instead of adjustment?
Replace your chain if you notice: visible stretching beyond adjustment range, rusted or damaged links, frequent loosening despite proper adjustment, or unusual wear patterns. Chains typically last 10-15 years with proper maintenance.
Is it normal for my garage door chain to make noise?
Some noise is normal, especially in chain-drive models. However, excessive grinding, squeaking, or rattling indicates problems. Proper lubrication usually resolves minor noise issues. Persistent loud noises suggest worn components needing replacement.
What’s the difference between chain-drive and belt-drive openers?
Chain-drive openers use metal chains and are more durable but noisier. Belt-drive models use rubber belts, offering quieter operation but potentially shorter lifespans. Chamberlain offers both types, with chain-drives being more common in residential applications due to their reliability and cost-effectiveness.
Conclusion
Learning how to tighten chain on Chamberlain garage door opener empowers you to maintain your home’s convenience and security while saving money on professional repairs. With proper tools, safety precautions, and this step-by-step guide, you can confidently address chain tension issues in under 30 minutes.
Remember, regular maintenance prevents most garage door problems. By following the preventive tips outlined above and addressing issues promptly, your Chamberlain opener will serve you reliably for years to come.
Found this guide helpful? Share it with friends and family who might benefit from learning proper garage door maintenance. Bookmark this page for future reference, and don’t hesitate to reach out with questions in the comments below. Your garage door—and your wallet—will thank you!
Stay safe, stay informed, and keep your garage door running smoothly!



Leave a Reply