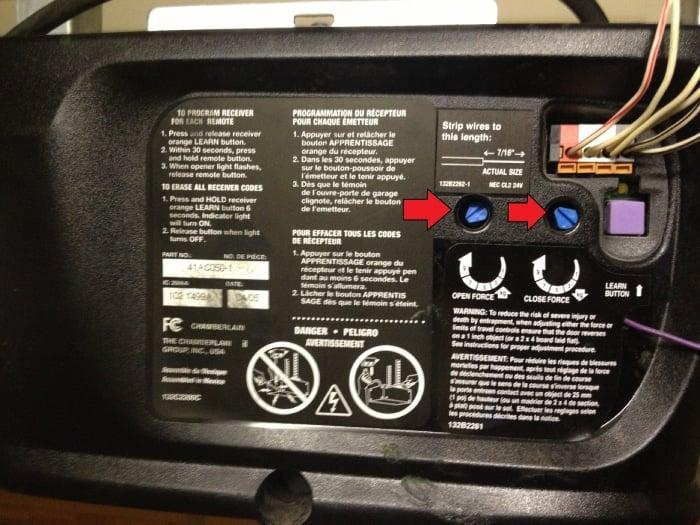
Your garage door opener is a convenient device that makes daily life easier. However, if it’s not operating with the right level of sensitivity, it can lead to issues such as the door not closing properly or reversing unexpectedly. In this article, we will explore the importance of garage door opener sensitivity adjustment, common problems it can solve, and how to adjust it correctly.

Understanding Garage Door Opener Sensitivity
The sensitivity setting on your garage door opener controls how much force the opener uses to close the door. It’s a crucial safety feature designed to prevent the door from closing on objects or people in its path. If the sensitivity is too high, the door may not reverse when it encounters an obstruction, potentially causing damage or injury. If it’s too low, the door may reverse unnecessarily, leaving your garage vulnerable to security risks.
Common Problems and Symptoms
Before we delve into how to adjust the sensitivity of your garage door opener, let’s look at some common problems and symptoms that may indicate an issue with sensitivity:
- Door Reverses When Closing: If your garage door starts to close but then immediately reverses, it may be due to excessive sensitivity.
- Door Doesn’t Close Completely: Conversely, if the door doesn’t close all the way and leaves a small gap, sensitivity may be set too low.
- Jerky or Uneven Movement: If the door exhibits jerky or uneven movement during operation, it can also be related to sensitivity.
Adjusting Garage Door Opener Sensitivity
Here are step-by-step instructions on how to adjust the sensitivity of your garage door opener:
1. Locate the Adjustment Controls
Typically, the adjustment controls for your garage door opener are located on the opener unit itself. Consult your opener’s manual if you’re unsure where to find them.
2. Test the Current Sensitivity
Before making any adjustments, it’s essential to test the current sensitivity setting. Place a piece of wood or a similar object in the door’s path and attempt to close it using the opener. If the door doesn’t reverse upon contact with the object or requires excessive force to reverse, you’ll need to adjust the sensitivity.
3. Adjust the Sensitivity Settings
Most garage door openers have two adjustment screws: one for closing force and one for opening force. To increase sensitivity (make it easier for the door to reverse), turn the adjustment screw counterclockwise. To decrease sensitivity (make it harder for the door to reverse), turn the screw clockwise.
4. Test Again
After making adjustments, test the door’s sensitivity by placing the object in its path and attempting to close it. Repeat the process until the door reverses smoothly upon contact without excessive force.
5. Fine-Tuning
If necessary, fine-tune the sensitivity until you find the perfect balance between safety and functionality. Keep testing until the door operates smoothly and consistently.
Conclusion
Proper garage door opener sensitivity adjustment is essential for the safe and efficient operation of your garage door. By addressing common problems and adjusting the sensitivity settings correctly, you can ensure that your garage door operates smoothly, closes securely, and maintains the safety of your home and family. If you encounter difficulties or are unsure about the adjustment process, consider consulting a professional garage door technician for assistance in achieving the optimal sensitivity setting for your garage door opener.


Leave a Reply