Is your garage door not closing all the way, reversing unexpectedly, or failing to open completely? You’re not alone — many homeowners face this issue, especially with automatic systems. Understanding how do I adjust my Chamberlain garage door opener can save you both time and costly technician visits.
This guide walks you through a clear, safe, and simple process to adjust your Chamberlain opener settings — including travel limits, force controls, and sensor alignment — so your garage door works perfectly again.
Read too: Mastering Quantum Garage Door Opener Programming: A Comprehensive Guide
Understanding How a Chamberlain Garage Door Opener Works
Before diving into adjustments, it’s important to understand the basics. Your Chamberlain garage door opener uses a motorized drive system to lift and lower the door. Its movement is regulated by three main components:
- Travel Limits: Control how far the door opens or closes.
- Force Adjustment: Determines how much power the motor uses to move the door.
- Safety Reversal System: Ensures the door stops or reverses if something obstructs its path.
These elements must be balanced properly. If any are misaligned, your door may stop midway, reverse suddenly, or refuse to close.
Step-by-Step: How to Adjust Your Chamberlain Garage Door Opener
Let’s go step-by-step so you can confidently perform adjustments yourself.
1. Check Power and Safety First
Before making any adjustments:
- Unplug the opener from the outlet.
- Make sure no one, especially children, is near the door.
- Have a sturdy ladder and flathead screwdriver ready.
Safety Tip: Never attempt to adjust springs or cables — those are high-tension components that require professional handling.
2. Adjust the Travel Limits
Travel limits tell the opener how far to move the door when opening and closing. If your garage door:
- Stops short of the floor
- Reverses before fully closing
- Opens only halfway
You likely need to reset the travel limits.
How to Adjust Travel Limits (Step-by-Step):
- Locate the Adjustment Screws
On most Chamberlain openers, they are found on the back or side panel labeled “Up” and “Down” or “Open” and “Close.” - Adjust the Down (Closing) Limit
- Turn the Down screw clockwise to increase travel (door closes further).
- Turn it counterclockwise to reduce travel.
- Adjust the Up (Opening) Limit
- Turn the Up screw clockwise to open the door further.
- Turn it counterclockwise to reduce opening height.
- Test the Door
Plug the opener back in and press the remote. If the door still doesn’t close or open fully, fine-tune by turning the screws a quarter-turn at a time.
3. Adjust the Force Settings
Force determines how much power the motor uses to move your garage door. Incorrect force settings can cause:
- The door to stop mid-cycle.
- The motor to strain unnecessarily.
- Safety reversal failure.
To Adjust Force:
- Locate the Force Adjustment Dials
These are usually on the back panel near the travel screws, labeled “Up Force” and “Down Force.” - Adjust the Down Force
- Turn clockwise to increase force if the door doesn’t close all the way.
- Turn counterclockwise to decrease force if the door closes too hard.
- Adjust the Up Force
- Turn clockwise if the door struggles to open.
- Turn counterclockwise if the door opens too fast or jerks.
- Test and Observe
Run the opener a few times to make sure it moves smoothly without excessive strain.
4. Align the Safety Sensors
Modern Chamberlain openers use infrared safety sensors near the bottom of the door track. If misaligned, the opener will refuse to close, flashing the LED lights.
To Realign Sensors:
- Locate Both Sensors
They’re positioned 4–6 inches from the floor on each side of the track. - Check for Obstructions
Remove any dirt, cobwebs, or debris. - Align the Lights
- The green light (receiver) should be steady.
- The amber light (transmitter) should also stay solid.
Adjust until both lights remain steady.
- Test Closure
Try closing the door — it should work smoothly without reversing.
5. Reprogram the Opener (If Needed)
If adjustments don’t fix the issue, your opener may need reprogramming.
Follow these steps:
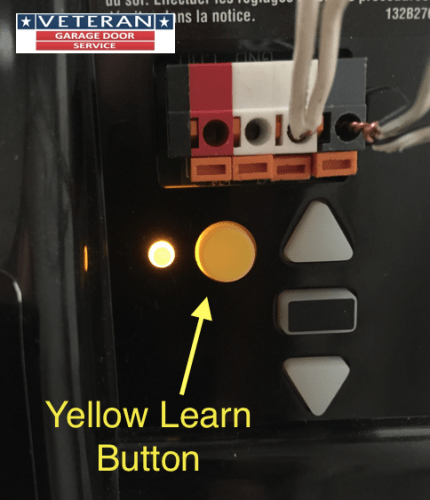
- Press and Hold the “Learn” Button on the opener for 6 seconds until the LED light turns off — this erases old codes.
- Press the “Learn” Button Again — the LED should turn on.
- Press the Remote Button once — the opener light blinks, confirming it’s paired.
- Test the Door to ensure it responds properly.
This step often resolves syncing or travel memory errors.
Troubleshooting Common Problems
Here’s a quick reference for frequent issues and solutions:
| Problem | Likely Cause | Fix |
|---|---|---|
| Door doesn’t close fully | Down travel too short | Increase down limit |
| Door reverses before closing | Sensors misaligned | Clean and realign sensors |
| Door won’t open all the way | Up travel too low | Increase up limit |
| Motor hums but door doesn’t move | Force too low or belt issue | Increase force or check drive belt |
| Door slams shut | Down force too high | Reduce down force |
Safety Reversal Test (Highly Recommended)
After every adjustment, perform a safety reversal test:
- Place a 2×4 piece of wood flat under the door.
- Close the door using your remote.
- The door should reverse immediately upon contact.
If it doesn’t reverse, reduce the down force and retest. Safety systems are mandatory under U.S. federal law for modern openers to prevent injury.
Expert Tip: Keep Your Opener Maintained
To avoid frequent adjustments:
- Lubricate moving parts every 6 months.
- Check the balance by manually lifting the door halfway — it should stay in place.
- Test sensors monthly.
- Replace remote batteries annually.
According to Chamberlain Group Inc., regular maintenance can extend opener lifespan by up to 40%.
External Reference
For general background on automatic door openers, you can check Wikipedia – Garage Door Opener.
FAQ: How Do I Adjust My Chamberlain Garage Door Opener
1. Why won’t my Chamberlain door close completely?
Usually, your down travel limit is set too short or the sensors are misaligned. Adjust both until the door closes fully.
2. How often should I adjust my opener?
Only when performance changes — for example, the door won’t open or close properly. Otherwise, regular maintenance is enough.
3. Can I adjust my Chamberlain opener myself?
Yes! As long as you follow the steps carefully and don’t touch tension springs or cables, it’s safe for DIY homeowners.
4. What if my opener light blinks but the door doesn’t move?
That usually indicates a sensor alignment issue or force imbalance. Recheck both.
5. How do I know if my opener needs replacement?
If it’s older than 15 years, makes excessive noise, or fails repeatedly even after adjustments, replacement may be more cost-effective.
Conclusion
Knowing how do I adjust my Chamberlain garage door opener empowers you to handle one of the most common household maintenance tasks safely and efficiently. By learning to fine-tune travel limits, force settings, and safety sensors, you can ensure smooth operation and prolong the life of your garage system.
Take a few minutes each season to test your opener and perform small adjustments — your wallet (and your garage door) will thank you!
If this guide helped, don’t forget to share it with friends or neighbors who might be struggling with their own garage door openers.


Leave a Reply