Power outages can leave your garage door inoperable, causing frustration and security concerns. Knowing how to add battery backup to garage door opener ensures your door continues to function even when the electricity is out. This guide explains step-by-step instructions, suitable for beginners and experienced DIYers alike, keeping safety and reliability as the top priorities.
Why Install a Battery Backup
Adding a battery backup to your garage door opener offers:
- Uninterrupted operation: Open and close your door during blackouts.
- Enhanced safety: Avoid getting stuck inside or outside the garage.
- Peace of mind: Essential for homes with frequent power outages.
- Compatibility with smart home systems: Many modern openers integrate battery backup seamlessly.
Read too: How To Replace Garage Door Roller Like a Pro? Step-by-Step Guide
Preparing for Installation
Before starting, ensure you have:
- A compatible battery backup unit for your opener (check model requirements).
- Screwdriver, pliers, and ladder if needed.
- Safety gloves and glasses.
- Owner’s manual or manufacturer’s guide for reference.
Tip: Always unplug the garage door opener before handling electronics.
Step-By-Step Installation Guide
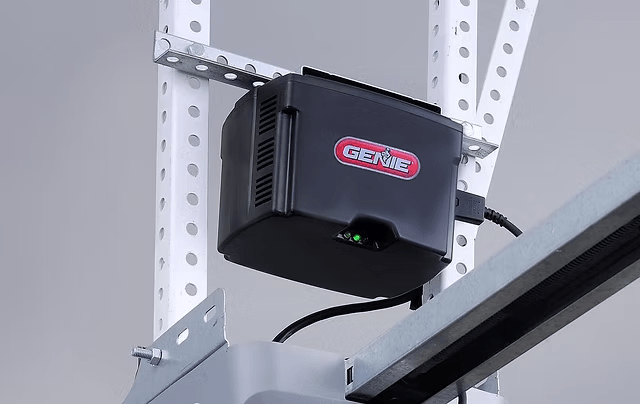
Step 1: Locate the Battery Compartment
- Most units, including Genie, LiftMaster, and Chamberlain, have a dedicated battery compartment near the motor.
- If your opener doesn’t have a pre-installed compartment, you may need an external battery kit compatible with your model.
Step 2: Prepare the Battery
- Ensure the battery is fully charged (usually 12V, 7Ah or as per manufacturer).
- Check the polarity—positive (+) to positive, negative (-) to negative.
Step 3: Connect the Battery
- Attach the battery leads to the corresponding terminals.
- Secure the battery in the compartment using the bracket or straps provided.
Step 4: Test the Battery Backup
- Plug the opener back in.
- Simulate a power outage by unplugging the unit.
- Press the remote or wall switch to ensure the door operates smoothly.
Step 5: Secure and Maintain
- Close the compartment.
- Periodically test the battery (every 3–6 months).
- Replace the battery every 3–5 years or as recommended by the manufacturer.
Common Issues and Troubleshooting
| Issue | Cause | Solution |
|---|---|---|
| Door won’t operate on battery | Battery not connected properly | Check terminals and polarity |
| Opener light blinks | Low battery | Recharge or replace battery |
| Remote fails to work | Not paired with opener | Re-sync remote after installation |
| Door moves slowly | Battery voltage low | Fully charge or replace battery |
Expert Tips
- Only use manufacturer-approved batteries to prevent damage.
- Keep a backup battery in the garage for emergencies.
- Test operation at least once a month to ensure readiness.
- Consider installing a smart battery monitor to track health.
- Consult Wikipedia – Garage Door Opener for technical details on opener types.
FAQ Section
Q1: Can I add a battery backup to any garage door opener?
A: Most modern openers support battery backups. Older models may require external kits or may not be compatible.
Q2: How long does the battery operate the garage door?
A: Typically 10–20 cycles (open/close) depending on battery size and door weight.
Q3: How often should I replace the battery?
A: Every 3–5 years or sooner if the battery fails a test cycle.
Q4: Can I install the battery myself?
A: Yes, following the manufacturer’s instructions. Ensure power is disconnected for safety.
Q5: Will the opener work during a blackout without a battery?
A: No. Without a battery backup, the opener will only function when electricity is available.
Q6: Can I use a car battery as backup?
A: It’s not recommended. Use only batteries approved by the opener manufacturer for safety and warranty compliance.
Conclusion
Knowing how to add battery backup to garage door opener enhances home security and convenience during power outages. By following these steps, you can ensure smooth operation, prolong battery life, and maintain peace of mind. Share this guide with neighbors and friends to help them secure their garage doors too!


Leave a Reply