If you’re struggling with a dark garage, knowing how to change light bulb on garage door opener is essential. A burnt-out bulb can make your garage unsafe and inconvenient, especially during evening hours. This guide walks you through a safe, simple, and efficient way to replace the bulb, ensuring your garage remains well-lit.
Why Garage Door Opener Light Matters
Garage door opener lights serve more than just illumination:
- Safety: Prevents trips and accidents in dark spaces.
- Security: Helps identify people and objects in the garage.
- Convenience: Provides light automatically when opening or closing the garage.
Read too: How To Replace Garage Door Roller Like a Pro? Step-by-Step Guide
According to home safety experts, proper lighting in garages reduces accidents by up to 40% annually.
Tools and Materials Needed
Before starting, gather:
- Replacement bulb (check manufacturer specifications, usually 60W incandescent or LED equivalent).
- Step ladder (ensure stability and height safety).
- Gloves (to avoid fingerprints on the new bulb).
- Screwdriver (if your opener light cover is secured with screws).
Step-By-Step Guide: How To Change Light Bulb On Garage Door Opener
Step 1: Ensure Safety First
- Disconnect the garage door opener from power—either unplug it or switch off the circuit breaker.
- Confirm that the light is completely cool to avoid burns.
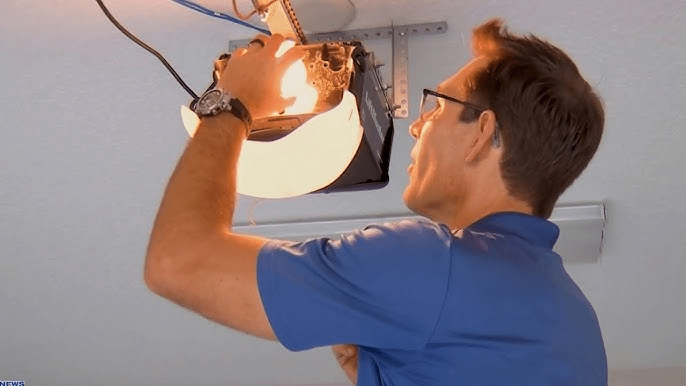
Step 2: Remove the Light Cover
- Identify the light cover on your garage door opener.
- If secured with clips, gently pull down.
- If screws are used, carefully unscrew and set aside.
Step 3: Remove the Old Bulb
- Using gloves, gently twist or pull out the old bulb (depending on the socket type).
- Inspect the socket for any corrosion or damage.
Step 4: Install the New Bulb
- Insert the replacement bulb into the socket.
- Ensure it fits securely without forcing.
- Check manufacturer’s guidelines for wattage limits.
Step 5: Replace the Cover and Restore Power
- Reattach the cover securely.
- Plug in the garage opener or turn on the circuit breaker.
- Test the light by opening or closing the garage door.
Tips for Bulb Maintenance
- Use LED bulbs: Longer lifespan and energy efficiency.
- Check annually: Inspect bulbs and wiring for safety.
- Avoid touching bulb glass: Oils from fingers can shorten bulb life.
- Keep spare bulbs: Saves time when replacements are needed.
| Bulb Type | Lifespan | Energy Efficiency | Recommended For |
|---|---|---|---|
| Incandescent | ~1,000 hrs | Low | Original setup, low cost |
| LED | ~25,000 hrs | High | Long-term, energy-saving |
| CFL | ~8,000 hrs | Medium | Moderate lifespan and efficiency |
FAQ Section
Q1: Can I replace the bulb while the opener is plugged in?
A: No, always disconnect power to avoid electric shock.
Q2: What type of bulb should I use for my garage opener?
A: Check your opener’s manual; most use 60W incandescent or compatible LED bulbs.
Q3: How often should I replace the bulb?
A: LED bulbs can last 5–10 years, while incandescent bulbs may need yearly replacement.
Q4: Can I use a higher wattage bulb?
A: No, exceeding manufacturer-recommended wattage may damage the opener or cause fire risk.
Q5: My bulb flickers after replacement. What should I do?
A: Ensure proper bulb type and secure installation. Check wiring for loose connections.
Q6: Is it better to switch to LED bulbs?
A: Yes, LEDs are energy-efficient, longer-lasting, and produce less heat.
Conclusion
Knowing how to change light bulb on garage door opener is essential for safety, convenience, and energy efficiency. By following this step-by-step guide, you can quickly replace the bulb, maintain proper lighting, and even upgrade to longer-lasting LED options. Share this guide with friends or family who might need an easy, reliable garage lighting solution.


Leave a Reply