Modern garage doors equipped with electronic openers provide convenience and security to homeowners. However, there may be situations when you need to know how to open a Liftmaster garage door manually. Power outages, remote malfunctions, or opener failures can render your electronic system temporarily inactive. In this article, we’ll guide you through the steps of manually opening a Liftmaster garage door, ensuring you’re prepared for any unexpected situations.
Safety First: Precautions Before Manual Operation
Before attempting to open your Liftmaster garage door manually, it’s essential to follow these safety precautions:
- Disconnect the Opener: If possible, disconnect the opener from the power source to prevent any accidental operation while you’re manually lifting the door.
- Secure the Area: Make sure the area around the garage door is clear of obstacles. This will prevent any accidents or damage while you’re operating the door manually.
- Seek Assistance: If your garage door is heavy or difficult to lift, don’t hesitate to ask for help from a family member or neighbor.
Steps to Manually Open a Liftmaster Garage Door
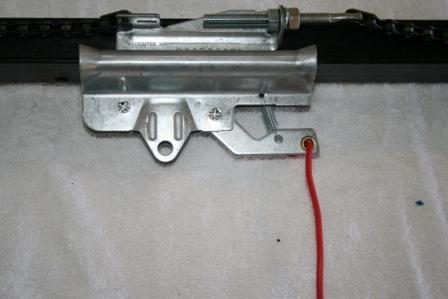
Step 1: Locate the Emergency Release Cord
Most Liftmaster garage door openers are equipped with an emergency release cord. This cord is usually red and hangs from the opener’s trolley. The emergency release cord is the key to disengaging the door from the opener and allowing manual operation.
Step 2: Pull the Emergency Release Cord
Gently pull down on the emergency release cord to disengage the garage door from the opener’s motor. You’ll feel the resistance decrease as the door becomes disconnected. Keep a firm grip on the cord as you move on to the next step.
Step 3: Lift the Door Manually
With the door disengaged from the opener, you can now manually lift it. Place your hands on the bottom edge of the door and lift it slowly and steadily. Lift with your legs rather than your back to avoid strain. If the door is properly balanced, it should open with relative ease.
Step 4: Secure the Door
Once the door is fully open, secure it in place by propping it up with a suitable object, such as a wooden block. This will prevent the door from accidentally closing while you’re working inside the garage.
Closing the Garage Door Manually
To close the garage door manually, follow these steps:
- Remove the securing object from under the door.
- Gently lower the door until it’s a few feet off the ground.
- Release the emergency release cord to re-engage the door with the opener’s motor.
- Lift the door slightly to engage the trolley.
- The opener will now be able to control the door electronically again.
Conclusion: Preparedness for Every Situation
In conclusion, knowing how to open a Liftmaster garage door manually is a valuable skill that ensures you’re prepared for unexpected situations. Power outages, remote malfunctions, or opener issues can all be managed with confidence when you understand the manual operation process. Remember to prioritize safety, follow the steps carefully, and seek professional assistance if you encounter difficulties. By staying informed and ready, you can maintain control over your garage door even when faced with technical challenges.


Leave a Reply