When it comes to installing a garage door, understanding the nuances of the rough opening is crucial. In this comprehensive guide, we’ll unravel the mysteries of the “9 x 7 Garage Door Rough Opening” and equip you with the knowledge needed for a seamless installation process.
Demystifying the Dimensions
The term “rough opening” refers to the framed opening in which the garage door will be installed. For a 9 x 7 garage door, precise measurements and careful preparation are essential. Let’s delve into the details to ensure your garage door fits like a glove.
Read too: How to Open Garage Door Without Power From Outside Like a Pro? Unlock the Secrets
Key Components of a Garage Door Rough Opening
1. Width and Height Considerations
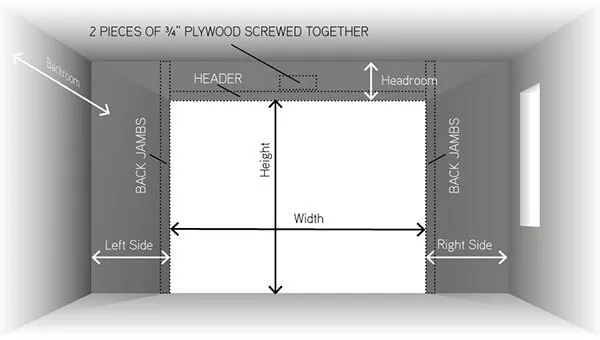
The 9 x 7 dimensions indicate the width and height of the garage door. The width of 9 feet and height of 7 feet are standard measurements, but it’s crucial to account for the framing and additional space needed for smooth operation.
2. Framing Requirements
Proper framing is the foundation for a successful garage door installation. The rough opening should be framed to accommodate the size of the door and provide ample support. Use pressure-treated lumber for durability and resistance to moisture.
3. Header Placement
The header, a horizontal beam supporting the load above the garage door, is a critical element. It distributes the weight of the door and prevents sagging. Follow the manufacturer’s guidelines for the correct placement and size of the header.
How To Create a 9 x 7 Garage Door Rough Opening: Step-by-Step Guide
Step 1: Measure and Mark
Accurate measurements are the cornerstone of a well-fitted garage door. Measure the width and height of the door, adding extra inches for framing. Mark the layout on the walls to guide the framing process.
Step 2: Frame the Opening
Begin framing by installing the bottom plate, followed by the king studs on either side. Add cripple studs between the king studs to support the header. Ensure the framing is level and plumb for a uniform opening.
Step 3: Install the Header
Secure the header across the top of the opening, connecting it to the king studs. The size of the header depends on factors such as the weight of the door and the span of the opening. Consult the door manufacturer’s recommendations for the appropriate header dimensions.
Step 4: Add Support and Trimmers
Reinforce the framing by adding additional support, such as trimmers and cripple studs. These elements provide stability and distribute the load evenly. Trim the framing as needed to achieve the desired rough opening size.
Common Mistakes to Avoid
1. Inaccurate Measurements
Precision is paramount. Double-check all measurements before cutting or installing framing members to avoid costly mistakes.
2. Neglecting Manufacturer Guidelines
Each garage door model may have specific requirements. Always consult the manufacturer’s guidelines for framing and installation instructions.
3. Skipping Structural Support
Proper support is crucial for the longevity and functionality of your garage door. Skipping steps or using inadequate framing materials can lead to structural issues.
Conclusion
Creating a 9 x 7 garage door rough opening is a fundamental step in the installation process. By understanding the dimensions, framing requirements, and following a meticulous step-by-step guide, you can ensure a precise and sturdy foundation for your garage door.
Remember, a well-crafted rough opening sets the stage for a smooth installation and enhances the overall performance of your garage door. Whether you’re a seasoned DIY enthusiast or a first-time installer, mastering the dimensions of a 9 x 7 garage door rough opening is a valuable skill that contributes to the functionality and aesthetic appeal of your home.


Leave a Reply