Introduction
Struggling to sync your vehicle’s HomeLink system with your Craftsman garage door opener? You’re not alone. Many homeowners face this challenge when trying to enjoy the convenience of opening their garage directly from their car. Learning how to program HomeLink with Craftsman garage door opener can save you time and frustration, giving you seamless access every time you pull into your driveway.
In this comprehensive guide, we’ll walk you through the exact steps needed to successfully pair your HomeLink system with your Craftsman garage door opener. Whether you have a newer model or an older unit, we’ve got you covered with clear, actionable instructions that work.
Understanding HomeLink and Craftsman Compatibility
Before diving into the programming process, it’s essential to understand what makes these two systems work together. HomeLink is a universal transceiver built into many vehicles that can control various devices, including garage door openers, gates, and home lighting systems. Craftsman, a trusted brand in garage door technology, produces openers that are generally compatible with HomeLink systems.
Why Compatibility Matters
Not all garage door openers work seamlessly with every HomeLink system. The compatibility depends on several factors:
- Frequency matching: Most Craftsman openers operate on 315 MHz or 390 MHz frequencies
- Security protocol: Rolling code vs. fixed code technology
- Model year: Newer models typically offer better HomeLink integration
According to Wikipedia’s entry on garage door openers, modern systems use rolling code technology for enhanced security, which requires specific programming procedures.
Preparing Your Vehicle and Garage Door Opener
Successful programming starts with proper preparation. Follow these essential steps before beginning the pairing process.
Step 1: Identify Your Craftsman Model
Locate the model number on your Craftsman garage door opener motor unit. This information is typically found on a label attached to the back or side of the unit. Common Craftsman series include:
- Series 100: Basic models with fixed codes
- Series 200: Mid-range with rolling codes
- Series 300: Advanced models with smart features
Step 2: Check Your Vehicle’s HomeLink System
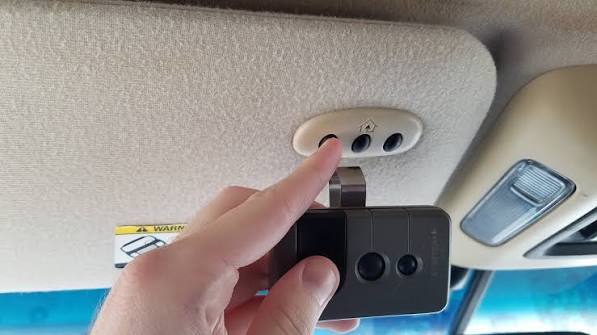
Consult your vehicle’s owner manual to locate the HomeLink buttons. These are usually found on the rearview mirror, sun visor, or overhead console. Most vehicles have three programmable buttons.
Step 3: Gather Necessary Tools
You’ll need:
- A sturdy ladder to reach your garage door opener
- Your vehicle parked within range (typically 10-20 feet from the opener)
- Fresh batteries in your vehicle (weak batteries can interfere with programming)
Step-by-Step Programming Instructions
Now let’s get to the core of how to program HomeLink with Craftsman garage door opener. Follow these detailed steps carefully.
Method 1: Standard Programming (For Most Models)
Time required: 10-15 minutes
- Clear existing HomeLink memory (if applicable)
- Press and hold the two outer HomeLink buttons simultaneously
- Hold for 20-30 seconds until the indicator light flashes rapidly
- Release both buttons
- Position your vehicle
- Park your car 10-20 feet from the garage door opener
- Ensure the garage door is closed
- Turn your vehicle’s ignition to the “ON” position (engine doesn’t need to be running)
- Initiate HomeLink learning mode
- Press and hold the desired HomeLink button
- Continue holding while proceeding to the next step
- Activate the Craftsman opener’s learn button
- Locate the “Learn” or “Smart” button on your Craftsman opener motor unit
- This button is usually yellow, red, purple, or green
- Press and release the Learn button (the indicator light will illuminate)
- You have 30 seconds to complete the next step
- Complete the pairing
- While still holding the HomeLink button, press it three times in succession
- Wait for the garage door to move or the HomeLink indicator to flash slowly
- Release the HomeLink button
- Test the connection
- Press the programmed HomeLink button
- The garage door should activate
- If successful, program additional buttons if needed
Method 2: For Older Craftsman Models (Fixed Code Systems)
If your Craftsman opener uses DIP switches instead of a Learn button:
- Match the DIP switches
- Open the HomeLink programming panel in your vehicle
- Set the DIP switches to match exactly with those on your Craftsman opener
- Ensure each switch position corresponds precisely
- Save the settings
- Close the HomeLink panel
- Test the button to confirm operation
- Secure the opener
- Close the DIP switch cover on your Craftsman unit
- Store the remote safely as a backup
Troubleshooting Common Issues
Even with careful following of instructions, problems can arise. Here’s how to address the most common issues.
Problem: HomeLink Won’t Program
Possible causes and solutions:
| Issue | Solution |
|---|---|
| Weak vehicle battery | Charge or replace battery before attempting |
| Too far from opener | Move vehicle closer (within 10 feet) |
| Wrong button sequence | Restart the process from step 1 |
| Interference from other devices | Turn off nearby electronics temporarily |
Problem: Garage Door Doesn’t Respond
Check these factors:
- Battery in handheld remote: Replace if weak
- Opener power supply: Ensure the unit is plugged in and receiving power
- Safety sensors: Verify they’re aligned and unobstructed
- Range limitations: Some older models have limited wireless range
Problem: Intermittent Operation
If the garage door works sometimes but not others:
- Reprogram the HomeLink button following the standard procedure
- Check for radio frequency interference from neighbors’ devices
- Consider upgrading to a newer Craftsman model with better HomeLink compatibility
Expert Tips for Success
Drawing from years of experience in garage door installation and HomeLink programming, here are professional recommendations:
Timing is crucial: Complete the entire programming sequence within the 30-second window after pressing the Learn button. Practice the button presses beforehand if needed.
Document your settings: Take photos of DIP switch positions or note down model numbers for future reference.
Maintain your system: Regularly test your HomeLink connection and replace vehicle batteries as recommended by the manufacturer.
Consider professional help: If multiple attempts fail, contact a certified Craftsman technician. Some complex systems require specialized knowledge.
Frequently Asked Questions
Q1: Can I program multiple vehicles to one Craftsman garage door opener?
A: Yes, most Craftsman openers can store up to 8-10 different remote codes, including HomeLink systems from multiple vehicles. Each vehicle needs to be programmed separately following the standard procedure.
Q2: What if my Craftsman opener doesn’t have a Learn button?
A: Older models without a Learn button use DIP switches. You’ll need to manually match the switch positions between your opener and the HomeLink system. Consult your Craftsman manual for the specific DIP switch configuration.
Q3: How long does HomeLink programming typically take?
A: The actual programming process takes about 2-3 minutes once you’re prepared. However, allow 10-15 minutes total for setup, positioning your vehicle, and testing. First-time users may need extra time to familiarize themselves with the process.
Q4: Will programming HomeLink erase my existing remote controls?
A: No, programming HomeLink does not affect your existing handheld remotes. All devices can operate simultaneously. However, clearing HomeLink memory will only remove previously programmed HomeLink buttons, not other remotes.
Q5: My HomeLink works inconsistently. What should I do?
A: Inconsistent operation often indicates weak batteries, interference, or incomplete programming. Try reprogramming the button, ensuring strong vehicle battery charge, and checking for nearby electronic interference. If problems persist, consider contacting Craftsman support for model-specific guidance.
Q6: Is it safe to program HomeLink myself?
A: Yes, programming HomeLink is completely safe when following manufacturer instructions. The process involves low-voltage wireless signals and poses no electrical hazard. Always ensure the garage door area is clear of people and objects during testing.
Conclusion
Learning how to program HomeLink with Craftsman garage door opener doesn’t have to be complicated. By following our step-by-step guide, you can enjoy the convenience of controlling your garage door directly from your vehicle. Remember to prepare properly, follow the instructions carefully, and troubleshoot methodically if issues arise.
The benefits are worth the effort: no more searching for remotes, faster garage access, and enhanced convenience in all weather conditions. Plus, with proper maintenance, your HomeLink system will provide reliable service for years to come.
Did you find this guide helpful? Share it with friends and family who might be struggling with their own HomeLink setup. Bookmark this page for future reference, and don’t hesitate to revisit these steps whenever you need to reprogram or add new vehicles to your system.
Have questions or success stories? Drop them in the comments below—we love hearing from our readers!



Leave a Reply