Introduction
Have you ever stood outside your garage, fumbling with keys or a remote that just won’t work? It’s a frustrating scenario that many homeowners face, especially when the batteries die or the remote gets lost. Learning how to program keypad on Chamberlain garage door opener is a simple yet essential skill that can save you time, money, and significant stress. Whether you have just installed a new keypad or need to reset an existing one, this comprehensive guide will walk you through every step with clarity and confidence.
Chamberlain is one of the most trusted brands in the garage door industry, known for its reliability and user-friendly technology. However, even the best technology requires proper setup to function correctly. In this article, we will demystify the programming process, address common troubleshooting issues, and provide expert tips to ensure your keypad works seamlessly every time. By the end of this guide, you’ll not only know how to sync your keypad but also understand how to maintain it for long-term performance.
Understanding Your Chamberlain Keypad Model
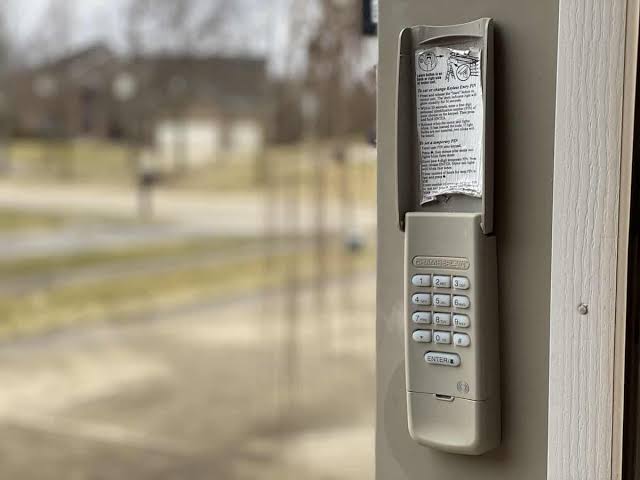
Before diving into the programming steps, it is crucial to identify which type of keypad you have. Chamberlain produces several models, and while the core programming logic is similar, the physical buttons and specific sequences can vary slightly. The two most common types are the standard wireless keypads (like the KLIK1U or KLIK2U) and the newer smart-enabled keypads that integrate with the MyQ ecosystem.
Most modern Chamberlain openers use a “Learn” button located on the motor unit itself. This button is typically colored yellow, purple, orange, or red, depending on the manufacturing year. Identifying this color is the first step in ensuring you follow the correct procedure. If you are unsure about your model, check the label on the back of your keypad or consult the manual that came with your garage door opener.
For a deeper understanding of garage door safety standards and mechanisms, you can refer to Wikipedia’s page on Garage Door Openers, which provides excellent background information on how these systems operate and evolve over time.
Step-by-Step Guide: How to Program a Standard Wireless Keypad
Programming a standard Chamberlain wireless keypad is a straightforward process if you follow the sequence precisely. Here is a detailed breakdown of the steps involved.
Step 1: Locate the Learn Button
Climb a sturdy ladder to access your garage door opener motor unit mounted on the ceiling. Look for the “Learn” button. It is usually located near the hanging antenna wire. Note the color of the button, as this may affect the timing in later steps.
Step 2: Clear Old Codes (Optional but Recommended)
If you are reprogramming due to security concerns or previous errors, it is wise to clear all existing codes. Press and hold the “Learn” button for approximately 6–10 seconds until the indicator light turns off. Release the button. This action erases all previously programmed remotes and keypads, so you will need to reprogram all devices afterward.
Step 3: Enter Programming Mode on the Keypad
On your wireless keypad, enter a 4-digit personal identification number (PIN) of your choice. Avoid obvious combinations like “1234” or “0000” for security reasons. After entering your PIN, press and hold the “Enter” or “Program” button. The LED light on the keypad should start blinking, indicating it is ready to sync.
Step 4: Sync with the Motor Unit
While the keypad LED is blinking, quickly press the “Learn” button on the motor unit. The indicator light on the motor unit will either blink or turn solid, confirming it has received the signal. You typically have 30 seconds to complete this step after pressing the Learn button.
Step 5: Test the Connection
Return to your keypad and enter the PIN you created, followed by the “Enter” button. The garage door should activate immediately. If it does not, repeat the process, ensuring you are within range (usually 10–15 feet) of the motor unit during programming.
Troubleshooting Common Programming Issues
Even with careful following of instructions, things can go wrong. Here are some common issues and their solutions.
| Issue | Possible Cause | Solution |
|---|---|---|
| Keypad Light Not Blinking | Dead batteries | Replace with fresh alkaline batteries. Ensure correct polarity. |
| Motor Unit Does Not Respond | Wrong Learn button pressed | Ensure you are pressing the correct “Learn” button, not the lock or light button. |
| Door Moves Then Stops | Safety sensors blocked | Check the photo-eye sensors at the bottom of the door tracks for obstructions or misalignment. |
| Intermittent Connectivity | Signal interference | Move other wireless devices away from the opener. Try reprogramming closer to the unit. |
Expert Tip: Battery Matters
Many users overlook the importance of battery quality. According to industry experts, using high-quality alkaline batteries rather than heavy-duty or rechargeable ones can significantly improve the lifespan and signal strength of your keypad. Rechargeable batteries often have a lower voltage output, which can cause erratic behavior in garage door openers.
Programming Smart KeyPads with MyQ Technology
If you have a newer Chamberlain opener equipped with Wi-Fi and MyQ technology, the process might involve an app-based setup. While the physical keypad still uses a PIN, the initial integration often requires the MyQ app.
- Download the MyQ App: Available on iOS and Android.
- Create an Account: Follow the prompts to set up your home network.
- Add Device: Select “Add Device” and choose “Garage Door Opener.”
- Follow On-Screen Instructions: The app will guide you through syncing your keypad and other accessories.
This method offers added benefits, such as remote monitoring, activity alerts, and integration with smart home systems like Amazon Alexa or Google Assistant.
Security Best Practices for Your Garage Keypad
Programming your keypad is just the first step; securing it is equally important. Here are some best practices to keep your home safe.
- Change Your PIN Regularly: Update your 4-digit code every 6–12 months.
- Avoid Obvious Combinations: Do not use your birth year, address, or sequential numbers.
- Clear Unused Codes: If you sell your home or give a keypad to someone else, always clear the memory and reprogram it.
- Monitor Activity: If you have a MyQ-enabled opener, check the activity log regularly for any unauthorized access attempts.
FAQ Section
Q1: Can I program multiple keypads to one Chamberlain opener?
Yes, most Chamberlain openers can support multiple wireless keypads and remotes. Typically, you can program up to 8–10 different devices. Simply repeat the programming steps for each additional keypad.
Q2: What do I do if I forget my keypad PIN?
If you forget your PIN, you cannot retrieve it. You must clear the memory of the opener by holding down the “Learn” button until the light goes out, then reprogram all your devices with new PINs.
Q3: Why is my keypad working intermittently?
Intermittent issues are often caused by weak batteries, signal interference from other electronics, or distance from the motor unit. Try replacing the batteries first, and if the problem persists, try reprogramming the keypad closer to the motor.
Q4: Is it safe to leave my keypad outside?
Chamberlain keypads are designed for outdoor use and are weather-resistant. However, ensure the cover is closed when not in use to protect the buttons from rain, dust, and extreme temperatures.
Q5: Can I program a universal keypad to my Chamberlain opener?
Yes, many universal keypads are compatible with Chamberlain openers. The programming process is similar, but you may need to dip-switch settings or specific code sequences found in the universal keypad’s manual.
Q6: How long do keypad batteries last?
Typically, keypad batteries last between 1–2 years, depending on usage frequency and battery quality. If you notice the LED light dimming or the response becoming sluggish, it is time to replace the batteries.
Conclusion
Learning how to program keypad on Chamberlain garage door opener is a valuable skill that enhances both convenience and security for your home. By following the step-by-step instructions outlined above, you can easily sync your device, troubleshoot common issues, and ensure reliable access to your garage. Remember to prioritize security by choosing strong PINs and maintaining your hardware with fresh batteries.
If you found this guide helpful, please share it with friends or family who might be struggling with their garage door setup. Don’t forget to bookmark this page for future reference, and feel free to leave a comment below if you have any additional questions or tips to share!



Leave a Reply