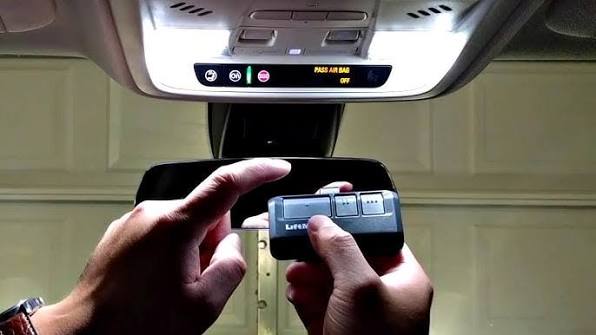
Have you ever pulled into your driveway, pressed the button in your car, and watched nothing happen? It is a frustrating experience that disrupts your daily routine. If you are wondering how to program Liftmaster garage door opener in car, you are not alone. Millions of drivers face this connectivity issue every year, but the solution is often simpler than you think.
This guide will walk you through the exact steps to sync your vehicle’s built-in system with your Liftmaster opener. Whether you drive a Ford, Toyota, Honda, or BMW, we will cover the universal methods and brand-specific nuances to get your door opening smoothly again.
Understanding the Technology: Why Programming Is Necessary
Before diving into the buttons, it helps to understand what is happening behind the scenes. Modern garage door openers use rolling code technology for security. This means the code changes every time you press the button to prevent hackers from intercepting the signal.
When you buy a new car or reset your system, the car’s transmitter and the garage receiver are out of sync. Programming them establishes a secure handshake between the two devices. According to Wikipedia’s entry on garage door openers, this encryption standard was widely adopted in the late 1990s to enhance home security.
Most cars use one of three systems:
- HomeLink: The most common universal system found in Ford, GM, Honda, and Toyota.
- Car2U: Used primarily in older Chrysler, Dodge, and Jeep vehicles.
- Brand-Specific Systems: Some luxury brands like BMW and Mercedes have their own proprietary integration methods.
Method 1: Programming Without a Handheld Remote (The “Learn Button” Method)
If you have lost your handheld remote or prefer not to use it, you can program your car directly using the Liftmaster motor unit. This method requires a ladder and access to your garage ceiling.
Step-by-Step Instructions
- Locate the Learn Button: Look at your Liftmaster motor unit hanging from the garage ceiling. The “Learn” button is usually located on the back panel near the antenna wire. It is typically colored yellow, purple, orange, or red.
- Clear Old Codes (Optional): If you are reprogramming, hold down the Learn button for about 10 seconds until the indicator light blinks. This clears all previously programmed remotes. Note: You will need to reprogram all other remotes after doing this.
- Initiate Car Programming: Sit in your car with the ignition turned to the “On” or “Accessory” position. Press and hold the desired HomeLink button in your car. Do not release it yet.
- Press the Learn Button: While still holding the car button, climb the ladder and press the Learn button on the Liftmaster unit once. The indicator light on the motor will turn on or blink.
- Complete the Sync: Return to your car and continue holding the HomeLink button. Watch the indicator light in your car. It will slowly blink and then change to a rapid flash or solid light. This indicates successful programming.
- Test the Connection: Press the button in your car. The garage door should activate. If it does not, repeat the process, ensuring you hold the buttons firmly.
Method 2: Programming With a Handheld Remote (The Cloning Method)
This method is often easier because it allows you to stay in your car. It works by “cloning” the signal from an existing working remote to your car’s system.
Step-by-Step Instructions
- Prepare Your Devices: Sit in your car with the ignition on. Have your working Liftmaster handheld remote ready.
- Enter Programming Mode: Press and hold the two outer buttons on your HomeLink system simultaneously. Hold them for about 20 seconds until the indicator light begins to flash rapidly. This puts the system into learning mode.
- Position the Remote: Hold the handheld remote 1–3 inches away from the HomeLink buttons in your car. Keep the remote’s LED facing the HomeLink buttons.
- Transfer the Signal: Press and hold the button on the handheld remote that you want to clone. Keep holding it while simultaneously pressing and holding the desired HomeLink button in your car.
- Wait for Confirmation: Continue holding both buttons. The HomeLink indicator light will flash slowly at first, then rapidly. Once it flashes rapidly, the signal has been successfully copied.
- Test the Door: Press the newly programmed HomeLink button. The garage door should respond immediately.
Troubleshooting Common Sync Issues
Even with careful following of instructions, things can go wrong. Here are the most common issues and how to fix them.
| Issue | Possible Cause | Solution |
|---|---|---|
| Door moves partially then stops | Safety sensors blocked | Check if objects block the eye sensors near the floor. Clean lenses with a soft cloth. |
| Light blinks but door doesn’t move | Weak battery in remote | Replace the battery in your handheld remote and try cloning again. |
| No response from car button | Wrong frequency | Ensure your Liftmaster model is compatible with your car’s HomeLink version (most post-2000 models are). |
| Intermittent operation | Distance too far | Reprogram while closer to the garage door. Some systems require proximity during setup. |
The “Compatibility Bridge” Problem
If you have an older Liftmaster model (pre-2011) and a newer car, or vice versa, you might face frequency mismatches. Liftmaster uses different frequencies: 315 MHz, 390 MHz, and 433 MHz.
If standard programming fails, you may need a compatibility bridge. This is a small device that plugs into your Liftmaster unit and translates the signal for newer cars. You can purchase these from Liftmaster directly or authorized dealers. Always check your motor’s model number to determine the correct frequency before buying accessories.
Specific Tips for Major Car Brands
While HomeLink is universal, some manufacturers have unique quirks.
- Ford & Lincoln: Often require you to cycle the ignition key three times to enter programming mode. Listen for a chime confirming the mode is active.
- Toyota & Lexus: May require you to hold the HomeLink button for up to 60 seconds during the initial clearing phase. Patience is key here.
- Honda & Acura: Typically follow the standard two-button hold method but may require you to press the “Program” button on the rearview mirror if equipped.
- BMW & Mercedes: These brands often use a menu-driven approach via the infotainment screen rather than physical buttons on the mirror. Navigate to “Vehicle Settings” > “Garage Door Opener” to start the process.
Frequently Asked Questions (FAQ)
1. Can I program multiple cars to one Liftmaster opener?
Yes, Liftmaster openers can store multiple codes. Most modern units can handle up to 8–10 different remotes or car systems. Simply repeat the programming process for each vehicle.
2. Why does my garage door reverse immediately after closing?
This is usually a safety sensor issue, not a programming error. Check the alignment of the sensors near the floor. If the LED light on one sensor is blinking or off, realign them until both show a steady light.
3. Do I need a professional to program my car?
No, programming your car is a DIY task that takes 10–15 minutes. However, if you have a complex luxury vehicle with integrated infotainment systems, consult your owner’s manual for specific menu navigation steps.
4. What if my Liftmaster opener doesn’t have a Learn button?
Very old models (pre-1993) may use DIP switches instead of a Learn button. In this case, you must manually match the switch positions on your car’s remote (if applicable) to the switches on the motor unit. Consider upgrading to a modern universal receiver kit for easier compatibility.
5. Is it safe to use HomeLink?
Yes, HomeLink uses the same rolling code encryption as your handheld remote. It is considered secure and is approved by major automotive manufacturers worldwide.
6. How do I reset my HomeLink system?
To clear all programmed buttons, hold the two outer HomeLink buttons for 10–20 seconds until the indicator light changes from solid to flashing. This wipes the memory, allowing you to start fresh.
Conclusion
Learning how to program Liftmaster garage door opener in car saves you time and eliminates the hassle of fumbling for handheld remotes. By understanding whether you need the direct “Learn Button” method or the “Cloning” method, you can troubleshoot effectively. Remember to check your frequency compatibility and keep your safety sensors clean for optimal performance.
Now that your garage door is synced, enjoy the convenience of seamless entry. Did this guide help you get back on track? Share this article with friends who struggle with their garage remotes, or leave a comment below with your car model and any tips you discovered during the process!



Leave a Reply