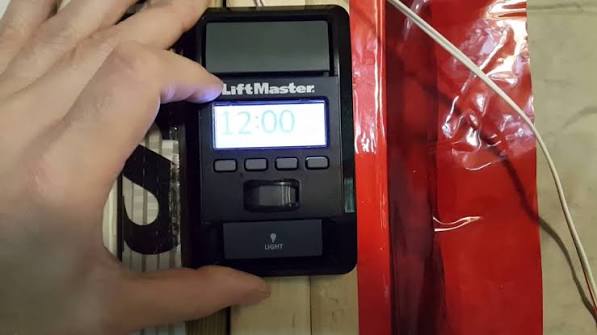
Upgrading or replacing your garage hardware shouldn’t be a stressful experience. If you are wondering how to remove Liftmaster garage door opener wall button safely, you are in the right place. This simple, step-by-step guide will help you detach the old unit quickly and prepare for a seamless, professional-grade replacement.
How To Remove Liftmaster Garage Door Opener Wall Button: What You Need to Know
Before diving into the physical steps, it helps to understand the scope of the task. Having the right tools and knowledge prevents mid-project frustration and ensures a clean, damage-free removal.
For this task, you will only need a few basic household items:
- Flathead screwdriver: For prying off the cover plate or button cap.
- Phillips head screwdriver: Usually a #2 size, to remove the hidden mounting screw.
- Wire strippers: Optional, but useful if you need to trim frayed wire ends.
- Electrical tape: To temporarily cap exposed wires and prevent short circuits.
- A small magnetic container: To keep the mounting screw from getting lost in the garage.
Pro Tip: Keep a flashlight or your smartphone’s light handy. Garage walls can be dimly lit, and seeing the wire terminals clearly is crucial for both safety and accuracy.
Why You Might Need to Replace Your Wall Control
According to industry maintenance data, over 30% of residential garage door service calls are related to faulty, worn-out, or outdated wall control panels. You might need to remove the button for several practical reasons:
- The physical button is stuck, sticky, or completely unresponsive.
- You are upgrading to a smart LiftMaster MyQ wall control panel for remote access.
- The wiring behind the panel has become frayed, corroded, or chewed by pests.
- You are repainting the garage and need to detach the unit temporarily for a clean finish.
Understanding the “why” ensures you approach the task with the right mindset and proper preparation.
Safety First: Critical Precautions Before You Begin
Safety is non-negotiable when working with any motorized home appliance. A garage door opener is a motorized device that opens and closes a garage door controlled by switches on the garage wall
en.wikipedia.org. Even though the wall button operates on low voltage (typically around 24V DC), you must still eliminate any risk of accidental activation or electrical shock.
- Disconnect the Power: Locate the main power cord of your garage door opener and unplug it from the wall outlet. If it is hardwired, turn off the corresponding circuit breaker in your home’s electrical panel.
- Verify Power is Off: Press the wall button once. If the LED light does not turn on and the motor does not hum, you are safe to proceed.
- Secure the Garage Door: Ensure the garage door is fully closed before you begin. This prevents any accidental drops or tension issues while the system is offline.
Step-by-Step Removal Instructions
Now, let’s get to the core of the process. Follow these exact steps to detach the wall control panel without damaging your drywall or the internal wiring.
Step 1: Release the Outer Cover or Button Cap
Most modern LiftMaster wall controls feature a snap-on design. To remove a LiftMaster MyQ wall control mounted on a stud, apply firm outward pressure near the bottom edge to release the snap clips
www.justanswer.com. For older models, you may need to gently pry the white push-button cap off with a flathead screwdriver, which will then swing down to reveal the hidden mounting screw
www.doityourself.com.
Step 2: Remove the Mounting Screw
Once the cover is off, you will see a single Phillips head screw securing the panel to the wall or electrical box. Use your #2 Phillips head screwdriver to turn this screw counterclockwise. Place the screw immediately into your small container so it does not roll away into the garage abyss.
Step 3: Slide the Unit Upward
LiftMaster wall panels are designed to hook onto a mounting bracket. After the screw is removed, gently slide the entire control unit straight upward. It should detach from the bracket with minimal resistance. Do not yank it, as the wires are still connected to the back.
Step 4: Disconnect the Wiring
You will now see two thin wires connected to the back of the panel, typically terminating in red and white terminals. These are standard low-voltage bell wires.
- Note the color coding: The red wire usually connects to the red terminal, and the white wire to the white terminal.
- Loosen the terminal screws counterclockwise using a small flathead screwdriver.
- Gently pull the wires free from the terminals.
Step 5: Secure the Exposed Wires
Before walking away, wrap the bare ends of the red and white wires with a small piece of electrical tape. This prevents them from accidentally touching each other or a metal junction box, which could cause a short circuit when you eventually restore power.
LiftMaster Wall Control: Old vs. New Models Comparison
If you are removing the old button to install a new one, it is helpful to know what you are upgrading to. Here is a quick comparison of standard legacy panels versus modern smart panels.
| Feature | Legacy Wall Control (e.g., 78LM) | Modern Smart Wall Control (e.g., 885LM / MyQ) |
|---|---|---|
| Connectivity | Wired only, no smart features | Wi-Fi enabled, smartphone app control |
| Security | Basic fixed-code or older rolling code | Advanced Security+ 2.0® encryption |
| Installation | Simple 2-wire connection | Simple 2-wire connection (backward compatible) |
| Extra Features | Single open/close button | Timer-to-close, vacation lock, built-in Wi-Fi |
Upgrading to a smart panel not only improves daily convenience but also enhances the overall security of your home’s perimeter access.
Troubleshooting Common Removal Issues
Even straightforward DIY tasks can hit a snag. Here is how to handle common hiccups professionally:
- The panel won’t slide up: Double-check that the hidden screw is completely removed. Sometimes, layers of paint can seal the edges of the cover to the wall. Carefully run a utility knife around the perimeter to break the paint seal.
- The wire broke off inside the terminal: Do not panic. Use your wire strippers to strip back 1/4 inch (about 6 mm) of fresh insulation from the wire end. This will expose clean copper for a solid connection on your new panel.
- The new panel doesn’t work after installation: Ensure the wires are firmly seated under the terminal screws and that the screws are tightened securely. Also, verify that the main opener unit is plugged back in and the circuit breaker is on.
Frequently Asked Questions (FAQ)
Q1: Can I remove the LiftMaster wall button without turning off the power?
Answer: While the wall button operates on low voltage (making it less dangerous than standard 120V household wiring), it is highly recommended to disconnect the power. This prevents accidental motor activation, which could cause injury or damage to the opener’s logic board while the wires are exposed.
Q2: What type of wire is used for the LiftMaster wall control?
Answer: LiftMaster wall controls typically use standard 2-conductor, stranded bell wire. It is inexpensive, flexible, and perfectly suited for low-voltage DC signals. If your existing wire is damaged, you can easily replace it with a new spool of 22-gauge bell wire from any local hardware store.
Q3: How do I know if my new wall button is compatible with my opener?
Answer: Most LiftMaster wall controls manufactured after January 1, 1995, are universally compatible with LiftMaster, Chamberlain, and Craftsman openers that use two-wire setups
www.amazon.com. Always check the compatibility chart on the new product’s packaging or the manufacturer’s website before purchasing.
Q4: Can I install the new wall button in a different location?
Answer: Yes, you can relocate the wall button. However, you will need to run a new length of bell wire from the garage door opener motor unit to the new desired location. Ensure the new location is at least 5 feet above the floor to prevent children from reaching it, as per standard safety guidelines.
Q5: What should I do with the old wall button?
Answer: If the old unit is still functional, consider donating it to a local habitat repair shop or offering it on a community freecycle board. If it is broken, check your local municipal guidelines for electronic waste (e-waste) disposal, as it contains small circuit boards and recoverable metals.
Q6: Will removing the wall button erase my garage door remote codes?
Answer: No. Removing or replacing the wall control panel does not affect the memory of your garage door opener. Your handheld remotes and keypad codes will remain intact and fully functional once the new wall button is wired and powered.
Conclusion
Learning how to remove Liftmaster garage door opener wall button is a straightforward, manageable DIY task that can save you the cost of a professional service call. By following these safety-first, step-by-step instructions, you can confidently detach the old unit, inspect the wiring, and prepare for a modern, secure upgrade.
Taking control of your home maintenance not only saves money but also gives you peace of mind knowing your garage operates safely and efficiently.
Did you find this guide helpful? Share this article on Facebook, Twitter, or Pinterest to help your friends and neighbors tackle their own DIY garage projects with confidence!



Leave a Reply