Is your garage door suddenly acting “dumb” instead of “smart”? There is nothing quite as frustrating as being locked out of your home because your smart device ran out of juice. If you are wondering how to replace battery in myq garage door opener components, you have come to the right place.
Whether you are dealing with a low-battery alert on your phone or a loud beeping sound coming from the ceiling, this guide will walk you through the fix. We break down exactly what battery you need and how to swap it out safely, ensuring your garage is secure and connected again.
Identifying Your MyQ Device
Before you start unscrewing anything, it is vital to identify which device is losing power. The “MyQ system” actually consists of two distinct parts, and they use very different power sources.
- The MyQ Garage Door Sensor (The Tilt Sensor): This is the small, white sensor mounted on the top panel of your garage door. If your app says “Low Battery,” this is likely the culprit. It typically uses a standard CR2450 3V lithium coin battery support.chamberlaingroup.com.
- The Main Garage Door Opener (LiftMaster with MyQ): This is the large motor unit hanging from your garage ceiling. If this unit is beeping, it usually has an internal backup battery (often model 485LM) designed to help you open the door during a power outage.
Note: The main MyQ Smart Garage Hub (the box plugged into the wall) does not use a replaceable internal battery; it is powered by a wall outlet. However, the sensors attached to it do require batteries.
Guide 1: How to Replace the MyQ Sensor Battery (CR2450)
This is the most common maintenance task. Replacing the battery in your door sensor is quick and requires no tools.
What You Need:
- One (1) CR2450 Lithium Battery (available at any hardware or grocery store).
Step-by-Step Instructions:
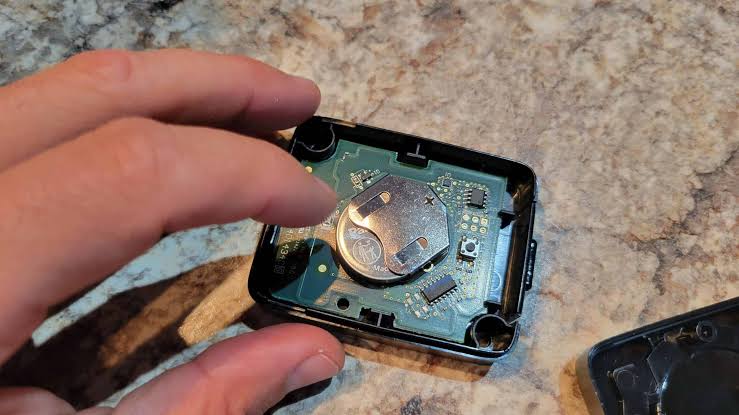
- Access the Battery Compartment: Locate the sensor on your door panel. Look for a small button or release tab on the bottom edge of the sensor support.vivint.com.
- Remove the Cover: Press this button firmly while pulling the front cover away from the door. The cover should slide off easily.
- Swap the Battery: You will see the old battery nestled in a holder. Slide the old CR2450 out and slide the new one in support.vivint.com. Ensure the plus (+) side is facing up and visible.
- Reassemble: Slide the cover back onto the sensor until it clicks into place.
Guide 2: Replacing the Battery in the Main Opener (LiftMaster)
If your main garage door opener is beeping, the internal backup battery has likely died. These units usually require a 12V 5Ah Lithium-Ion battery (Part # 485LM)
www.amazon.com.
Safety Warning: Always exercise caution when working with high-voltage garage equipment.
Step-by-Step Instructions:
- Disconnect Power: Unplug the garage door opener from the wall outlet. Disconnect ALL electric and battery power before proceeding mandmdoors247.com.
- Access the Interior: Remove the screws from the top cover of the opener unit to expose the internal components.
- Remove the Old Battery: Locate the battery backup pack (usually mounted on the back panel or a bracket). Unplug the battery connector (typically F1 terminals) and unscrew the battery from its bracket.
- Install the New Battery: Connect the new battery (use ONLY the LiftMaster recommended part, such as #485LM) mandmdoors247.com. Secure it firmly.
- Restore Power: Plug the unit back into the wall. The motor will likely move or beep as it initializes.
Troubleshooting: Why Is It Still Beeping?
Have you replaced the battery, but the annoyance continues? Here is why.
If you replaced the sensor battery but the app still shows “Low,” the system hasn’t “woken up” to the new power source yet. To fix this, you need to manually reset the connection. Run two full open and close cycles using your wall control button
support.chamberlaingroup.com. This signals the motor to check the sensor again, usually clearing the error alert within 24 hours.
If the beeping continues on the main unit, ensure the battery was seated correctly in the connector. Sometimes, simply removing the new battery for 10 minutes and re-inserting it will trigger a fresh diagnostic check
support.suretyhome.com.
Why Lithium-Ion Batteries Matter
You might wonder why manufacturers recommend specific battery types.
Modern MyQ components rely on lithium-ion technology because it offers a high energy density and maintains a consistent voltage output until it is depleted
www.amazon.com. Unlike older battery technologies, lithium-ion batteries are less susceptible to the temperature fluctuations common in unheated garages. For a deeper understanding of the technology keeping your home secure, you can read about the chemical properties of these cells on Wikipedia.org.
FAQ Section
Q: How long does the MyQ sensor battery usually last? A: Under normal conditions, a CR2450 battery typically lasts between 1 to 2 years
support.chamberlaingroup.com. If you are changing it more frequently, your sensor might be in a very cold environment or the battery might be defective.
Q: Can I use rechargeable batteries in my MyQ device? A: It is generally not recommended. Rechargeable batteries often provide 1.2V or 3.6V depending on chemistry, which may not match the exact 3V requirement of the sensor or the 12V requirement of the backup unit, potentially causing device failure.
Q: How much does a replacement battery cost? A: A CR2450 sensor battery is very cheap (often under $5 for a pack). A main unit backup battery (485LM) is more expensive, typically ranging between $30 and $50.
Q: Will my garage door still work if the battery dies? A: If the sensor battery dies, you can still open the door manually via the wall button, but you will lose “smart” alerts and app control. If the main unit battery dies, the door will still work normally as long as there is electricity, but it will not work during a power outage.
Q: Do I need to re-pair the device after changing the battery? A: In most cases, no. Simply performing a few manual open/close cycles is enough to re-establish the link. If it fails to connect, you may need to use the “Add Device” feature in the MyQ app to re-pair it.
Conclusion
Learning how to replace battery in myq garage door opener components is a simple DIY task that can save you the cost of a service call. Whether you are slipping a coin cell into your sensor or swapping out the main backup unit, keeping these devices charged ensures your home remains secure and your daily routine stays uninterrupted.
Did this guide help you fix your garage door? Share this post with your neighbors or friends on social media so they can stop the beeping too!



Leave a Reply