Introduction
Is your once-whisper-quiet garage door now sounding like a freight train, or has the belt snapped entirely, leaving you stranded? We understand the frustration of a malfunctioning opener, but learning how to replace belt on Chamberlain garage door opener is a manageable DIY task that can save you hundreds in service fees. This comprehensive guide will walk you through the process safely and efficiently, restoring peace and functionality to your home’s main entry point.
Why Do Chamberlain Belts Fail? Understanding the Basics
Before grabbing your wrench, it helps to understand why this component fails. Chamberlain belt-drive openers are renowned for their quiet operation because they use a steel-reinforced rubber belt rather than a metal chain. However, according to general mechanical principles outlined in Wikipedia’s overview of garage door mechanisms, all tension-based drive systems experience wear over time due to friction, thermal expansion, and load stress.
Typically, a Chamberlain belt lasts 10 to 15 years. Premature failure often results from:
- Improper Tension: A belt that is too tight stretches prematurely; too loose causes slippage and fraying.
- Misalignment: If the rail isn’t level, the belt rubs against the housing.
- Environmental Factors: Extreme cold makes rubber brittle; excessive heat accelerates degradation.
- Door Balance Issues: If your springs are weak, the opener works twice as hard, destroying the belt.
Expert Insight: “Always check your door balance before replacing a belt. An unbalanced door is the #1 cause of repeat belt failures within six months of replacement.” — Certified Garage Door Technician
Tools and Parts You Will Need
Preparation prevents frustration. Gather these items before starting:
| Item | Specification/Notes |
|---|---|
| Replacement Belt | Chamberlain OEM Part (e.g., 41A3589-3) – Do not use generic |
| Stepladder | Stable, 6-8 ft minimum |
| Socket Set | 7/16″ and 1/2″ sockets most common |
| Adjustable Wrench | For tension nut adjustment |
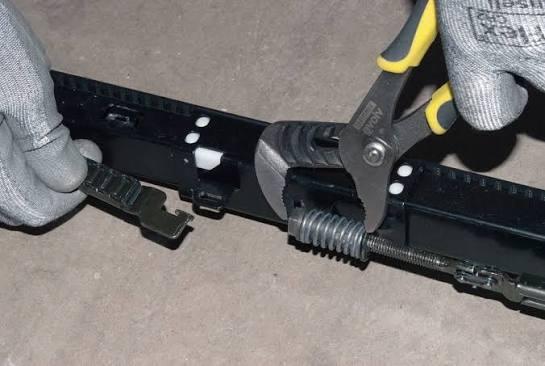
| Vise Grips/Locking Pliers | To secure trolley during install |
| Safety Glasses | Non-negotiable for overhead work |
| Gloves | Protect hands from sharp rail edges |
Critical Safety Warning: Always disconnect power to the opener at the breaker panel before beginning. The capacitor can hold a charge even when unplugged. Never bypass safety sensors or force components.
Step-by-Step: How To Replace Belt On Chamberlain Garage Door Opener
Follow these precise steps for a successful installation. Allow 60–90 minutes for first-timers.
1. Release Tension and Remove Old Belt
Locate the tensioner assembly at the front of the rail (near the motor). Using your socket wrench, loosen the tension nut until the belt is completely slack. Slide the old belt off the motor sprocket and trolley pulley. Inspect the sprocket teeth for wear—if they’re hooked or shiny, replace the sprocket simultaneously.
2. Position the New Belt
Thread the new belt through the rail channel, ensuring the ribbed side faces inward toward the trolley. Loop it around the front idler pulley, then back toward the motor. Pro tip: Use vise grips to clamp the belt to the rail temporarily so it doesn’t slip while you work.
3. Connect Belt to Trolley
Align the belt ends at the trolley connector plate. Insert the provided pins or bolts through both belt loops and the trolley bracket. Tighten securely but do not overtighten, which can crush the belt fibers. Ensure the connection sits flat without twisting.
4. Reapply Proper Tension
This is the most critical step. Hand-tighten the tension nut until the belt no longer sags. Then, using your adjustable wrench, turn the nut exactly 3–4 full rotations past hand-tight. The correct tension allows 1/4 inch of vertical deflection when pressed midway between the motor and front pulley with moderate thumb pressure.
Precision Matters: Over-tensioning by just 2 extra rotations can reduce belt life by 40%. Under-tensioning causes noisy operation and premature wear.
5. Test and Adjust Limits
Restore power and operate the door manually via the wall button (not remote). Watch the belt travel smoothly without jumping or rubbing. If the door reverses prematurely or doesn’t close fully, adjust the travel limits per your Chamberlain manual. Run 3–5 complete cycles to seat the belt properly.
Belt vs. Chain: Is Upgrading Worth It?
If you’re considering switching systems during replacement, here’s a quick comparison:
| Factor | Belt Drive | Chain Drive |
|---|---|---|
| Noise Level | Ultra-quiet (<50 dB) | Loud (70-80 dB) |
| Lifespan | 10-15 years | 15-20 years |
| Maintenance | Low (no lubrication) | Moderate (annual lube) |
| Cost | Higher upfront | Lower upfront |
| Best For | Attached garages, bedrooms above | Detached garages, budget installs |
For homes with living spaces adjacent to the garage, belt drives remain the gold standard despite slightly shorter lifespans.
Common Mistakes to Avoid During Replacement
Even experienced DIYers stumble here. Don’t let these derail your project:
- Skipping Door Balance Check: Disconnect the opener and lift the door manually. It should stay open at chest height. If it drops, call a spring professional first.
- Using Non-OEM Belts: Aftermarket belts often lack Chamberlain’s proprietary ribbing pattern, causing slippage and voiding warranties.
- Ignoring Rail Alignment: Use a level across the entire rail. Even 1/8″ deviation creates drag points.
- Rushing Tension Adjustment: Take your time. Measure deflection twice; adjust once.
- Forgetting Safety Sensor Realignment: Bumping the rail during work can misalign sensors. Verify the indicator lights are solid green after reassembly.
FAQ: Your Top Questions Answered
How often should I replace my Chamberlain garage door belt?
Under normal residential use (3-5 cycles daily), expect 10-15 years of service. Heavy commercial use or unbalanced doors may require replacement every 5-7 years. Inspect annually for cracks, fraying, or glazing.
Can I use a chain on my Chamberlain belt-drive opener?
No. Belt and chain drive systems use incompatible sprockets, trolleys, and rail designs. Converting requires replacing the entire opener unit. Stick with OEM-specification belts only.
Why is my new belt making noise after replacement?
New belts require a 24-48 hour break-in period. Persistent noise usually indicates improper tension (too tight = whining; too loose = slapping), misaligned rail, or worn sprocket bearings. Recheck tension specs first.
Do I need to reprogram my remotes after belt replacement?
Generally, no. Belt replacement doesn’t affect the logic board or radio frequency. However, if you disconnected wiring or reset the unit during troubleshooting, you may need to re-sync remotes per your model’s manual.
What’s the average cost for professional belt replacement?
Professional service typically ranges $180-$320, including parts and labor. DIY replacement costs $40-$80 for an OEM belt. The savings are significant, but only attempt DIY if you’re comfortable working at height with mechanical systems.
How do I know if my belt needs replacing versus just adjusting?
Adjust if the belt is intact but loose/sagging. Replace if you see visible cracks, missing ribs, frayed edges, or stretched sections that won’t hold tension. A belt that slips repeatedly despite proper tension also needs replacement.
Conclusion: Restore Quiet Confidence to Your Garage
Learning how to replace belt on Chamberlain garage door opener empowers you to maintain one of your home’s most-used systems safely and affordably. With the right tools, OEM parts, and attention to tension specifications, you’ll enjoy years of whisper-quiet reliability. Remember: patience during installation pays dividends in longevity and performance.
Found this guide helpful? Share it with fellow homeowners on Facebook, Pinterest, or Nextdoor who might be battling a noisy garage door! Tag us in your DIY success photos—we love seeing our community tackle projects with confidence. Safe repairing! 🛠️



Leave a Reply