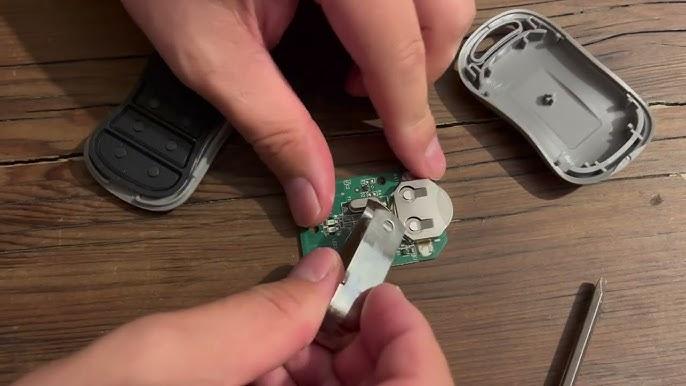
Is your car remote suddenly failing to respond, leaving you frustratingly stranded in the driveway while you are rushing to work or picking up the kids? Don’t worry, learning how to replace battery on Genie garage door opener remotes is a quick, simple DIY task that anyone can master in just a few minutes without needing to call an expensive technician. Grab a fresh replacement battery, and let us walk you through the exact, foolproof steps to restore your daily convenience and secure your home!
How To Replace Battery On Genie Garage Door Opener (Step-by-Step)
Before diving into the physical replacement, it is crucial to identify which type of Genie remote you own. Most modern Genie remotes use either a 3-volt lithium coin cell or a 12-volt alkaline battery.
Having the right tools makes this process effortless. You will only need a small flathead screwdriver, a clean microfiber cloth, and your replacement battery.
Ensure your workspace is well-lit and around 68–72°F (20–22°C) for optimal battery handling. Extreme cold can temporarily reduce the voltage of a new battery before it even goes into the remote.
Step 1: Open the Remote Casing
Locate the small notch or slot on the edge of your Genie remote. Some newer Intellicode models have a tiny Phillips-head screw on the back; if yours does, remove it first.
Gently insert the flathead tool into the notch and twist it slightly to pop the casing open. Never use excessive force, as this can crack the plastic housing and ruin the remote.
Step 2: Remove the Old Battery
Once the remote is open, carefully lift the old battery out of its compartment. Take note of the battery’s orientation—specifically, which side is facing up.
Usually, the positive (+) side faces outward. Keeping track of this ensures you will not accidentally install the new battery backward.
Step 3: Clean the Contacts
Using a dry, clean cloth or a cotton swab, gently wipe the metal contact points inside the battery compartment. Dust and minor corrosion can prevent a solid electrical connection.
If you notice heavy green or white crust, dip the cotton swab in a tiny amount of isopropyl alcohol to clean it, then let it dry completely. This minor step is often overlooked, but clean contacts ensure maximum conductivity.
Step 4: Insert the New Battery
Place the new battery into the compartment, ensuring it matches the orientation you noted earlier. Press down gently until it sits snugly in place without rattling.
Step 5: Reassemble and Test
Snap the two halves of the remote casing back together until you hear a firm click. If you removed a small screw in Step 1, do not forget to tighten it back into place.
Stand about 10 to 15 feet away from your garage and press the button to test the signal. The door should activate instantly.
Which Battery Does My Genie Remote Need?
Choosing the correct replacement battery is vital for long-lasting performance. Using the wrong voltage can permanently damage the remote’s internal circuit board.
Here is a quick comparison of the most common batteries used in Genie openers:
| Battery Type | Voltage | Common Genie Models | Estimated Lifespan |
|---|---|---|---|
| CR2032 | 3V Lithium | Intellicode 2 & 3 (G3T-R, GIT-3) | 3 to 5 Years |
| A23 | 12V Alkaline | Older 3-Button Remotes (GMICT-BX) | 1 to 2 Years |
| CR2016 | 3V Lithium | Visor Clips & Mini Remotes | 2 to 4 Years |
| 9V Alkaline | 9V | Legacy Keypads (GK-R) | 1 Year |
Understanding Battery Labels: When shopping for replacements, you might see confusing alphanumeric codes. The “CR” indicates lithium manganese dioxide chemistry, which is excellent for low-drain devices like remotes.
The numbers represent physical dimensions. For example, a CR2032 is 20mm wide and 3.2mm thick. Always buy from reputable brands to avoid internal acid leaks that destroy electronics.
Troubleshooting: What If It Still Doesn’t Work?
You replaced the battery, but the door still won’t open. Why? Sometimes, the issue isn’t the battery at all.
According to industry statistics from the International Door Association (IDA), nearly 20% of garage door opener service calls are due to misaligned safety sensors or signal interference rather than dead batteries.
Check the Safety Sensors
Look at the small LED lights on the safety sensors located near the floor on both sides of your door. If one light is blinking or off, the infrared beam is obstructed.
Clear away any cobwebs, leaves, or debris blocking the path. The LEDs should both glow steadily when aligned correctly.
Test the Wall Console
If your handheld remote fails, but the wall console inside the garage works perfectly, the issue is definitely with your remote or its signal.
However, if the wall console also fails, the problem lies with the main motor unit or the power supply. Check your home’s electrical panel to ensure the breaker hasn’t tripped.
Reprogram the Remote
If the lights are solid but the remote fails, it may have lost its programming. Locate the “Learn” button on the main motor head near the antenna wire.
Press and release it, then immediately press the button on your remote. The motor’s LED will blink to confirm the successful pairing.
Maintenance Tips for Your Genie Garage Door System
To ensure your system operates smoothly year-round, regular maintenance is essential. A well-maintained system saves you money on repairs and enhances your home’s security.
In fact, modern systems are incredibly secure; for a deeper understanding of the technology, you can read about the history and mechanics of the garage door opener on Wikipedia.
- Lubricate Moving Parts: Every six months, apply a lithium-based grease to the chain or screw drive. Avoid using WD-40, as it attracts dirt and grime.
- Test the Auto-Reverse Feature: Place a 2×4 piece of wood flat on the ground under the door. Close the door; it should immediately reverse upon hitting the wood.
- Check Hardware Tightness: The vibration from daily use can loosen bolts. Use a socket wrench to tighten all visible brackets annually.
Frequently Asked Questions (FAQ)
Q1: How often should I replace the battery in my Genie remote? Most Genie remote batteries last between 2 to 5 years, depending on usage frequency and battery quality. If you notice a decreased range or have to press the button multiple times, it is time for a replacement.
Q2: Can I use a rechargeable battery in my Genie remote? No, it is highly discouraged. Rechargeable batteries have a lower nominal voltage and a different discharge curve. This can cause your Genie remote to malfunction or fail to transmit a strong enough signal to the motor.
Q3: Why does my Genie remote work intermittently? Intermittent issues are usually caused by signal interference from nearby LED bulbs. If you recently installed cheap LED lights in your garage, they might emit radio frequencies that block the opener’s receiver. Try turning off the garage lights to see if the remote’s range improves.
Q4: Do I need to reprogram my Genie remote after changing the battery? Generally, no. The remote retains its programming in its non-volatile memory. However, if the battery was dead for an extended period, you might need to perform a quick reprogramming sequence using the “Learn” button on the motor unit.
Q5: Is it safe to replace the battery myself? Absolutely. Replacing the battery is entirely safe as long as you handle the small components carefully. Always ensure your hands are dry before opening the remote casing to prevent short-circuiting the delicate microchip inside.
Q6: Can extreme weather affect my Genie remote battery? Yes, temperature extremes significantly impact battery performance. Leaving your remote in a car during a freezing winter night (below 20°F) can temporarily reduce its voltage output. Conversely, extreme heat can cause alkaline batteries to leak or degrade much faster.
Conclusion
Mastering how to replace battery on Genie garage door opener remotes is an essential home maintenance skill that saves you both time and money while keeping your family safe. By following our detailed step-by-step guide, choosing the correct battery type, and performing basic troubleshooting, you can ensure your garage remains accessible and secure for years to come. You no longer have to rely on expensive service calls for minor fixes.
Did this comprehensive guide help you get back into your garage today? Share this article on your favorite social media platforms like Facebook, X (Twitter), and Pinterest to help your friends and family avoid getting stuck in the driveway!



Leave a Reply