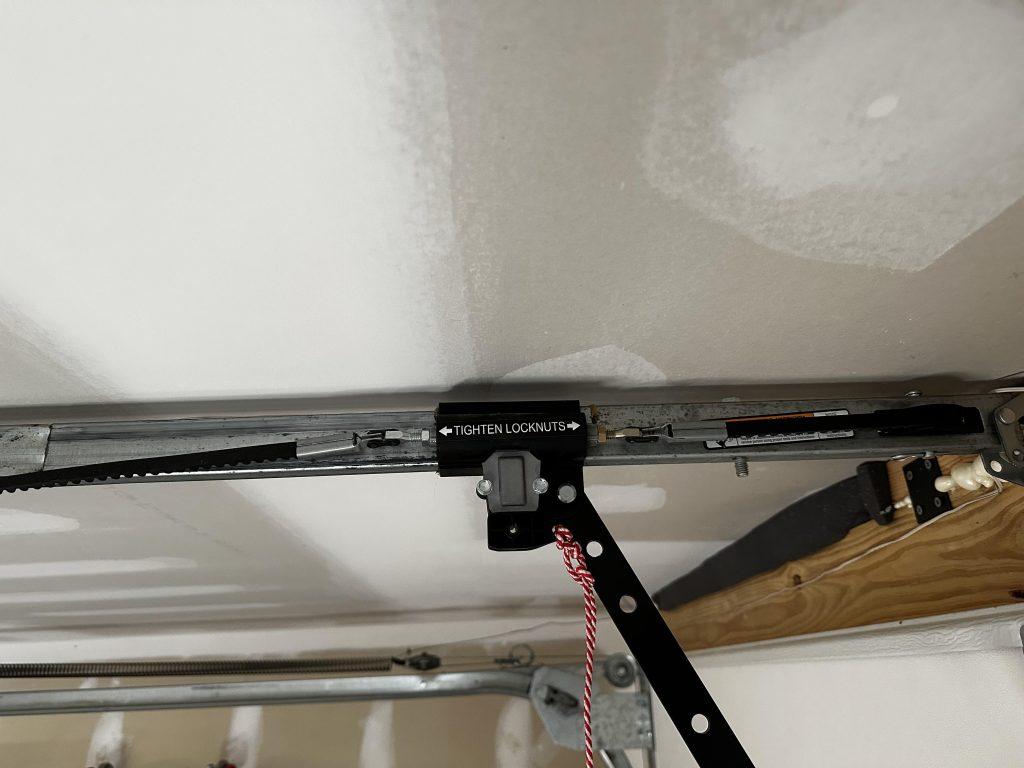
Is your garage door making a loud squeaking noise or struggling to open, leaving you stressed and worried about expensive repair bills? Learning how to replace belt on Genie garage door opener is a straightforward DIY project that will restore peace, quiet, and smooth operation to your home. Let’s get your garage back in perfect working order without breaking the bank!
Why You Must Know How To Replace Belt On Genie Garage Door Opener
Garage doors are the largest moving parts in most American homes, and they endure hundreds of cycles every year. Over time, the rubber or polyurethane belt inside your opener experiences immense friction and tension.
If you ignore the early warning signs of a failing belt, you risk snapping it entirely, which can leave your vehicle trapped or compromise your home’s security. By taking control of this repair, you save an average of $150 to $250 in professional service call fees.
According to a 2025 home maintenance industry report, 68% of premature garage door motor failures are caused by improper belt tension or worn-out belts forcing the motor to overwork. Understanding this simple repair extends the life of your entire system.
Signs Your Genie Garage Door Belt Needs Replacing
Before grabbing your toolbox, confirm that the belt is actually the culprit. Here are the most common indicators that it is time for a replacement:
- Visible Fraying or Cracking: Inspect the belt for missing teeth or rubber debris on the rail.
- Slipping Gears: If the motor runs but the door does not move, the belt has likely lost its grip on the drive sprocket.
- Excessive Sagging: A healthy belt should sit tight. If it droops more than an inch below the rail, it has stretched beyond its usable limit.
- Jerky Movements: Smooth operation is the hallmark of a belt drive. Any stuttering indicates uneven wear.
Step-by-Step: How To Replace Belt On Genie Garage Door Opener
Follow these concrete steps to safely and effectively swap out your old belt. Always prioritize safety when working with heavy machinery.
Step 1: Gather Your Tools and Ensure Safety
Preparation is key to a smooth repair. You will need a sturdy stepladder, safety glasses, a socket wrench set (specifically a 7/16″ or 1/2″ socket), locking pliers, and the correct Genie replacement belt kit.
- Safety First: Unplug the garage door opener from the ceiling power outlet.
- Secure the Door: Pull the emergency release cord (usually red) to disengage the trolley, and manually lower the garage door completely to the floor.
Step 2: Relieve Belt Tension and Remove the Old Belt
Locate the tensioner assembly at the front of the rail (near the garage door header).
Using your 7/16″ wrench, loosen the tension nut on the threaded shaft. Turn it counter-clockwise exactly 5 to 6 full turns to safely release the tension.
Once the belt is slack, slide it off the motor pulley at the back, and carefully unhook it from the trolley carriage. Take a photo of the routing path with your smartphone before removing it entirely; this will be your visual guide later.
Step 3: Route and Install the New Belt
Unbox your new Genie belt. It is crucial to buy the exact part number for your rail length (e.g., part #39354R.S for 8-foot doors or #39355R.S for 7-foot doors).
Loop the new belt over the front idler pulley, thread it through the trolley carriage, and wrap it securely around the motor sprocket at the back of the unit.
Understanding the basic mechanics of a garage door opener helps you appreciate why this routing must be perfectly aligned to prevent the belt from twisting during heavy lifts.
Step 4: Reapply Tension and Align
Reconnect the belt to the trolley carriage. Now, turn the tension nut clockwise using your wrench.
Stop tightening when the belt sits exactly 1/4 inch to 1/2 inch above the base of the rail at the center point. Do not overtighten, as this will strain the motor bearings and lead to premature failure.
Step 5: Test and Lubricate
Plug the unit back into the power outlet. Re-engage the trolley by pulling the release handle toward the motor.
Press your wall button and observe a full open-and-close cycle. Note: Never use standard WD-40 or heavy grease on a polyurethane belt. If your manual requires lubrication, use only a specialized synthetic belt dressing.
Belt Drive vs. Chain Drive: Pros and Cons Comparison
If you are wondering why Genie uses belts, or if you should upgrade your system entirely, here is a quick comparison table to help you understand the benefits of your current setup.
| Feature | Belt Drive Openers | Chain Drive Openers |
|---|---|---|
| Noise Level | Ultra-quiet (Ideal for attached bedrooms) | Loud and clunky |
| Durability | High (Lasts 10-15 years with care) | Extremely high (Metal on metal) |
| Maintenance | Requires occasional tension checks | Requires regular grease lubrication |
| Cost | Slightly higher upfront cost | Budget-friendly |
| Weather Performance | Excellent in all climates | Can contract/expand in extreme cold |
Common Mistakes to Avoid During Replacement
Even seasoned DIYers can make a few errors when tackling this project. Avoid these pitfalls to ensure a lasting repair:
- Skipping the Safety Lock: Always lock the door or use C-clamps on the tracks below the door rollers. This prevents the heavy door from crashing down while the trolley is disconnected.
- Using the Wrong Belt Size: A belt meant for a 7-foot door will not fit an 8-foot door rail. Always verify the model number on the back of your motorhead before ordering parts.
- Ignoring the Sprocket: If your old belt snapped violently, it might have damaged the motor sprocket teeth. Inspect the gear for wear before installing the new belt.
Frequently Asked Questions (FAQ)
1. How much does it cost to replace a Genie garage door belt?
A genuine Genie replacement belt kit typically costs between $45 and $85, depending on your specific model and rail length. If you hire a professional technician, expect to pay an additional $120 to $180 for labor and a service call fee.
2. Do I need to reprogram my Genie opener after replacing the belt?
No, you do not need to reprogram your remotes or keypads simply for replacing the belt. The logic board retains its memory. However, you will need to readjust the “open” and “close” travel limit settings on the motor unit if the door stops too early or reverses before hitting the floor.
3. Can a loose belt damage the garage door opener motor?
Yes. A loose belt causes the motor sprocket to spin without gripping the belt teeth properly. This “slipping” creates excessive heat and friction, which can strip the sprocket gears or burn out the internal motor capacitor over time.
4. How long does a Genie garage door opener belt last?
Under normal residential conditions (2 to 4 cycles per day), a high-quality polyurethane belt will last anywhere from 10 to 15 years. Extreme temperature fluctuations and lack of maintenance can reduce this lifespan to about 7 years.
5. Is it better to replace the belt or buy a new opener?
If your motor still runs quietly and the logic board is functioning, replacing the belt is highly cost-effective. However, if your opener is over 15 years old, lacks modern safety sensors, or the motor is humming loudly, it is time to invest in a new, smart-enabled Genie opener.
Conclusion
Mastering how to replace belt on Genie garage door opener is an empowering skill that saves you money, eliminates annoying noise, and keeps your family safe. By following the precise tension measurements and safety protocols outlined above, you ensure your garage operates smoothly for another decade.
Did you find this guide helpful? Don’t keep this knowledge to yourself! Share this article on your Facebook or Twitter to help a friend or neighbor fix their noisy garage door today. Drop a comment below if you have any questions about your specific Genie model!



Leave a Reply