Introduction
Is your garage door opener grinding loudly, humming without moving, or failing to lift the door entirely? You are likely dealing with worn-out internal components, and learning how to replace drive gear on garage door opener systems is the most cost-effective solution to restore functionality. This common mechanical failure can be intimidating, but with the right guidance and safety precautions, you can complete this repair yourself and save hundreds of dollars on professional service calls.
Why Does My Garage Door Opener Drive Gear Fail?
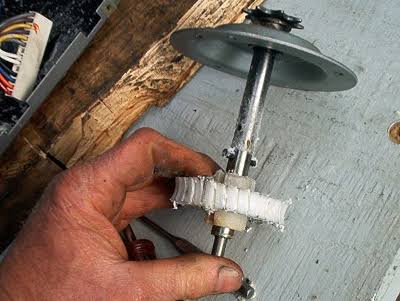
Before grabbing your screwdriver, it is vital to understand why this component fails. The drive gear (often called the main gear or worm gear) is typically made of engineered plastic or nylon. Manufacturers design these gears as “sacrificial” components. According to general mechanical engineering principles documented on Wikipedia, sacrificial parts are intentionally designed to fail before more expensive metal components like the motor shaft or chain drive sprocket.
Common Causes of Premature Wear
- Lack of Lubrication: Metal-on-plastic friction generates excessive heat, melting the gear teeth over time.
- Door Imbalance: If your springs are not properly tensioned, the opener works twice as hard, accelerating gear wear.
- Age and Cycle Count: Most residential openers have a lifespan of 10–15 years or roughly 10,000 cycles. Plastic degrades naturally over this period.
- Extreme Temperatures: Uninsulated garages in freezing climates can make nylon gears brittle and prone to cracking.
Expert Insight: “If your opener is over 12 years old and the gear strips, consider replacing the entire unit rather than just the gear. Newer models offer DC motors, battery backup, and smart connectivity that older AC units lack.” — Certified Garage Door Technician Consensus
Signs You Need a Drive Gear Replacement
Not every garage door issue points to a bad gear. Use this checklist to confirm your diagnosis before purchasing parts:
| Symptom | Likely Cause | Action Required |
|---|---|---|
| Motor hums, door doesn’t move | Stripped drive gear | Replace gear |
| Loud grinding/rattling noise | Worn gear teeth or bearing | Inspect & replace gear |
| Door reverses mid-travel | Sensor misalignment or limit switch | Adjust sensors/limits first |
| Complete silence, no lights | Logic board or capacitor failure | Electrical troubleshooting |
| Smooth operation, loud squeak | Dry rollers or hinges | Lubricate hardware only |
Key Takeaway: If the motor runs audibly but the trolley does not travel along the rail, you have almost certainly confirmed the need for a gear replacement.
Tools and Parts You Will Need
Preparation prevents frustration. Gather these items before starting:
- Replacement Gear Kit: Ensure it matches your exact model number (e.g., LiftMaster 41A2817, Genie 36179R.S).
- Socket Set & Wrenches: Typically 7/16” and 1/2” for mounting bolts.
- Phillips & Flathead Screwdrivers: For housing covers and electrical connections.
- Punch Pin or Small Nail: To remove the roll pin securing the gear to the shaft.
- Hammer: Light taps only.
- White Lithium Grease: Specifically formulated for garage door openers (never use WD-40).
- Safety Glasses & Gloves: Metal shavings and spring tension pose real hazards.
- Stepladder: Stable platform for overhead work.
Step-by-Step: How To Replace Drive Gear On Garage Door Opener
Follow these instructions precisely. Rushing this process can damage the motor assembly or cause personal injury.
Step 1: Disconnect Power and Secure the Door
Unplug the opener from the ceiling outlet. Do not rely solely on the wall switch. Pull the emergency release cord to disengage the trolley, then manually lower the door to the fully closed position. Lock the door tracks with vise grips below the bottom roller to prevent accidental movement while you work overhead.
Step 2: Remove the Opener Cover
Locate the screws securing the outer housing (usually 4–6 screws on the top and sides). Carefully lift the cover away. Some models have wiring harnesses attached to the cover; if so, gently disconnect them and set the cover aside safely.
Step 3: Access the Drive Gear Assembly
Remove the sprocket cover or gear housing plate. You will see the main drive gear meshed with the smaller worm gear on the motor shaft. Take a photo at this stage for reassembly reference. Note the orientation of washers, spacers, and the thrust bearing.
Step 4: Remove the Old Gear
Use your punch pin and hammer to tap out the roll pin that secures the gear to the shaft. Support the shaft from behind to avoid bending it. Slide the old gear off. Inspect the worm gear on the motor shaft closely. If its teeth are also worn, chipped, or shiny-smooth, you must replace both gears simultaneously. Installing a new plastic gear against a damaged metal worm gear will destroy the new part within weeks.
Step 5: Clean and Inspect Internal Components
Wipe away old grease, plastic debris, and metal filings from the gear chamber. Check the thrust bearing and washer stack for wear. Replace any pitted or cracked bearings now—they cost less than $5 and prevent future callbacks.
Step 6: Install the New Drive Gear
Slide the new gear onto the shaft in the exact same orientation as the old one. Align the roll pin holes perfectly. Tap the new roll pin into place until it is flush and secure. Apply a generous bead of white lithium grease to all gear teeth and contact surfaces. Do not skip this step—dry installation guarantees premature failure.
Step 7: Reassemble and Test
Reinstall the gear housing plate, ensuring all alignment marks match. Reconnect any wiring harnesses and replace the outer cover. Remove the vise grips from the track. Plug the opener back in. Operate the door through 3–4 complete cycles while observing and listening. The operation should be smooth and quiet. If binding occurs, immediately stop and recheck gear alignment.
Step 8: Reset Travel Limits and Force Settings
New gears may slightly alter the trolley’s resting position. Consult your owner’s manual to readjust the up/down travel limits and force sensitivity. Modern openers often require a “learn” cycle after gear replacement to recalibrate properly.
Critical Safety Warnings
- Never bypass safety sensors during testing. They exist to prevent crushing injuries.
- Avoid touching capacitor terminals even after unplugging. Capacitors store lethal charge. Discharge them with an insulated screwdriver across terminals before handling internal components.
- Do not adjust torsion springs as part of this repair. Spring adjustment requires specialized tools and training; hire a professional for spring work.
- Work with a partner when possible. Overhead repairs at height carry fall risk.
Frequently Asked Questions (FAQ)
How long does it take to replace a drive gear on a garage door opener?
For a moderately experienced DIYer, the process typically takes 60–90 minutes. First-timers should budget 2–3 hours to account for careful disassembly, cleaning, and reassembly verification. Professional technicians usually complete the job in under 45 minutes due to familiarity and specialized tools.
Is it worth replacing just the gear, or should I buy a new opener?
If your opener is under 10 years old and otherwise functional, gear replacement ($25–$45 for parts) is absolutely worthwhile. However, if the unit exceeds 12–15 years, lacks modern safety features, or has multiple failing components, investing in a new belt-drive or DC motor opener ($250–$400 installed) offers better long-term value, quieter operation, and improved safety compliance.
What type of grease should I use on the new drive gear?
Use only white lithium grease specifically labeled for garage door openers. Avoid petroleum-based greases, silicone spray, or WD-40, as these can degrade nylon gears or attract dust that accelerates wear. Apply grease to all tooth surfaces and the thrust bearing interface during installation.
Can a stripped drive gear damage my garage door opener motor?
Yes, indirectly. When the gear strips, the motor continues to run under load without moving the door, causing overheating. Prolonged operation in this state can burn out the motor windings or damage the capacitor. Always address grinding noises immediately to prevent cascading failures that turn a $30 gear fix into a $300 motor replacement.
Why did my new drive gear fail so quickly?
Premature failure usually stems from three causes: (1) installing a new gear against a worn worm gear without replacing both, (2) insufficient lubrication during installation, or (3) an unbalanced door placing excessive strain on the opener. Always balance your door manually before gear replacement—the door should stay in place when lifted halfway by hand.
Conclusion
Learning how to replace drive gear on garage door opener systems empowers you to maintain one of your home’s most-used mechanical systems safely and affordably. By following this detailed guide, using proper lubrication, and respecting safety protocols, you can extend your opener’s life by another decade while avoiding costly service calls. Remember: patience during reassembly and thorough inspection of mating components are what separate lasting repairs from repeat failures.
Found this guide helpful? Share it with a friend or neighbor tackling their own garage door repair! Tag us on social media with your before-and-after photos—we love celebrating successful DIY wins. Safe repairing! 🛠️



Leave a Reply