Introduction
There are few sounds more frustrating for a homeowner than the loud, grinding screech of a failing garage door opener, signaling that your daily routine is about to be disrupted. If you are searching for how to replace gear on Craftsman garage door opener models, you are likely dealing with worn-out nylon teeth that have stripped over years of reliable service. This comprehensive guide will walk you through the repair process safely and efficiently, helping you restore quiet, smooth operation without the expense of a professional service call.
Why Do Gears Fail in Craftsman Openers?
Before grabbing your screwdriver, it is vital to understand why this failure occurs. According to mechanical engineering principles documented on Wikipedia, gears are rotating machine parts having cut teeth which mesh with another toothed part to transmit torque. In Craftsman openers, manufacturers intentionally use nylon (plastic) gears rather than steel for the main drive sprocket.
This is not a design flaw; it is a safety feature. The nylon gear acts as a sacrificial component. If the garage door becomes obstructed or the springs fail, the plastic gear strips before the expensive motor burns out or the chain snaps. Typically, these gears last between 10 to 15 years depending on usage cycles and climate conditions.
Signs Your Gear Needs Replacement
- Grinding Noise: A distinct “rrr-rrr” sound when the motor runs but the door doesn’t move.
- Motor Runs, Door Stays: The hum of electricity is present, but no mechanical engagement occurs.
- Plastic Shavings: Finding white dust or debris near the opener housing.
- Intermittent Movement: The door jerks or moves only partially before stopping.
Essential Tools and Safety Precautions
Safety must be your primary concern when learning how to replace gear on Craftsman garage door opener units. Garage doors are heavy, and openers contain high-tension springs and electrical components.
Required Tool List
| Tool | Purpose |
|---|---|
| Phillips & Flathead Screwdrivers | Removing housing covers and brackets |
| 7/16″ Socket & Ratchet | Loosening sprocket nuts and motor bolts |
| Hammer & Punch | Driving out roll pins from the shaft |
| Lithium-Based Grease | Lubricating new gear assembly |
| Safety Glasses | Protecting eyes from metal shavings/debris |
| Stepladder | Safe access to ceiling-mounted unit |
| Locking Pliers (Vise-Grips) | Holding shaft steady during pin removal |
Critical Safety Warnings
⚠️ DANGER: Always unplug the garage door opener from the power outlet before beginning any work. Never bypass safety sensors or attempt to adjust torsion springs yourself; those require certified professionals.
Step-by-Step: How To Replace Gear On Craftsman Garage Door Opener
Follow this detailed tutorial to complete the repair in approximately 45 to 90 minutes. Precision matters here; rushing can lead to misalignment and premature wear.
1. Disconnect Power and Release Tension
Unplug the unit. Pull the emergency release cord (usually red) to disengage the trolley from the chain/belt. Manually lower the garage door to the fully closed position. This removes tension from the opener carriage, making disassembly safer and easier.
2. Remove the Opener Cover
Use your Phillips screwdriver to remove the four to six screws securing the outer housing. Carefully lift the cover off. You may need to disconnect the light lens or wiring harness clips depending on your specific Craftsman model. Set screws aside in a magnetic tray to prevent loss.
3. Extract the Old Sprocket Assembly
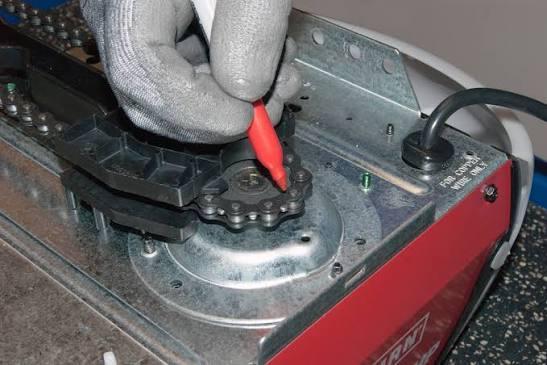
Locate the main drive sprocket connected to the motor shaft. Use a hammer and punch to drive out the roll pin securing the sprocket to the shaft. This is often the most challenging step; apply firm, controlled strikes. Once the pin is removed, slide the old sprocket and bearing plate off the shaft. Inspect the shaft for burrs or damage; file smooth if necessary.
4. Install the New Gear and Sprocket
Apply a thin layer of lithium-based grease to the motor shaft. Slide the new bearing plate and sprocket onto the shaft, ensuring proper orientation (teeth facing the correct direction as indicated in your kit’s instructions). Align the hole in the sprocket with the hole in the shaft. Insert the new roll pin (never reuse the old one) and tap it flush with the hammer and punch.
5. Reassemble and Lubricate
Reattach any brackets or limit switch assemblies you removed during disassembly. Apply the provided grease generously to the new nylon gear teeth and the mating worm gear on the motor shaft. Do not use petroleum-based grease, as it degrades nylon over time. Reinstall the housing cover and secure all screws snugly but do not overtighten.
6. Test and Adjust Limits
Plug the opener back in. Operate the door using the wall button (not the remote, initially). Listen for smooth, quiet engagement. If the door does not open or close fully, adjust the travel limit screws on the side of the unit according to the manufacturer’s markings. Re-engage the trolley with the chain/belt and test the auto-reverse safety feature by placing a 2×4 board under the door.
Pros vs. Cons: DIY Gear Replacement vs. Professional Service
Understanding the trade-offs helps you make an informed decision about tackling how to replace gear on Craftsman garage door opener repairs yourself.
| Factor | DIY Replacement | Professional Service |
|---|---|---|
| Cost | $25–$45 (gear kit only) | $150–$300 (parts + labor) |
| Time Investment | 1–2 hours | 30–60 minutes (after arrival) |
| Skill Level Required | Intermediate mechanical aptitude | None (handled by technician) |
| Warranty | Parts only (typically 1 year) | Labor + parts warranty |
| Risk Factor | Moderate (electrical/mechanical) | Minimal (insured professional) |
| Long-Term Value | High savings, skill acquisition | Convenience, guaranteed result |
Frequently Asked Questions (FAQ)
How long does a Craftsman garage door opener gear typically last?
Under normal residential use (3–5 cycles per day), nylon drive gears typically last 10 to 15 years. Heavy commercial use, extreme temperatures, or improperly balanced doors can reduce lifespan to 5–7 years. Regular lubrication with appropriate grease extends longevity significantly.
Can I replace just the nylon gear without replacing the sprocket?
While technically possible on some older models, it is strongly recommended to replace the entire sprocket-and-gear assembly. The bearing surfaces and shaft interfaces wear simultaneously; installing a new gear on a worn sprocket leads to rapid re-failure. Complete kits cost only marginally more and ensure reliable performance.
What type of grease should I use on the new gear?
Use only white lithium grease or silicone-based garage door lubricant specifically rated for nylon/plastic gears. Avoid WD-40, petroleum jelly, or automotive axle grease, as these chemically degrade nylon and attract excessive dust. Most replacement kits include the correct lubricant.
My opener still makes noise after gear replacement—what’s wrong?
Post-replacement noise usually indicates one of three issues: (1) insufficient lubrication on gear teeth, (2) misaligned sprocket causing binding, or (3) worn motor bearings unrelated to the gear. Re-check alignment, add grease, and listen carefully to isolate the sound source. If the motor itself growls, the motor bearings may need replacement.
Is it worth replacing the gear on a 20-year-old opener?
Generally, no. Modern openers feature DC motors, battery backup, Wi-Fi connectivity, and quieter belt-drive systems. If your unit exceeds 15–18 years, invest in a new opener rather than sinking money into obsolete technology. The gear replacement makes sense primarily for units under 12 years old that are otherwise functional.
Do I need to reprogram my remotes after replacing the gear?
No. Gear replacement is purely mechanical and does not affect the logic board, radio frequency settings, or security codes. Your remotes, keypads, and smart home integrations will function exactly as before. However, you will likely need to readjust the travel limits and force settings after reassembly.
Conclusion
Learning how to replace gear on Craftsman garage door opener systems is a rewarding DIY project that saves significant money while extending the life of a reliable piece of equipment. By following this step-by-step guide, prioritizing safety, and using quality replacement parts, you can restore your garage door’s smooth, quiet operation in under two hours. Remember: patience during reassembly and proper lubrication are the keys to long-term success.
Found this guide helpful? Share it with fellow homeowners on Facebook, Pinterest, or your neighborhood Nextdoor group who might be struggling with the same grinding opener woes. Tag a friend who loves DIY projects, and don’t forget to bookmark this page for future maintenance reference. Your garage—and your ears—will thank you!



Leave a Reply