Introduction
There are few things more frustrating than pressing your remote and hearing nothing but silence from your garage. If you have already ruled out dead batteries and sensor misalignment, you are likely wondering how to replace logic board on garage door opener units to restore normal operation. This guide provides a safe, comprehensive walkthrough designed for US homeowners who want to save hundreds of dollars on service calls while adhering to modern safety standards.
Replacing the circuit board is often the most cost-effective solution when an opener has power but refuses to respond to commands. By following this tutorial, you can diagnose the issue accurately and perform the swap with confidence, ensuring your home remains secure and accessible.
What Is a Garage Door Opener Logic Board?
Before grabbing a screwdriver, it is vital to understand what component you are actually replacing. The logic board serves as the “brain” of your garage door opener system. It processes signals from your remote controls, wall consoles, and safety sensors, translating them into mechanical actions like opening, closing, or stopping the motor.
According to technical documentation referenced in Wikipedia’s article on garage door openers, modern residential openers utilize complex microprocessor-based control systems that manage variable speed, soft start/stop features, and rolling code security. When this board fails due to power surges, age, or moisture, the entire system becomes unresponsive even if the motor capacitor and gears are perfectly functional.
Signs Your Logic Board Has Failed
- No Response to Remotes: New batteries do not resolve the issue.
- Wall Console Works, Remotes Don’t: Indicates a receiver failure on the board.
- Erratic Behavior: Door opens partially, reverses randomly, or lights flash without command.
- Burnt Smell or Visible Damage: Scorch marks or swollen capacitors on the PCB.
- Age Factor: Units older than 10–15 years frequently experience board degradation.
Safety First: Critical Precautions Before Starting
Working with electrical components requires strict adherence to safety protocols. Garage door openers operate on standard US household voltage (120V AC), which can be lethal. Additionally, the torsion spring system stores immense kinetic energy and should never be adjusted during this repair.
Essential Safety Checklist
- Disconnect Power: Unplug the unit from the ceiling outlet and turn off the dedicated circuit breaker.
- Discharge Capacitors: Wait at least 5 minutes after unplugging to allow stored energy to dissipate.
- Use Insulated Tools: Prevent accidental shorts or shocks.
- Secure the Door: Clamp the door to the track with locking pliers to prevent unexpected movement.
- Anti-Static Protection: Wear an ESD wrist strap to prevent damaging the new board before installation.
Expert Note: According to the Consumer Product Safety Commission (CPSC), approximately 30,000 garage door-related injuries occur annually in the US. Always prioritize electrical isolation over speed. If you are uncomfortable working near live wiring, hire a licensed technician.
Tools and Parts You Will Need
Gathering the correct materials beforehand prevents mid-repair delays. Compatibility is crucial; using the wrong board can damage your motor or void warranties.
| Item | Specification/Notes | Estimated Cost (USD) |
|---|---|---|
| Replacement Logic Board | Exact OEM part number match | $85 – $160 |
| Phillips Screwdriver | #2 size, magnetic tip preferred | N/A |
| Nut Driver Set | 1/4″ and 5/16″ common sizes | N/A |
| Needle-Nose Pliers | For wire connectors and harness clips | N/A |
| Smartphone/Camera | Document wiring configuration | Free |
| ESD Wrist Strap | Protects sensitive electronics | $8 – $15 |
| Multimeter (Optional) | Verify power is truly off | $20 – $40 |
Pro Tip: Locate your opener’s model number on the back panel near the light lens. Search this exact number plus “logic board” to ensure compatibility. Generic boards may fit physically but lack proper firmware calibration for safety reversal tests.
Step-by-Step: How To Replace Logic Board On Garage Door Opener
Follow these detailed instructions carefully. Allocate 45–90 minutes for first-time replacements.
Step 1: Access the Motor Head Assembly
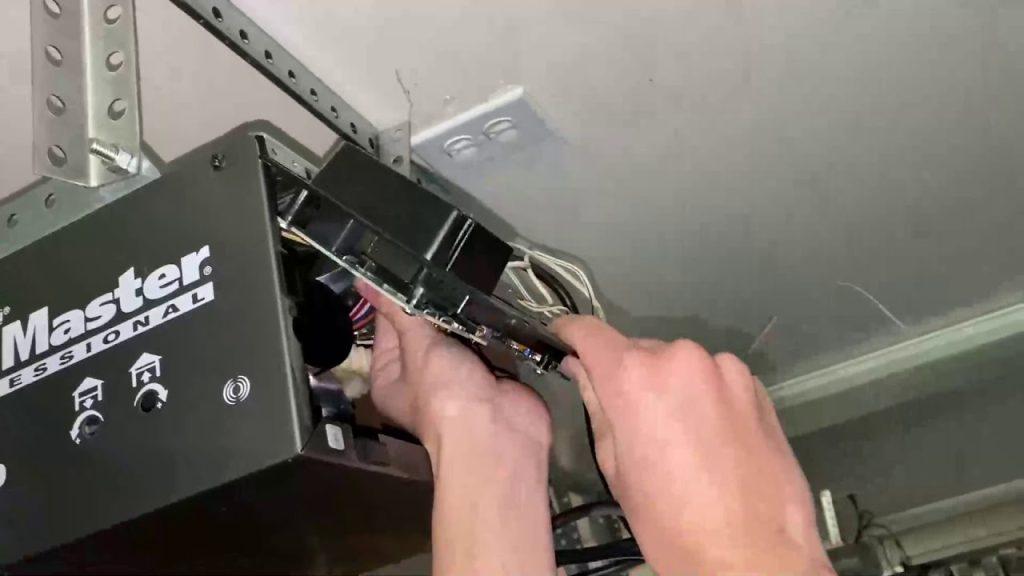
Remove the outer cover of the opener by unscrewing the retaining screws (typically 4–6). Some models use snap-fit tabs; gently pry with a flathead if needed. Set aside all hardware in a magnetic tray to avoid losing small screws inside the housing.
Step 2: Document Existing Wiring Configuration
This step is non-negotiable. Take clear, well-lit photos of every wire connection, noting color coding and terminal positions. Label wires with painter’s tape if colors are faded. Modern boards have multiple harnesses for safety sensors, wall buttons, travel limit switches, and accessory ports. Miswiring can cause immediate failure or unsafe operation.
Step 3: Disconnect All Electrical Connections
Carefully release each wire harness clip. For screw-terminals, loosen completely and pull wires straight out. Avoid yanking, as aged insulation can crack. If your unit has a backup battery, disconnect it first to eliminate residual current paths.
Step 4: Remove the Old Logic Board
Unscrew the mounting brackets securing the board to the chassis. Note any standoffs or spacers beneath the board—these must transfer to the new unit to prevent short circuits against the metal housing. Gently lift the old board out, checking for hidden ribbon cables or ground straps.
Step 5: Install the New Logic Board
Position the replacement board onto existing standoffs. Secure with original screws, tightening snugly but not overtightened (plastic housings crack easily). Reconnect all wire harnesses according to your reference photos. Double-check every connection before proceeding.
Step 6: Reassemble and Initial Power Test
Replace the outer cover loosely (do not fully tighten yet). Restore power at the breaker and plug in the unit. Observe indicator LEDs: most brands show a steady green or amber light indicating successful boot. Listen for unusual buzzing or clicking sounds that suggest wiring errors.
Step 7: Reprogram Remotes and Safety Sensors
New boards reset to factory defaults. Follow manufacturer instructions to sync remotes and keypads. Crucially, test the photo-eye sensors immediately: place an object in the beam path while closing; the door must reverse within 2 seconds. Adjust travel limits and force settings per manual specifications to meet UL 325 safety compliance.
Step 8: Final Verification and Cleanup
Cycle the door through 5 complete open/close sequences. Confirm smooth operation, proper reversal sensitivity, and consistent remote range. Once verified, fully secure the cover and dispose of the old board responsibly at an e-waste facility.
Troubleshooting Common Post-Replacement Issues
Even with careful installation, problems can arise. Use this diagnostic table before calling a professional:
| Symptom | Likely Cause | Solution |
|---|---|---|
| Door moves 6 inches then stops | Travel limits not set | Reprogram up/down limits per manual |
| Remote works intermittently | Antenna wire damaged/pinched | Inspect antenna routing; re-solder if broken |
| Lights flash 5 times | Sensor obstruction/misalignment | Clean lenses; realign brackets; check wiring |
| Motor hums but no movement | Capacitor not connected properly | Verify capacitor leads seated on new board |
| No LED indicators after power | Blown fuse on new board | Check incoming voltage; inspect board for shipping damage |
Frequently Asked Questions (FAQ)
How much does it cost to replace a garage door opener logic board professionally?
Professional service typically ranges from $200 to $350 including parts and labor in the US market. DIY replacement saves $100–$200 but requires comfort with electrical work. Always get itemized quotes to compare against OEM part pricing.
Can I repair a logic board instead of replacing it?
While theoretically possible for skilled electronics technicians, repair is rarely recommended for consumers. Surface-mount components require specialized equipment, and repaired boards lack reliability guarantees. Replacement ensures warranty coverage and certified safety compliance.
How long do garage door opener logic boards last?
Average lifespan is 10–15 years, though power surges can cause premature failure. Installing a whole-home surge protector or dedicated GFCI outlet can extend board life significantly. Units in humid climates may degrade faster due to corrosion.
Will replacing the logic board fix my garage door opener?
Only if the board is confirmed faulty. Diagnose thoroughly first: test outlets, inspect wiring, verify sensor alignment, and check gear/sprocket condition. Replacing a good board won’t solve mechanical failures or external electrical issues.
Do I need to reprogram everything after replacement?
Yes, absolutely. New boards erase all paired devices and custom settings. Budget 15–20 minutes for reprogramming remotes, keypads, and smart home integrations. Keep your owner’s manual accessible or download the PDF version beforehand.
Is it safe to bypass safety sensors temporarily while testing?
Never bypass safety sensors. This violates federal regulations and creates severe entrapment hazards. If sensors malfunction, diagnose the root cause (wiring, alignment, board output) rather than circumventing protection. Safety systems exist for critical reasons.
Conclusion: Restore Your Garage Door Confidence Today
Learning how to replace logic board on garage door opener systems empowers you to maintain one of your home’s most-used mechanical systems independently. Beyond saving significant money, you gain valuable troubleshooting skills applicable to future repairs. Remember: patience, documentation, and safety always trump speed when working with electrical garage components.
Your newly restored opener should provide reliable service for another decade when installed correctly. Did this guide help you successfully complete the repair? Share your experience or questions in the comments below, and don’t forget to share this article on social media to help fellow homeowners tackle this common challenge confidently!
Disclaimer: This content is for educational purposes only. Garage door opener repair involves electrical and mechanical hazards. Always consult your manufacturer’s manual and consider professional assistance if uncertain. Compliance with local building codes and UL 325 safety standards is the homeowner’s responsibility.



Leave a Reply