Introduction
There are few things more frustrating than pressing your garage door remote repeatedly while sitting in a rainstorm, only to have nothing happen. If you own an older model opener, understanding how to set dip switches on garage door opener units is the key to restoring seamless access and maintaining home security. This comprehensive guide will walk you through the process with empathy and precision, helping you troubleshoot and sync your system without the need for expensive service calls.
What Are Dip Switches and Why Do They Matter?
Before diving into the tutorial, it is essential to understand what these tiny components actually do. Dip switches (Dual In-line Package switches) are small, manual toggle switches located inside both your garage door opener motor unit and your handheld remote. They function as a physical binary code generator.
Unlike modern “rolling code” technology that changes frequencies with every use, dip switches rely on a fixed pattern of “On” and “Off” positions. According to technical documentation referenced on Wikipedia, these electromechanical devices have been used since the 1970s to configure hardware parameters. For garage doors, they create a unique frequency signature. If the pattern on the remote does not match the pattern on the motor unit exactly, the door will not respond.
Why this matters for you:
- Security: A mismatched or default setting can leave your garage vulnerable to neighbors’ remotes or bad actors using universal scanners.
- Functionality: Proper alignment ensures consistent signal reception.
- Longevity: Correctly setting switches prevents motor strain caused by partial signal recognition.
Safety First: Pre-Programming Checklist
Working with electrical appliances requires caution. Before you learn how to set dip switches on garage door opener systems, complete this safety checklist:
- Disconnect Power: Unplug the opener or turn off the circuit breaker to prevent accidental activation while your hands are near moving parts.
- Use Proper Lighting: The motor housing is often dark; use a headlamp or flashlight rather than holding a phone in one hand.
- Stable Ladder: Ensure your stepladder is on level ground before climbing to reach the ceiling-mounted unit.
- Non-Conductive Tools: Use a plastic stylus, ballpoint pen tip, or small flathead screwdriver to avoid shorting circuits.
- Document Current Settings: Take a photo of existing switch positions before making changes, just in case you need to revert.
Expert Note: Never adjust dip switches while the unit is powered on. While the voltage is low, accidental contact with other components can damage the logic board or cause injury.
Step-by-Step: How To Set Dip Switches On Garage Door Opener
Follow these detailed instructions to synchronize your remote and motor unit. This process applies to most legacy brands including LiftMaster, Chamberlain, Craftsman, and Genie models manufactured before 1996.
Step 1: Locate the Dip Switches on the Motor Unit
Remove the light lens cover or the main housing cover of your garage door opener. Look for a row of 8 to 12 tiny sliding switches. They are typically colored red, blue, or black and may be labeled “Code,” “Frequency,” or simply numbered 1–12.
- 8-Switch Units: Offer 256 possible combinations.
- 9-Switch Units: Offer 512 possible combinations.
- 12-Switch Units: Offer 4,096 possible combinations (most secure for legacy systems).
Step 2: Access the Remote Control Switches
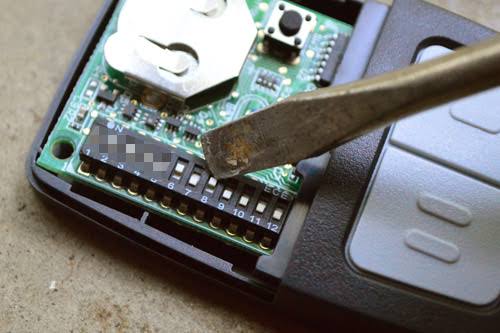
Open your handheld remote’s battery compartment. You may need to remove a small screw or slide a latch. Inside, you will find a matching bank of dip switches. Some newer-style remotes for older openers may have internal jumpers instead of visible sliders; consult your specific manual if the layout differs.
Step 3: Choose a New Code Pattern
Do not use factory defaults. Many openers ship with all switches in the “down” or “off” position, which is the first combination thieves try. Create a random pattern:
| Switch Position | Recommended Action | Security Level |
|---|---|---|
| All Up / All Down | Avoid Completely | Very Low |
| Alternating Pattern | Avoid (e.g., up-down-up) | Low |
| Random Mix | Recommended | High |
| Matches Neighbor | Check & Change Immediately | Critical Risk |
Example Secure Pattern for 9-Switch: Up, Down, Up, Up, Down, Down, Up, Down, Up.
Step 4: Match Both Units Exactly
Using your non-conductive tool, carefully slide each switch on the remote to match your chosen pattern. Then, climb to the motor unit and set those identical switches to the exact same positions. Precision is critical; even one misaligned switch will prevent operation.
Step 5: Test and Reassemble
- Replace all covers securely.
- Restore power to the opener.
- Stand at least 5 feet away and press the remote button.
- Observe the response: immediate activation indicates success. Delayed or intermittent response suggests a partially seated switch—recheck alignment.
Troubleshooting Common Dip Switch Issues
Even after learning how to set dip switches on garage door opener systems correctly, problems can persist. Here are solutions to frequent issues:
Remote Works Only When Very Close
- Cause: Weak battery or antenna wire issue.
- Fix: Replace remote battery first. If unresolved, check that the antenna wire hanging from the motor unit is fully extended and not touching metal surfaces.
Door Opens Randomly Without Input
- Cause: Frequency interference or duplicate code with neighbor.
- Fix: Reset to a completely new random pattern on both units. Consider upgrading to a rolling-code receiver kit if interference persists.
Remote LED Lights But Door Doesn’t Move
- Cause: Signal is transmitting but not being recognized.
- Fix: Verify every single switch position matches. Clean switch contacts with compressed air; dust buildup can create false readings.
Multiple Remotes Won’t Sync Simultaneously
- Cause: Each remote must individually match the motor unit.
- Fix: Program each remote separately to the same motor unit code. There is no “master sync” for dip switch systems.
FAQ: Your Top Questions Answered
Can I convert my dip switch opener to rolling code technology?
Yes, many manufacturers offer conversion kits that replace the internal receiver board with a modern rolling-code module. This allows you to keep your existing motor while gaining enhanced security and compatibility with smart home integrations. Installation typically takes 30–45 minutes and costs between $40–$80.
How often should I change my dip switch settings?
For security best practices, reset your dip switch codes annually or whenever you move into a new home, lose a remote, or experience suspicious activity. Unlike rolling codes, dip switches never change automatically, making periodic manual updates essential.
Are dip switch garage door openers still safe to use?
They provide basic functionality but lack modern encryption. If you live in a densely populated area or have valuable items in your garage, consider upgrading. However, with unique non-default codes and proper maintenance, they remain adequate for many homeowners in low-risk environments.
Why does my new universal remote not work with my old opener?
Universal remotes must specifically list compatibility with your opener’s brand and switch count. An 8-switch remote cannot communicate with a 12-switch receiver. Always verify the product specifications against your motor unit’s switch configuration before purchasing.
Can weather affect dip switch performance?
Extreme cold can make switch mechanisms stiff, leading to poor contact. Humidity may cause corrosion over decades. If you notice seasonal reliability issues, inspect switches for oxidation and apply a tiny amount of electronic contact cleaner.
Is it cheaper to repair dip switches or replace the entire opener?
If only the switches are faulty and the motor runs smoothly, cleaning or replacing the switch bank ($5–$15 part) is cost-effective. However, if your opener is over 20 years old, lacks safety reversal sensors, or shows motor wear, replacement ($200–$400 installed) offers better long-term value and safety compliance.
Conclusion
Mastering how to set dip switches on garage door opener systems empowers you to maintain secure, reliable access to your home without depending on costly technicians. By following this step-by-step guide, prioritizing safety, and choosing non-default code patterns, you extend the life of your equipment while protecting your property. Remember: consistency between remote and motor unit is everything, and annual code resets are your best defense against unauthorized access.
Found this guide helpful? Share it on Facebook, X (Twitter), or Pinterest to help fellow homeowners regain control of their garage security. Have a unique dip switch challenge we didn’t cover? Drop a comment below—we’d love to help you solve it!



Leave a Reply