Introduction
There are few things more frustrating than pulling into your driveway only to realize your automatic garage door isn’t responding, leaving you stranded outside or forcing you to manually lift a heavy door. If you have recently pulled the emergency release cord during a power outage or maintenance, knowing how to reconnect a garage door to the opener is an essential skill for every homeowner. This guide provides a safe, empathetic, and professional walkthrough to get your system running smoothly again without expensive service calls.
Why Did My Garage Door Disconnect From The Opener?
Before diving into the reconnection process, it is vital to understand why the disconnection occurred. The garage door opener system relies on a mechanical link between the motor’s trolley and the door itself. When this link is severed, the motor runs, but the door stays put.
The most common cause is the intentional pulling of the emergency release cord (usually a red handle hanging from the opener rail). This safety feature allows manual operation during power failures. However, other issues can mimic a disconnection:
- Broken Trolley Latch: The mechanical arm connecting the trolley to the door may be bent or snapped.
- Misaligned Sensors: Safety eyes may prevent the door from engaging even if mechanically connected.
- Worn Gears: Internal plastic gears in older openers can strip, causing slippage.
- Obstruction Detection: The door may have hit an object, triggering an auto-reverse that disengaged the clutch.
Expert Insight: According to industry safety standards outlined by the Consumer Product Safety Commission, modern openers are required to have auto-reverse mechanisms. Never bypass these safety features when attempting to reconnect your system, as doing so poses significant injury risks.
Safety First: Pre-Reconnection Checklist
Garage doors are the largest moving object in your home and operate under high spring tension. Before learning how to reconnect a garage door to the opener, complete this safety audit:
- Disconnect Power: Unplug the opener or turn off the circuit breaker to prevent accidental activation while your hands are near moving parts.
- Inspect Springs: Look for gaps in torsion springs or frayed cables. Do not proceed if springs appear damaged; call a professional immediately.
- Clear the Area: Remove vehicles, tools, pets, and children from the door’s path.
- Test Manual Balance: Lift the door halfway manually. It should stay in place. If it falls or rises on its own, the springs are unbalanced and unsafe for automatic operation.
- Wear Protection: Use safety glasses and work gloves to protect against sharp metal edges and debris.
Step-by-Step: How To Reconnect A Garage Door To The Opener
This tutorial assumes you have a standard chain-drive or belt-drive opener with a trolley release mechanism. Always consult your specific model’s manual for variations.
Step 1: Close the Door Completely
The reconnection mechanism typically requires the door to be in the fully closed position. Manually lower the door until it sits flush with the floor. Ensure the track is clear of debris that might prevent full closure.
Step 2: Locate the Emergency Release Cord and Trolley
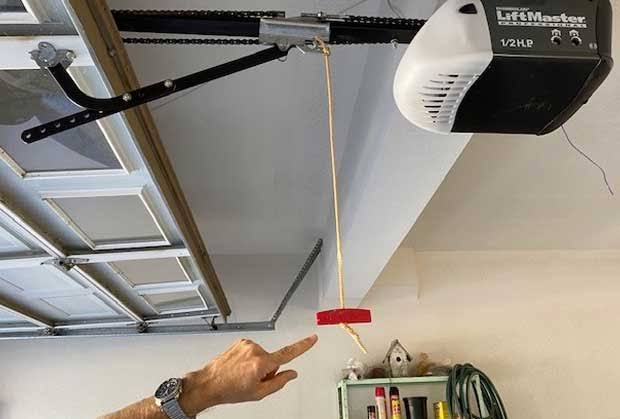
Find the red emergency release cord hanging from the opener rail near the motor unit. Identify the trolley (the moving part attached to the chain/belt) and the carriage (the part attached to the door’s top bracket). You will see a latch or lever mechanism where these two components meet.
Step 3: Align the Trolley With the Carriage
With the power still disconnected, gently pull the emergency release cord toward the motor unit while simultaneously sliding the trolley along the rail. Your goal is to align the trolley’s engagement slot directly over the carriage’s connecting pin or hook.
- For Chain/Belt Drives: Pull the release handle toward the motor until you hear or feel a distinct click. This indicates the latch has re-engaged.
- For Screw Drives: Slide the trolley until the internal clutch snaps back into the drive screw groove.
Step 4: Verify Mechanical Engagement
Tug firmly on the emergency release cord away from the motor. The trolley should not slide freely along the rail. If it moves independently of the door, the latch has not seated properly. Repeat Step 3, applying slightly more pressure until the connection is solid.
Step 5: Restore Power and Test
Plug the opener back in or restore breaker power. Press the wall button (not the remote, to avoid signal interference). Observe the first cycle closely:
- The trolley should move with the door immediately.
- Listen for grinding, clicking, or straining noises.
- Watch for smooth, even travel without jerking.
If the motor runs but the door doesn’t move, disconnect power immediately and re-inspect the latch alignment.
Step 6: Adjust Travel Limits and Force Settings
After reconnection, the opener may need recalibration. Most modern units have digital limit settings via buttons on the motor housing:
| Setting | Purpose | Adjustment Tip |
|---|---|---|
| Up Limit | Determines how far the door opens | Set so door opens fully without straining |
| Down Limit | Determines closing position | Door should seal evenly on floor |
| Force Sensitivity | Auto-reverse threshold | Test with 2×4 board; door must reverse on contact |
Refer to your opener’s manual for exact programming sequences, as these vary significantly by brand and model year.
Troubleshooting: When Reconnection Fails
Even after following the steps above, some homeowners find their door still won’t reconnect. Here are targeted solutions:
- Latch Won’t Click: The release lever may be bent. Inspect for visible deformation. Minor bends can sometimes be straightened with pliers, but replacement is safer.
- Door Reverses Immediately Upon Closing: Clean the safety sensor lenses with a soft cloth. Check for wire damage or misalignment. Even slight obstructions trigger reversal.
- Motor Hums But Doesn’t Move: Capacitor failure is likely in older units. This requires electrical testing and professional replacement.
- Excessive Noise After Reconnection: Lubricate rollers, hinges, and the opener rail with silicone-based garage door lubricant. Never use WD-40, which attracts dust and degrades components.
Frequently Asked Questions (FAQ)
Q1: Can I reconnect my garage door opener without pulling the emergency release cord?
Yes, if the disconnection was caused by an obstruction or power surge rather than manual release. Simply clearing the obstruction and resetting the opener (unplugging for 30 seconds) often restores function. However, if the trolley is visibly separated from the carriage, physical re-engagement via the release mechanism is necessary.
Q2: How often should I test my emergency release and reconnection mechanism?
Test monthly as part of routine maintenance. Pull the release cord, operate the door manually, then reconnect and test automatic function. Regular testing prevents corrosion or stiffness that could make emergency reconnection difficult during actual power outages.
Q3: Is it safe to reconnect a garage door opener myself if I’m not handy?
Basic reconnection via the emergency release cord is designed for homeowner use and requires no special tools. However, if you encounter broken parts, spring issues, or electrical problems, hire a certified technician. Garage door springs store lethal energy and should never be adjusted by untrained individuals.
Q4: Why does my garage door keep disconnecting after I reconnect it?
Repeated disconnection usually indicates worn components. Common culprits include a stretched chain/belt, damaged trolley latch, or misaligned tracks putting lateral stress on the connection. Have a professional inspect the entire system if this occurs more than once.
Q5: What’s the difference between reconnecting and resetting a garage door opener?
Reconnecting refers to restoring the mechanical link between trolley and door. Resetting involves clearing the opener’s electronic memory (remotes, keypads, travel limits). You may need to do both after a major malfunction, but they address entirely different systems.
Q6: Can smart garage door openers be reconnected differently?
Smart openers (Wi-Fi enabled) use the same mechanical reconnection process as traditional units. However, after physical reconnection, you may need to recalibrate via the companion app and update firmware. Always ensure Wi-Fi connectivity before testing smart features post-reconnection.
Conclusion: Restore Confidence In Your Garage Door
Knowing how to reconnect a garage door to the opener transforms a stressful breakdown into a manageable five-minute task. By prioritizing safety, understanding your specific opener type, and methodically following the re-engagement steps, you protect both your property and your family. Regular maintenance and monthly testing of the emergency release mechanism ensure this knowledge remains fresh when you need it most.
Remember, while DIY reconnection empowers homeowners, there is no shame in calling professionals for complex issues. Your safety always outweighs convenience.
Found this guide helpful? Share it with neighbors, friends, or family members who might face the same garage door dilemma! Tag us on social media with your successful reconnection stories or questions—we love celebrating DIY wins and helping communities stay safe. Together, we can keep garages functioning smoothly and homes secure. 💪🏠



Leave a Reply