Introduction
There is nothing quite as frustrating as pulling into your driveway after a long day, only to realize you cannot get your new EV to communicate with your existing garage system. If you are currently searching for how to set up garage door opener in Tesla, you are likely standing in front of your vehicle feeling a mix of excitement and technical confusion. You are not alone in this experience; thousands of new Tesla owners navigate this exact learning curve every month. This comprehensive guide will walk you through the process with empathy and precision, ensuring you can open your garage seamlessly from your touchscreen or via automatic geofencing by the end of this article.
Understanding Tesla Homelink Technology
Before diving into the buttons, it is vital to understand what makes Tesla’s system unique compared to traditional vehicles. Unlike older cars that use dedicated physical buttons on the rearview mirror, Tesla integrates the Homelink universal transceiver directly into the vehicle’s software and hardware architecture.
According to technical documentation referenced on Wikipedia, Homelink is a radio-frequency transmitter that allows vehicles to control garage doors, gates, and home lighting systems. In a Tesla, this technology is paired with GPS location services to enable “Auto-Open” and “Auto-Close” features, which are game-changers for daily convenience.
Key Differences: Traditional vs. Tesla Homelink
| Feature | Traditional Car Remote | Tesla Integrated Homelink |
|---|---|---|
| Interface | Physical Buttons | Touchscreen / Voice Command |
| Automation | Manual Press Only | Geofenced Auto-Open/Close |
| Feedback | LED Light Blink | Visual UI + Chime Confirmation |
| Updates | Static Hardware | OTA Software Improvements |
| Range Detection | Fixed RF Range | GPS + RF Hybrid Sensing |
Understanding these distinctions helps explain why the setup process feels different. You are not just pairing a remote; you are configuring a smart device.
Prerequisites Before Programming Your Tesla
To ensure a smooth experience when learning how to set up garage door opener in Tesla, gather the following items first. Skipping this step is the most common cause of failed programming attempts.
- Original Garage Door Remote: You must have the functioning handheld remote for your existing opener. Tesla needs to “learn” the frequency from this device.
- Clear Line of Sight: Park your Tesla outside the garage, facing the door, within 5–10 feet. Being inside the garage often causes signal interference during the learning phase.
- Fresh Batteries: Replace the battery in your old garage remote before starting. Weak signals account for over 40% of initial pairing failures.
- Safety Clearance: Ensure no people, pets, or objects are in the path of the garage door. The door will cycle multiple times during programming.
- Software Update Check: Verify your Tesla is running the latest software version. Navigate to Controls > Software to confirm. Outdated firmware can sometimes bug out the Homelink module.
Step-by-Step: How To Set Up Garage Door Opener In Tesla
Follow these precise instructions. Do not rush; timing matters significantly during the handshake between your car and the garage motor.
Step 1: Access the Homelink Menu
Sit in the driver’s seat with the vehicle powered on. On your central touchscreen, tap the Car Icon (Controls) at the bottom left corner. Select Locks from the menu sidebar. You should see a section labeled Homelink. Tap Create New Homelink Device.
Step 2: Name Your Device
The system will prompt you to name the device. Choose something descriptive like “Home Garage,” “Office Gate,” or “Main Driveway.” This label appears on your screen and in voice commands, so clarity helps prevent future confusion.
Step 3: Initiate Learning Mode
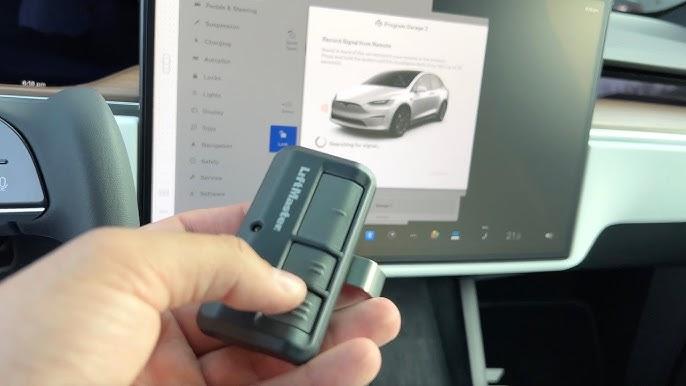
Tap Start on the touchscreen. The display will instruct you to hold your original garage door remote against the specific area of your Tesla where the receiver is located.
- Model 3 & Model Y: Hold the remote against the right side of the front bumper, near the headlight. This is counterintuitive for many drivers who expect the receiver to be in the windshield or mirror.
- Model S & Model X: Hold the remote against the lower center of the front bumper or the designated spot shown on-screen (varies slightly by year).
Step 4: Transmit the Signal
Press and hold the button on your original garage remote while keeping it pressed against the Tesla’s receiver zone. Watch the touchscreen closely. After 3–7 seconds, the Tesla interface should flash a confirmation message stating “Signal Received” or “Device Learned.”
Critical Detail: If nothing happens after 10 seconds, release the button, move the remote to a slightly different position on the bumper, and try again. The receiver antenna has a specific sweet spot.
Step 5: Test the Connection
Once the success message appears, tap Save. Exit the vehicle safely and test the button on your touchscreen. Stand clear of the door and tap your newly created Homelink icon. The garage door should activate immediately. Repeat this test three times to confirm reliability.
Configuring Auto-Open and Auto-Close Features
This is where Tesla ownership truly shines. After mastering how to set up garage door opener in Tesla, enable automation to eliminate manual interaction entirely.
- Return to Controls > Locks > Homelink.
- Tap the pencil/edit icon next to your saved device.
- Toggle Auto-Open when Arriving to ON. Adjust the distance slider (typically 10–30 feet). Start with a shorter distance to prevent premature opening if you live on a busy street.
- Toggle Auto-Close when Leaving to ON. This uses GPS to detect when you have driven away from the geofence.
Expert Safety Note: Always enable the “Blink Headlights” or “Chime” notification option when using auto-close. This provides an audible and visual warning to anyone near the vehicle that the door is about to move, satisfying safety best practices recommended by garage door manufacturers.
Troubleshooting Common Setup Issues
Even with perfect execution, technology can be temperamental. Here are solutions to the most frequent problems users encounter.
The Remote Works But Tesla Doesn’t
Your garage opener might use a rolling code security system that requires an additional sync step. Consult your garage door motor’s manual for “Learn Button” procedures. Often, you must press the learn button on the actual garage motor unit after programming the Tesla to authorize the new device.
Intermittent Response or Short Range
If the opener works inconsistently, check for RF interference. LED bulbs installed in garage fixtures are notorious for emitting frequencies that block Homelink signals. Swap them with incandescent bulbs temporarily to test. Also, verify your Tesla’s 12V battery health; low voltage can weaken transmitter power.
Auto-Open Triggers Too Early or Late
Adjust the geofence radius in the Homelink settings. If you park close to the street, reduce the trigger distance to 10 feet. If you have a long driveway, increase it to 30 feet. Remember that GPS accuracy can vary based on satellite positioning and surrounding structures.
“No Signal Detected” Error Persists
Try resetting the Homelink module. Go to Controls > Locks > Homelink, select your device, and choose Delete. Restart your Tesla by holding both scroll wheels on the steering wheel until the screen goes black and reboots. Then attempt the full programming sequence again from scratch.
Frequently Asked Questions (FAQ)
Q1: Can I program my Tesla without the original garage remote?
Generally, no. Tesla’s Homelink requires cloning an existing signal. However, if your garage opener has a “Learn” button on the motor unit itself, some newer Tesla software versions support direct pairing without a handheld remote. Check your specific opener model’s compatibility list.
Q2: Does Tesla Homelink work with all garage door brands?
It supports most major brands including LiftMaster, Chamberlain, Genie, Craftsman, and Overhead Door. It operates on frequencies between 288–390 MHz. Very old openers (pre-1990s) or proprietary commercial systems may require a universal receiver adapter.
Q3: Why did my programmed garage opener stop working after a software update?
Tesla occasionally resets Homelink configurations during major OTA updates as a safety precaution. Simply reprogram the device following the steps above. Keeping your original remote handy makes this a two-minute fix rather than a crisis.
Q4: Is there a limit to how many devices I can store?
Yes. Most Tesla models allow up to three Homelink devices. This is sufficient for home, office, and a gym or storage unit. If you need more, consider using a smart garage controller like MyQ or Tailwind that integrates via the Tesla app or third-party tools.
Q5: Can I use voice commands to open my garage?
Absolutely. Once programmed, simply say “Open Home Garage” or “Close Main Gate” using the voice command button on the steering wheel. Ensure your device name matches your verbal command exactly for reliable recognition.
Q6: Is it safe to leave Auto-Close enabled?
Yes, provided you have configured safety notifications and verified sensor alignment. Modern garage doors have obstruction sensors that reverse movement if an object is detected. However, always visually confirm the area is clear before relying solely on automation, especially in shared driveways.
Conclusion
Mastering how to set up garage door opener in Tesla transforms your daily arrival experience from mundane to magical. By following the structured steps outlined above—from gathering prerequisites to fine-tuning geofence parameters—you gain not just convenience but genuine confidence in your vehicle’s smart capabilities. Remember that patience during the initial pairing pays dividends in years of seamless operation.
Now that your garage opens like clockwork, why keep this knowledge to yourself? Share this guide on social media to help fellow Tesla owners skip the frustration and get straight to the satisfaction. Tag a friend who just took delivery of their new EV—they will thank you later! Safe driving and happy automating.



Leave a Reply