Introduction
Is your Craftsman garage door making a loud rattling noise or struggling to open smoothly? A sagging chain is a common issue, but fixing it is much easier than you might think. In this guide, you will learn exactly how to tighten chain on Craftsman garage door opener systems safely and effectively, restoring peace and reliability to your daily routine.
Why Does Your Craftsman Garage Door Chain Sag?
Before diving into the fix, it helps to understand why this happens. Garage door chains are made of durable metal, but they are not immune to the laws of physics. Over time, the constant stress of lifting a heavy door causes the metal links to stretch slightly.
According to the International Door Association (IDA), nearly 30% of residential garage door service calls are related to improper tension or worn drive components. Environmental factors also play a role. Temperature fluctuations in your garage can cause the metal rail and chain to expand and contract, gradually altering the tension.
Additionally, if the door was not perfectly balanced during the initial installation, the opener motor has to work harder, accelerating chain wear. Recognizing these factors can help you maintain your system proactively and avoid costly repairs down the road.
How To Tighten Chain On Craftsman Garage Door Opener
Adjusting the chain tension is a straightforward DIY task if you follow the correct safety protocols and steps. Below is a detailed, step-by-step tutorial to get your garage door running quietly and efficiently.
Step 1: Disconnect the Power
Safety always comes first. Before touching any part of the garage door opener, unplug the unit from the wall outlet or turn off the dedicated circuit breaker. This prevents the motor from accidentally activating while your hands are near the moving parts.
Step 2: Close the Garage Door Completely
Ensure the garage door is fully closed. This relieves the lifting tension from the chain and the motor, making the adjustment process safer and more accurate. If the door is open, the chain will naturally sag differently, leading to an incorrect adjustment.
Step 3: Gather Your Essential Tools
You do not need a massive toolbox for this job. Just ensure you have the following items ready:
- A sturdy stepladder (to safely reach the motor unit).
- Safety glasses (to protect your eyes from falling dust or debris).
- Work gloves (to prevent pinching your fingers).
- A 7/16-inch wrench (for holding the locknut).
- A 1/2-inch wrench (for turning the adjusting nut).
Step 4: Locate the Tension Adjustment Nuts
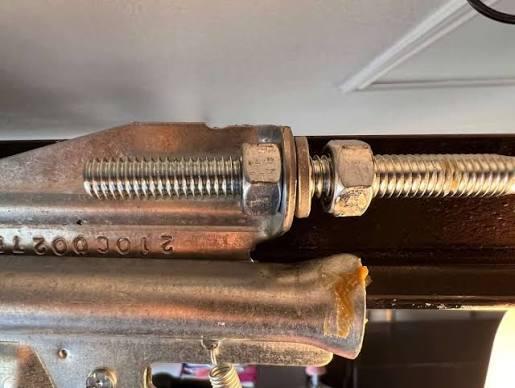
Climb your stepladder and look at the motor end of the garage door rail. You will see two nuts threaded onto a bolt near the sprocket: a locknut (closer to the motor) and an adjusting nut (closer to the rail).
Step 5: Measure the Current Sag
Before making any changes, assess the current tension. The chain should hang approximately 1/4 inch to 1/2 inch above the base of the rail for a straight, one-piece rail. If you have a sectional, curved rail, the ideal sag is slightly higher, around 1/2 inch to 3/4 inch at the midpoint of the rail.
Step 6: Adjust the Nuts Carefully
Place the 7/16-inch wrench on the locknut to hold it perfectly steady. Then, place the 1/2-inch wrench on the adjusting nut. Turn the adjusting nut clockwise in small, precise increments—about quarter-turns at a time.
Pro Tip: Never turn the adjusting nut more than a half-turn at once. Over-tightening is a common mistake that can strip the internal gears or burn out the opener’s motor.
Step 7: Test the Movement
Once the chain rests at the ideal 1/4 to 1/2 inch height, tighten the locknut against the adjusting nut to secure it in place. Plug the opener back in, step clear of the door, and test the operation using the wall button. Listen for smooth, quiet movement without any grinding or excessive vibration.
Chain Drive vs. Belt Drive: A Quick Comparison
If you are wondering whether your chain drive is the best option long-term, here is a quick breakdown of how it compares to modern belt drive systems. Understanding the mechanics of a chain drive can help you appreciate why proper tension is critical for efficient power transmission.
| Feature | Chain Drive Openers | Belt Drive Openers |
|---|---|---|
| Noise Level | Moderate to High (metallic rattle) | Very Quiet (rubber/fiberglass belt) |
| Durability | Extremely High (handles heavy doors) | High (resistant to rust, but can wear) |
| Maintenance | Requires periodic tensioning | Minimal tensioning needed over time |
| Cost | Budget-friendly and widely available | Premium pricing (20–30% more expensive) |
Note: If your chain is severely stretched, rusted, or has stiff links, tightening may not be enough. In such cases, replacing the entire chain assembly is the safest and most effective solution.
Common Mistakes to Avoid When Adjusting Garage Door Chains
Even experienced DIYers can make missteps. Avoid these common pitfalls to ensure a successful repair:
- Over-tightening the chain: A chain that is too tight puts immense strain on the opener’s motor and sprocket. This can lead to premature motor failure or a stripped gear, turning a $0 repair into a $200+ replacement.
- Using the wrong lubricant: While lubricating the chain is a good idea after adjustment, never use standard WD-40. It is a solvent, not a lubricant, and it will attract dust and grit, creating an abrasive paste. Instead, use a dedicated white lithium grease or a silicone-based garage door lubricant.
- Ignoring door balance: If your garage door springs are broken or poorly balanced, the opener bears the entire weight of the door. This will cause the chain to sag again almost immediately. Always ensure the door is properly balanced by a professional if you suspect spring issues.
Frequently Asked Questions (FAQ)
1. How often should I tighten the chain on my Craftsman garage door opener?
You should inspect the chain tension every 6 to 12 months. However, you only need to tighten it if the sag exceeds the recommended 1/2 inch mark. Regular visual inspections can help you catch minor slack before it becomes a noisy problem.
2. What happens if the garage door chain is too tight?
An overly tight chain can cause excessive wear on the opener’s internal nylon gear, lead to motor overheating, and create a loud humming or straining sound during operation. In severe cases, it can snap the chain or damage the rail mounting brackets.
3. Can I use WD-40 to lubricate my garage door chain?
No, you should avoid using standard WD-40. It is designed to displace moisture and clean, not to provide long-lasting lubrication. Over time, it attracts dirt and grime. Opt for a white lithium grease spray or a specialized garage door chain lubricant for best results.
4. Why is my Craftsman garage door opener chain slipping or jumping?
Chain slipping is usually a sign of a worn-out drive sprocket or a severely stretched chain. If tightening the chain does not resolve the slipping, the teeth on the sprocket may be worn down, requiring a professional replacement of the drive assembly.
5. Is it safe to adjust the chain tension myself?
Yes, adjusting the chain tension is generally safe for homeowners, provided you disconnect the power first and keep your hands clear of the moving sprocket. However, if the repair involves replacing the chain or adjusting the high-tension garage door springs, you should always hire a certified technician.
Conclusion
Learning how to tighten chain on Craftsman garage door opener units is a valuable DIY skill that saves you time, money, and unnecessary frustration. By following this step-by-step guide, you can eliminate annoying rattling noises, prevent premature motor wear, and ensure your garage door operates smoothly for years to come. Remember to always prioritize safety, use the correct tools, and avoid the temptation to over-tighten.
Did you find this guide helpful? Share this article with your friends, family, or neighbors on Facebook, Twitter, or Pinterest to help them tackle their own garage door maintenance with confidence! If you have any questions or additional tips, leave a comment below—we love hearing from our community.



Leave a Reply