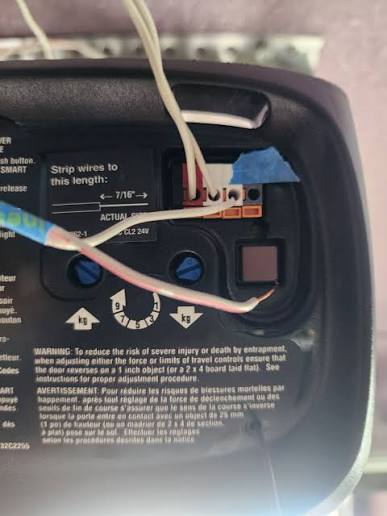
Struggling with loose wires or confusing terminals while trying to install your new garage system? You are not alone, and learning how to wire up a Chamberlain garage door opener is easier than you might think. This friendly, step-by-step guide will walk you through the process safely, ensuring your garage door operates smoothly and securely for years to come.
How To Wire Up A Chamberlain Garage Door Opener: Essential Preparations
Before diving into the actual wiring process, gathering the right tools and materials is crucial for a smooth installation. Having everything on hand prevents mid-project frustration and ensures a professional-grade finish.
Required Tools and Materials:
- 22-gauge or 20-gauge stranded bell wire (This is the industry standard for low-voltage garage door systems).
- Wire strippers (To remove exactly 1/4 inch or 6 mm of insulation).
- Phillips-head screwdriver (For securely fastening terminal screws).
- Staple gun and insulated plastic staples (To secure wires along the wall without damaging the insulation).
- Safety goggles (Always protect your eyes when working with tools and overhead components).
Pro Tip: According to the Consumer Product Safety Commission (CPSC), properly installed and wired safety reversing sensors prevent thousands of garage door-related injuries annually. Taking the time to wire this correctly is not just about functionality; it is a critical household safety measure.
Understanding the Chamberlain Wiring Terminals
One of the most common questions users ask is, “What do the colored wires and terminals actually mean?” Understanding your opener’s terminal block is the absolute key to a successful setup.
Most Chamberlain garage door openers feature a clearly labeled terminal block located on the motor head, right next to the “LEARN” button
support.chamberlaingroup.com. Here is a quick, easy-to-read breakdown of what you will encounter:
| Terminal / Wire Color | Function | Connection Detail |
|---|---|---|
| Red & White (or Terminal 1 & 2) | Wall Control Panel | Connects the push-button door control to the motor unit. |
| Two White Terminals | Safety Reversing Sensors | Connects the sending and receiving sensors at the bottom of the door tracks. |
| White & White/Red Striped | Alternative Wall Control | Some models use a solid white and a white wire with a red stripe for the wall button support.chamberlaingroup.com. |
Note: We color-code the wires simply for convention, but they are often electrically equivalent for the wall control, making the process more forgiving for beginners
bluemate.com. However, the safety sensors must be wired correctly to function properly.
Step-by-Step Guide: Connecting the Wires
Now, let us get into the practical steps. Follow these concrete instructions to ensure a flawless, reliable connection.
Step 1: Power Down the System
Safety first. Unplug the garage door opener from the electrical outlet or turn off the dedicated circuit breaker. Never work on low-voltage wiring while the motor unit is receiving main power.
Step 2: Prepare the Wires
Using your wire strippers, carefully strip exactly 1/4 inch (6 mm) of insulation from the ends of your 22-gauge stranded wire. Stripping too much can expose bare wire, creating a short-circuit risk, while stripping too little will result in a poor, intermittent connection.
Step 3: Connect the Wall Control Panel
Locate the red and white terminals (often labeled 1 and 2) on the motor head.
- Wrap the stripped end of the white wire around the white terminal post.
- Wrap the red (or white/red striped) wire around the red terminal post.
- Crucial Detail: Always wrap your wire clockwise around the post before tightening the screw. This ensures that as you tighten the screw, the wire pulls tighter rather than spinning off the post beezgaragedoors.com.
Step 4: Wire the Safety Reversing Sensors
Each safety sensor has two wires: one solid white and one white with a black (or red) stripe
support.chamberlaingroup.com.
- Twist the two solid white wires from both sensors together.
- Twist the two striped wires together.
- Attach the combined solid white wires to one of the white terminals on the motor head, and the combined striped wires to the other white terminal.
- Ensure the wires are securely fastened and not touching each other, which could cause a false “obstruction” signal.
Step 5: Route and Secure the Wiring
Run the wires from the motor head down to the wall control and sensors. Use insulated staples to secure the wire to the wall or door frame every 12 to 18 inches (30 to 45 cm). Do not use standard metal staples, as they can pierce the wire insulation over time due to garage vibrations, causing intermittent failures.
Step 6: Restore Power and Test
Plug the unit back in. The wall control should light up, and the safety sensor LEDs should glow steadily (usually green on the receiving end and amber on the sending end). Press the wall button to test the door’s operation. If the door reverses when an object breaks the sensor beam, your wiring is a complete success.
For a deeper understanding of the mechanics behind these automated systems, you can explore the general principles of a garage door opener on Wikipedia.
Common Wiring Mistakes to Avoid
Even experienced DIYers can make simple errors. Avoiding these pitfalls will save you hours of frustrating troubleshooting:
- Over-tightening Terminal Screws: This can strip the screw head or cut the delicate stranded wire, leading to a broken connection. “Snug” is sufficient.
- Ignoring Wire Polarity on Sensors: While the wall control wires are often interchangeable, the safety sensors rely on a specific circuit. Mixing the striped and solid wires at the sensor end will cause the system to fail the safety test.
- Running Wires Near High-Voltage Lines: Never run your low-voltage garage door wires parallel to or bundled with 120V electrical wires. This can induce electrical interference, causing the opener to act erratically. Keep them separated by at least 6 inches.
Pros and Cons: DIY Wiring vs. Professional Installation
Deciding whether to tackle this project yourself or hire a pro? Here is a quick comparison to help you make an informed decision.
| Factor | DIY Wiring | Professional Installation |
|---|---|---|
| Cost | Low (Only cost of wire, ~$15–$30) | High ($100–$200+ for labor) |
| Time | 1–2 hours (depending on experience) | Scheduled appointment, 1-hour job |
| Control | Complete control over wire routing | Relies on the technician’s preferred method |
| Risk | Moderate (if safety steps are ignored) | Very Low (backed by a service warranty) |
Verdict: If you are comfortable using basic hand tools and following safety protocols, DIY wiring is highly rewarding, educational, and cost-effective.
Frequently Asked Questions (FAQ)
Q1: Can I use any type of wire for my Chamberlain garage door opener?
A: While you might be tempted to use spare thermostat or speaker wire, it is highly recommended to use 22-gauge or 20-gauge stranded bell wire. Solid core wire can break over time due to the vibrations of the garage door, whereas stranded wire is flexible and specifically designed for this low-voltage application.
Q2: What happens if I wire the safety sensors backward?
A: If the sending and receiving wires are swapped, the safety sensors will not align properly. The receiving sensor’s LED will typically blink or remain off, and the garage door will refuse to close, or it will immediately reverse. Simply swap the wires at the white terminals to fix this.
Q3: Why is my Chamberlain garage door opener flashing after wiring?
A: A flashing light on the wall control or motor unit usually indicates a wiring fault. Check for loose connections, ensure no bare wires are touching, and verify that the safety sensor wires are not pinched, severed, or stapled incorrectly.
Q4: Do I need a professional electrician to wire my Chamberlain garage door opener?
A: No. Garage door opener accessory wiring operates on low voltage (typically around 24V DC), which is generally safe for DIY enthusiasts. However, the main 120V power outlet supplying the opener must be installed according to local electrical codes, which may require a licensed electrician.
Q5: How far can the wall control be from the motor unit?
A: For optimal performance, the total wire run for the wall control should not exceed 100 feet (30 meters). Beyond this distance, voltage drop can cause the button to become unresponsive or the system to behave erratically.
Conclusion
Learning how to wire up a Chamberlain garage door opener does not have to be a daunting task. By gathering the right tools, understanding your terminal block, and following these precise, step-by-step instructions, you can achieve a safe, reliable, and professional-looking installation. Remember, proper wiring is the backbone of your garage door’s safety features, protecting your family, your pets, and your vehicle.
Did you find this guide helpful? If so, please share this article on your favorite social media platforms like Facebook, Twitter, or Pinterest to help other DIY enthusiasts tackle their garage projects with confidence and ease!



Leave a Reply