Introduction
Is your garage door remote refusing to cooperate just when you need it most? You are not alone; thousands of homeowners face connectivity issues with their openers every year, often due to simple synchronization errors rather than hardware failure. If you are wondering how to program Liftmaster 8500 garage door opener remote, this guide will walk you through the process clearly and safely, ensuring you regain control of your home access without the hassle of calling a technician.
The Liftmaster Model 8500 is a popular wall-mounted jackshaft opener known for its quiet operation and space-saving design. However, its programming interface can seem slightly different from traditional ceiling-mounted units. Whether you have lost your original remote or bought a new universal one, getting it synced correctly is crucial for both convenience and security. Let’s dive into the details.
Understanding Your Liftmaster 8500 System
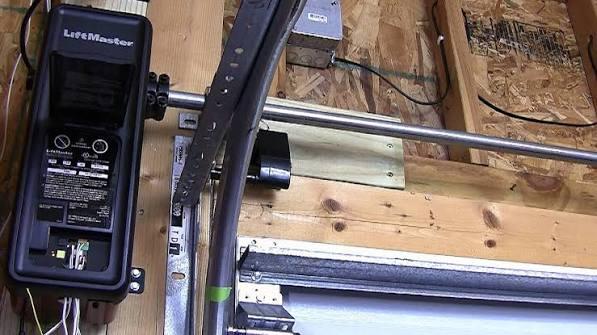
Before pressing any buttons, it is essential to understand what makes the Model 8500 unique. Unlike standard chain-drive openers, the 8500 uses a motor mounted on the wall beside the garage door header. This design reduces noise and frees up ceiling space, but it also means the “Learn” button location might be less obvious to first-time users.
Key Features to Note
- Motor Type: DC Motor with soft start/stop technology.
- Security Protocol: Uses Security+ 2.0 rolling code technology, which changes the access code every time you use the remote to prevent hacking.
- Compatibility: Works with most Liftmaster, Chamberlain, and Craftsman remotes manufactured after 1993.
According to industry standards, maintaining updated firmware and proper remote synchronization is vital for home security. For more background on how garage door openers evolved to include encrypted signals, you can refer to the historical context provided by Wikipedia.
Step-by-Step: How To Program Liftmaster 8500 Garage Door Opener Remote
Programming your remote is a straightforward process if you follow the correct sequence. The key component here is the “Learn” button located on the motor unit.
Step 1: Locate the Learn Button
On the Liftmaster 8500, the motor unit is mounted on the wall. Look for the light cover or the antenna wire hanging down. The Learn button is typically located on the back or side of the motor housing, near the antenna. It is usually a square button that may be yellow, purple, orange, or red, depending on the manufacturing year.
Pro Tip: If you cannot find the button, consult your specific owner’s manual diagram, as minor revisions to the 8500 model may shift the button placement slightly.
Step 2: Clear Old Codes (Optional but Recommended)
If you are reprogramming because your remote was lost or stolen, you should clear the memory first to ensure unauthorized access is revoked.
- Press and hold the Learn button for about 6–10 seconds.
- Release the button when the indicator light next to it turns off.
- This erases all previously programmed remotes and keypads. You will need to reprogram all your devices after this step.
Step 3: Initiate Programming Mode
- Press and release the Learn button quickly. Do not hold it down.
- The indicator light will turn on and remain steady (or blink, depending on the version). You now have 30 seconds to complete the next step.
Step 4: Sync the Remote
- Take your handheld remote.
- Press and hold the button you wish to use for opening/closing the door.
- Hold it until the motor unit’s lights flash or you hear two clicks. This confirms the code has been accepted.
- Release the remote button.
Step 5: Test the Connection
Stand outside the garage and press the remote button. The door should activate immediately. If it does not, repeat Steps 3 and 4, ensuring you are within range (usually 10–20 feet) during programming.
Troubleshooting Common Programming Issues
Even with careful execution, things can go wrong. Here are the most common hurdles and how to overcome them.
| Issue | Possible Cause | Solution |
|---|---|---|
| Light doesn’t turn on | Dead battery in remote or unit power issue | Replace remote batteries; check if the opener is plugged in. |
| Remote works intermittently | Signal interference or weak batteries | Change batteries; move away from LED bulbs which can cause interference. |
| Learn button unresponsive | Logic board freeze | Unplug the opener for 1 minute, then plug it back in to reset the system. |
| Code not accepted | Wrong protocol | Ensure your remote is compatible with Security+ 2.0 (most modern Liftmasters are). |
The LED Bulb Interference Factor
A surprisingly common issue in modern homes is interference from LED light bulbs. Some non-shielded LEDs emit electromagnetic noise that disrupts the radio frequency of garage door openers. If your remote fails to program despite following the steps above, try temporarily removing any LED bulbs from the opener unit and using incandescent bulbs during the setup process.
Advanced Tips for Multiple Remotes
If you have multiple family members or vehicles, you can program up to 8 different remotes to a single Liftmaster 8500 unit.
- Repeat the Process: Simply repeat Steps 3 and 4 for each additional remote.
- Label Your Remotes: Use masking tape to label remotes (e.g., “Dad’s Truck,” “Mom’s SUV”) to avoid confusion later.
- Keypad Integration: If you also have a wireless keypad, program it immediately after the remotes using the same Learn button method. Press the Learn button, then enter your desired PIN on the keypad followed by the “Enter” button.
Safety First: Best Practices
While programming seems harmless, always prioritize safety around garage doors.
- Keep Clear: Ensure no people or pets are under the door while testing.
- Sensor Check: After programming, verify that the safety reversal sensors (the eyes near the floor) are aligned. If the beam is blocked, the door should not close.
- Secure Your Code: Never share your remote’s frequency details publicly. If a remote is lost, clear the memory as described in Step 2 to prevent unauthorized entry.
FAQ Section
Q1: Can I program a universal remote to my Liftmaster 8500?
A: Yes, most universal remotes sold at major hardware stores are compatible with Liftmaster models. Look for packaging that mentions “Security+ 2.0” compatibility. Follow the universal remote’s specific instructions, which usually involve setting dip switches or holding a specific combination of buttons before pressing the Learn button on the motor.
Q2: Why does my remote only work when I am very close to the garage?
A: This is typically a battery issue. Weak batteries reduce the signal strength significantly. Replace the batteries with fresh alkaline ones. If the problem persists, check for signal interference from nearby electronics or LED bulbs.
Q3: What do I do if the Learn button light blinks rapidly?
A: A rapidly blinking light often indicates that the logic board is in a locked state or there is a fault. Try unplugging the unit for 60 seconds to perform a hard reset. If it continues to blink rapidly after resetting, you may need to contact Liftmaster support for a potential board replacement.
Q4: Is it possible to program a remote without accessing the motor unit?
A: Generally, no. For security reasons, physical access to the Learn button on the motor unit is required to pair new devices. This prevents neighbors or passersby from syncing their remotes to your door. However, if you have the MyQ app set up, you can control the door via smartphone, but adding new physical remotes still requires the Learn button.
Q5: How often should I replace my remote batteries?
A: It is recommended to replace batteries once a year, or immediately if you notice a decrease in range. Using high-quality alkaline batteries ensures consistent performance and prevents leakage that could damage the remote’s internal contacts.
Q6: Can I program a car’s built-in HomeLink system to the Liftmaster 8500?
A: Yes. Most modern vehicles with HomeLink can be programmed to the 8500. You will need to put the opener into Learn mode (Step 3 above) and then follow your vehicle manufacturer’s instructions to sync the HomeLink button. This often involves holding the HomeLink button in the car while pressing the remote button.
Conclusion
Learning how to program Liftmaster 8500 garage door opener remote is a manageable task that saves you time and money. By locating the Learn button, clearing old codes if necessary, and following the 30-second synchronization window, you can restore seamless access to your garage. Remember to troubleshoot potential interference from LED bulbs and keep your safety sensors aligned.
Did this guide help you get your garage door working again? Share this article with friends or family who might be struggling with their own openers, and let us know in the comments if you have any other tips for maintaining a smooth-operating garage!



Leave a Reply