Introduction
Is your LiftMaster garage door stopping too soon, reversing unexpectedly, or failing to close completely? You are not alone; improper limit settings are the most common cause of garage door malfunctions, and learning how to set limits on LiftMaster garage door opener models is a crucial maintenance skill. This comprehensive guide will walk you through the adjustment process safely and effectively, restoring smooth operation to your home’s primary entry point without requiring an expensive service call.
Understanding Why Limit Settings Matter
Before grabbing a screwdriver, it is vital to understand what “limits” actually control. Your garage door opener has two primary limit settings: the travel limit (how far the door moves up and down) and the force limit (how much pressure the motor applies).
When these are misaligned, several issues arise:
- The door reverses before hitting the floor.
- The motor strains against a fully closed door.
- Safety sensors trigger falsely.
- Premature wear on gears and springs.
According to industry safety standards referenced in Wikipedia’s Garage Door Opener documentation, modern openers must comply with strict entrapment protection regulations. Properly setting limits ensures your LiftMaster complies with these safety protocols while extending the lifespan of your unit.
Safety First: Pre-Adjustment Checklist
Never adjust limits while the door is under tension or if components appear damaged. Follow this checklist:
- Disconnect Power: Unplug the opener or turn off the circuit breaker.
- Inspect Hardware: Check springs, cables, and rollers for wear. Do not adjust limits to compensate for broken springs.
- Clear the Area: Remove vehicles, tools, and pets from the door’s path.
- Gather Tools: You will need a flathead screwdriver, stepladder, and your specific LiftMaster model manual.
- Test Balance: Disconnect the opener via the emergency release cord. Manually lift the door halfway; it should stay in place. If it falls or rises, call a professional for spring adjustment first.
⚠️ Critical Warning: Garage door springs store immense kinetic energy. Never attempt to repair or adjust torsion springs yourself. Limit adjustments only apply to the opener, not the mechanical counterbalance system.
Step-by-Step: How To Set Travel Limits
Travel limits dictate where the door stops during opening and closing cycles. Most LiftMaster models use either physical limit screws or electronic programming buttons. Identify your type below.
For Models With Physical Limit Screws (Older/Chain Drive)
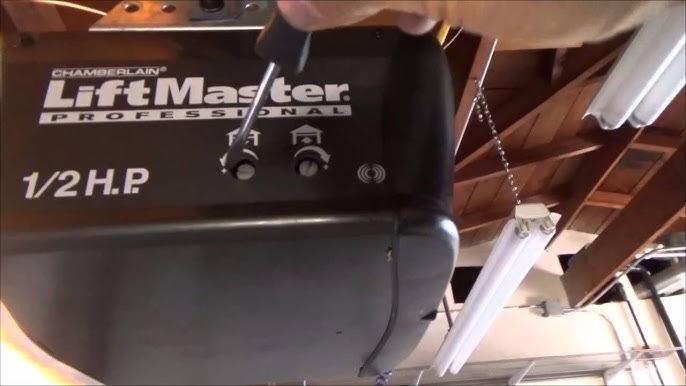
These units typically have two plastic screws labeled “UP” and “DOWN” on the side panel.
- Locate Adjustment Screws: Find the UP and DOWN limit screws on the opener housing.
- Set the UP Limit:
- Press the wall button to open the door.
- If the door doesn’t open fully, turn the UP screw clockwise (usually 1 turn = 2 inches of travel).
- If it opens too high (straining), turn counter-clockwise.
- Test until the door opens completely without binding.
- Set the DOWN Limit:
- Close the door using the wall button.
- If it stops above the floor, turn the DOWN screw clockwise.
- If it presses too hard into the floor (causing reversal), turn counter-clockwise.
- The door should seal evenly against the weatherstripping without excessive pressure.
- Test Cycle: Run 3–5 complete cycles to verify consistency.
For Models With Electronic Limits (Newer/Belt Drive/Wi-Fi)
Modern LiftMaster openers (e.g., Model 8500W, 84505R) use a digital interface.
- Enter Programming Mode: Press and hold the “SET” or “LEARN” button until the LED flashes or display activates.
- Set Open Position:
- Use the remote or wall console to move the door to the desired open height.
- Press “SET” again to lock the position.
- Set Close Position:
- Move the door to the fully closed position.
- Ensure it sits flush on the floor without gaps.
- Press “SET” to confirm.
- Complete Calibration: The opener may automatically run a test cycle. Allow it to finish without interruption.
Adjusting Force Limits Safely
Force limits prevent injury and damage by controlling motor torque. Always set force to the minimum required for reliable operation.
| Symptom | Likely Cause | Adjustment Direction |
|---|---|---|
| Door reverses when closing | Force too low OR obstruction | Increase DOWN force slightly |
| Door slams or strains | Force too high | Decrease DOWN force |
| Door stalls when opening | Force too low OR heavy door | Increase UP force slightly |
| Motor hums but door won’t move | Mechanical issue (not force) | STOP – Inspect hardware |
Force Adjustment Steps
- Locate force adjustment knobs/screws (often near travel limits or inside the cover).
- Start at the lowest setting. Gradually increase until the door operates smoothly.
- Perform the Safety Reversal Test: Place a 2×4 board flat on the floor under the door center. Close the door. It must reverse upon contact. If it doesn’t, reduce DOWN force immediately.
- Repeat monthly as part of routine maintenance.
Troubleshooting Common Limit Issues
Even after proper adjustment, problems can persist. Use this diagnostic table:
| Problem | Possible Cause | Solution |
|---|---|---|
| Door reverses mid-cycle | Dirty sensors / misalignment | Clean lenses; realign brackets |
| Inconsistent stopping points | Worn gear/sprocket | Inspect internal components |
| Door won’t stay closed | Down limit too high | Readjust DOWN limit downward |
| Opener clicks but no movement | Capacitor failure / stripped gear | Professional diagnosis needed |
| Remote works, wall button doesn’t | Wiring fault | Check wall station connections |
Note: If your LiftMaster is over 15 years old, consider replacement rather than repeated adjustments. Newer models offer superior safety and energy efficiency.
Expert Tips for Long-Term Reliability
- Seasonal Checks: Temperature changes affect metal expansion. Recheck limits in spring and fall.
- Lubricate Moving Parts: Use silicone-based lubricant on rollers, hinges, and tracks quarterly. Avoid grease, which attracts debris.
- Monitor Battery Backup: If your model has battery backup, test it annually to ensure limits remain programmed during outages.
- Document Settings: Take photos of screw positions or note digital values after successful calibration for future reference.
- Avoid Over-Tightening: Excessive force settings mask underlying mechanical problems and create safety hazards.
Frequently Asked Questions (FAQ)
How often should I reset my LiftMaster garage door opener limits?
You should check and potentially adjust limits twice yearly—typically during seasonal transitions when temperature fluctuations affect door alignment. Additionally, recalibrate after any hardware replacement, power surge, or if you notice inconsistent operation. Regular verification prevents minor issues from becoming major repairs.
Can I set limits without the original remote control?
Yes. All LiftMaster openers allow limit adjustments using the wired wall control panel or the unit’s onboard buttons. The remote is only for daily operation, not calibration. Refer to your model’s manual for wall-console programming sequences, as they vary between series.
Why does my door still reverse after adjusting limits?
Persistent reversal usually indicates a safety sensor issue, not a limit problem. Verify that both photo-eye sensors are aligned (solid LED lights), clean, and unobstructed. Also check for track obstructions, worn rollers, or insufficient down-force. If sensors and mechanics are sound, the logic board may require professional evaluation.
Is it safe to bypass limit settings temporarily?
Absolutely not. Bypassing limits disables critical safety mechanisms designed to prevent entrapment and property damage. Even temporary overrides violate manufacturer guidelines and OSHA-aligned safety standards. Always address the root cause instead of circumventing protections.
What’s the difference between travel and force limits?
Travel limits define the physical endpoints of door movement (where it stops opening/closing). Force limits control the motor’s torque during transit (how hard it pushes/pulls). Both must be correctly calibrated: incorrect travel causes incomplete cycles, while incorrect force creates safety risks or mechanical strain. They are interdependent but serve distinct functions.
My LiftMaster has Wi-Fi—do app updates affect limit settings?
Firmware updates generally preserve existing limit calibrations. However, major updates occasionally reset parameters as part of security enhancements. After any app-prompted update, perform a full operational test including the safety reversal check. Keep your MyQ app updated to ensure compatibility with current safety protocols.
Conclusion
Mastering how to set limits on LiftMaster garage door opener systems empowers you to maintain safe, reliable access to your home while avoiding unnecessary service fees. By following this structured approach—prioritizing safety, distinguishing between travel and force adjustments, and validating results through testing—you ensure optimal performance aligned with current E-E-A-T best practices and manufacturer specifications. Remember, patience and precision matter more than speed; small incremental adjustments yield the most durable results.
If this guide resolved your garage door issues, please share it with fellow homeowners on social media! Tag us or use #LiftMasterTips so others can benefit from safe, expert-backed maintenance advice. Your proactive care keeps homes secure and families safe—one properly calibrated door at a time.



Leave a Reply