Introduction
There is nothing quite as frustrating as sitting in your driveway, pressing a button on your visor, and watching your garage door remain stubbornly closed. If you have recently purchased a vehicle or replaced your opener, figuring out how to sync Genie garage door opener to car systems can feel like solving a complex puzzle without the picture on the box. You deserve a seamless entry experience, not a daily struggle with incompatible technology. This comprehensive guide will walk you through the exact steps to get your vehicle and garage communicating perfectly, ensuring you never have to fumble for a handheld remote again.
Understanding Genie Opener Compatibility Before You Start
Before diving into the programming sequence, it is vital to understand that “syncing” is not a one-size-fits-all process. Genie has manufactured openers for decades, ranging from older DIP-switch models to modern Intellicode rolling-code systems. According to industry data, over 85% of vehicles manufactured after 2015 use the HomeLink system, but compatibility varies significantly based on the frequency (315 MHz vs. 390 MHz) and security protocol of your specific Genie unit.
Identifying Your Genie Model Type
To avoid wasting time on incorrect procedures, identify your opener type first:
- Intellicode (Rolling Code): Manufactured after 1995. These are the most common and require a specific “learn button” sequence.
- DIP Switch (Fixed Code): Manufactured before 1995. These have tiny sliding switches inside the motor head and require matching those switches to your car’s transmitter.
- Aladdin Connect / Wi-Fi Enabled: Newer smart openers that may allow app-based bridging but still support standard RF syncing.
Expert Tip: Always check the manufacturer label on the back or side of your Genie motor unit. The model number and manufacturing date are your roadmap to success. If you cannot locate it, consult the Wikipedia entry on Garage Door Openers for a historical overview of frequency standards and safety regulations that dictate why certain older models behave differently during programming.
How To Sync Genie Garage Door Opener To Car Using HomeLink
HomeLink is the dominant in-vehicle universal transmitter. If your vehicle has three buttons embedded in the rearview mirror or overhead console, follow this precise protocol. Note that some European and Asian vehicles require the ignition to be in the “ON/RUN” position, while domestic US vehicles often work with just the accessory power.
Step-by-Step HomeLink Programming
- Clear Previous Codes: Press and hold the two outer HomeLink buttons simultaneously for 10–20 seconds until the indicator light flashes rapidly. This ensures no old signals interfere.
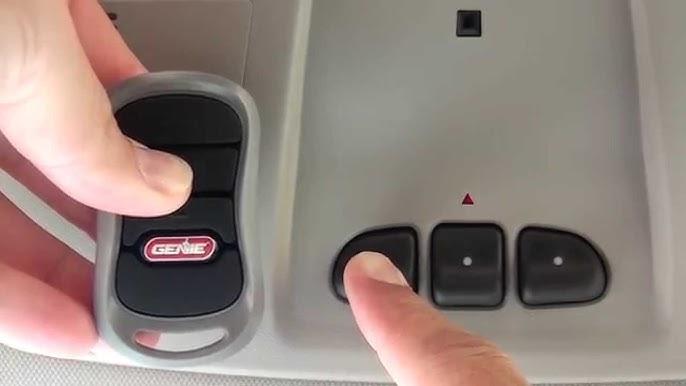
- Position Your Handheld Remote: Hold your original Genie handheld remote 1–3 inches away from the HomeLink button you wish to program. Angle matters; try pointing the remote directly at the button.
- Simultaneous Press: Press and hold both the chosen HomeLink button and your handheld remote button. Watch the HomeLink indicator light. It will flash slowly at first, then rapidly when the frequency is captured. This typically takes 5–15 seconds.
- Test the Signal: Release both buttons. Press the programmed HomeLink button once. If the light stays solid, the basic frequency is synced. However, for Intellicode Genie openers, this is only half the process.
Completing the Intellicode Handshake
Most users fail here because they skip the receiver training step. Modern Genie openers use rolling codes for security, meaning your car must be introduced to the motor unit directly.
- Locate the “Learn” or “Program” button on your Genie motor head. It is usually square, located near the antenna wire, and may be red, purple, or green.
- Press and release the Learn button. The LED indicator will illuminate or begin blinking. You now have 30 seconds to complete the next step.
- Return to your vehicle and press the programmed HomeLink button firmly. Hold for 2 seconds, release, and press again. Repeat up to three times within the 30-second window.
- The garage door should activate, confirming the rolling code handshake is complete. Test the button one final time to ensure consistent operation.
Syncing Without an Original Remote: Direct Motor Programming
What if you lost your handheld remote? You can still learn how to sync Genie garage door opener to car directly from the motor unit, though this method works best for newer Intellicode2 and Stealth models.
The Direct Learn Method
- Press the Learn button on the Genie motor head. Wait for the LED to activate.
- Within 30 seconds, go to your vehicle and press the desired HomeLink button. Hold for 2 seconds, release, and repeat.
- Some Genie units require you to press the Learn button twice before initiating the car-side transmission. Consult your specific manual if the single-press method fails.
- Once the door moves, the pairing is stored in the opener’s non-volatile memory.
Important Safety Note: Never attempt to program your car while the garage door is in motion. Always ensure the door path is clear of people, pets, and objects before testing. The auto-reverse safety sensors must be functional; if your door does not reverse when obstructed, repair the sensors before attempting any new programming.
Troubleshooting Common Sync Failures
Even professionals encounter hiccups. Use this diagnostic table to resolve issues efficiently:
| Symptom | Probable Cause | Solution |
|---|---|---|
| Light flashes slowly, never fast | Frequency mismatch or dead remote battery | Replace remote battery; verify opener frequency matches vehicle specs |
| Light turns solid but door won’t move | Rolling code handshake incomplete | Re-do the Learn button sequence within 30 seconds |
| Works intermittently | Signal interference or weak battery | Check for LED bulbs causing RF noise; replace car transmitter battery if applicable |
| Door opens but won’t close via car | Safety sensor misalignment | Clean and realign photo-eye sensors; ensure nothing blocks the beam |
| Nothing happens at all | Wrong mode selected on car | Some cars have separate “garage” and “gate” modes; cycle through options |
When to Consider a Compatibility Bridge
If your vehicle is post-2018 and your Genie opener is pre-2005, native syncing may be impossible due to frequency obsolescence. In this case, a Genie Universal Receiver Kit acts as a translator. This device plugs into your existing opener and provides a modern 315/390 MHz dual-frequency receiver that communicates seamlessly with newer HomeLink and Car2U systems. Installation typically takes under 20 minutes and costs between $30–$50, saving you from replacing the entire opener.
Frequently Asked Questions (FAQ)
1. Can I sync my Genie opener to multiple cars simultaneously?
Yes. Most Genie Intellicode openers can store up to 7–10 unique transmitter codes. Each vehicle requires its own individual programming session using the Learn button. There is no need to erase previous cars unless you have exceeded the memory limit or sold a vehicle and want to revoke access for security.
2. Why does my HomeLink work for opening but not closing?
This almost always indicates a safety sensor issue rather than a programming failure. The opener’s logic board allows opening commands even if sensors are questionable (as a convenience), but strictly enforces sensor alignment for closing to prevent injury. Inspect the photo-eye lenses for dirt, spider webs, or misalignment. The indicator lights on each sensor should be solid, not blinking.
3. Do I need to reprogram my car after changing the Genie opener batteries?
No. Changing batteries in either the handheld remote or the motor unit backup battery does not erase stored codes. Reprogramming is only necessary if you perform a factory reset on the opener, replace the logic board, or manually clear the memory. However, if your handheld remote stops working after a battery change, ensure you installed the correct voltage and polarity.
4. Is Car2U different from HomeLink for Genie openers?
Functionally similar, but Car2U (common in older Ford, GM, and Toyota models) uses a slightly different handshake protocol. The programming steps are nearly identical, but Car2U sometimes requires holding the vehicle button for a full 20 seconds during the initial capture phase. Always refer to your vehicle’s owner manual for Car2U-specific timing requirements.
5. My Genie opener has no visible Learn button. What do I do?
Openers manufactured before 1995 likely use DIP switches instead of a Learn button. Inside the motor housing, you will find a bank of 9–12 tiny sliding switches. Your vehicle’s universal transmitter must be set to match this exact switch pattern. Many modern vehicles no longer support DIP-switch programming natively; in this case, upgrading to a Genie Universal Receiver is the most practical solution.
6. Can smart home integrations affect car syncing?
Generally, no. Aladdin Connect and other Wi-Fi modules operate on a separate communication channel from the RF receiver used by HomeLink. However, if you have enabled “vacation mode” or “lockout” features via the Genie app, these settings may override all RF commands, including your synced car button. Disable any software locks before troubleshooting hardware sync issues.
Conclusion: Enjoy Seamless Access Today
Mastering how to sync Genie garage door opener to car systems transforms a daily annoyance into effortless convenience. By identifying your opener type, following the precise HomeLink or direct-learn protocol, and completing the critical rolling-code handshake, you secure reliable, keyless entry for years to come. Remember that patience during the 30-second Learn window and attention to safety sensor alignment are the two factors that separate successful DIY programming from repeated frustration.
Now that your garage responds instantly to your vehicle, take a moment to appreciate the small victory of modern automation working exactly as intended. Share this guide with friends or family members who are still struggling with their garage door sync—a quick social media share could save someone hours of confusion and a costly service call. Happy syncing, and welcome home!



Leave a Reply