When your Genie garage door opener screw drive carriage begins to show signs of wear or failure, it can be frustrating. The carriage plays a critical role in the operation of your garage door, allowing it to move smoothly along the track. Replacing the carriage is not a complicated task, but it requires patience and attention to detail. In this guide, we will walk you through the process of replacing the Genie garage door opener screw drive carriage, ensuring that your garage door functions optimally once again.
Understanding the Role of the Screw Drive Carriage
Before diving into the replacement process, it’s important to understand the role of the screw drive carriage in your Genie garage door opener. The screw drive system uses a threaded steel rod to lift and lower the door. The carriage is the part that connects the door to the motor, and it travels along the screw to move the door.
Read too: Mastering Quantum Garage Door Opener Programming: A Comprehensive Guide
Over time, the carriage can wear out due to friction, dust accumulation, and general use. When this happens, you may notice that your door moves sluggishly, makes unusual noises, or gets stuck midway. A faulty carriage needs to be replaced promptly to avoid further damage to the opener system.
How To Replace Genie Garage Door Opener Screw Drive Carriage: A Step-by-Step Process
Replacing the screw drive carriage on your Genie garage door opener is a manageable task that you can do yourself, with the right tools and some basic mechanical knowledge. Here’s how to go about it:
1. Gather Your Tools and Materials
Before you begin, ensure you have all the necessary tools and replacement parts. Here is a list of what you will need:
- Replacement Genie screw drive carriage
- Wrenches or socket set
- Screwdriver (Phillips or flathead, depending on your model)
- Ladder (if necessary to reach the opener)
- Safety gloves
- A small brush or vacuum (to clean the screw drive system)
Having everything ready in advance will make the replacement process smoother.
2. Disconnect the Power
For your safety, the first step is always to disconnect the power to the garage door opener. Unplug the opener from the electrical outlet to ensure there is no risk of electric shock while you’re working. It’s also a good idea to disconnect the emergency release cord to prevent the door from being accidentally operated while you’re working on it.
3. Position the Door in the Raised Position
To make the replacement process easier, raise the garage door fully. If the door is stuck or difficult to move, you may need to manually lift it, depending on the condition of the screw drive system. Once the door is in the fully raised position, secure it with a clamp or a locking mechanism to prevent it from falling while you work.
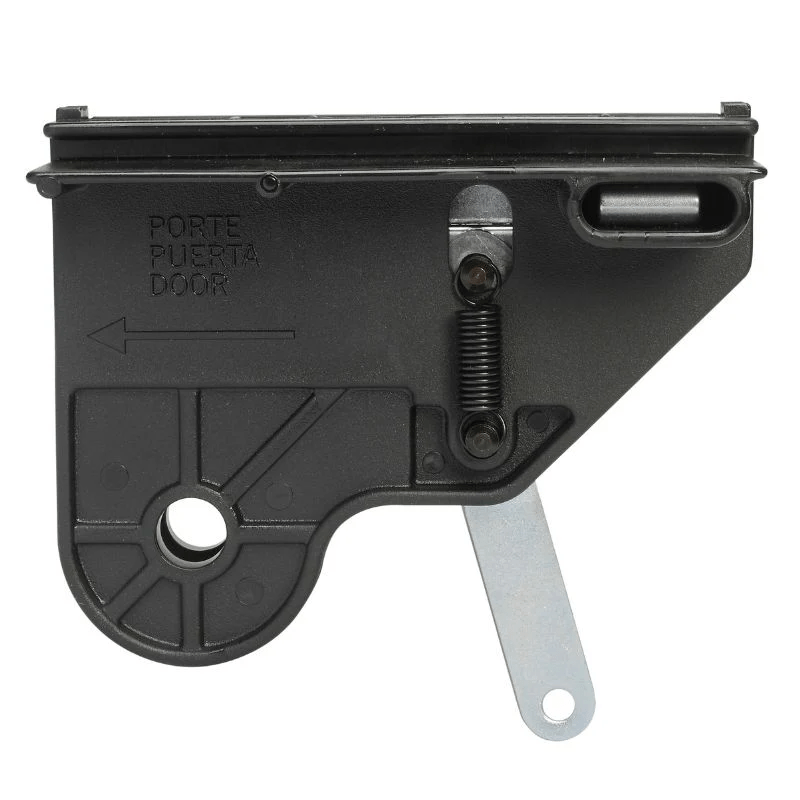
4. Remove the Existing Screw Drive Carriage
The next step is to locate and remove the old screw drive carriage. Depending on your Genie garage door opener model, this may involve loosening several bolts or screws that hold the carriage in place. Typically, these will be located near the end of the screw drive rail. Use the appropriate wrenches or socket set to remove these fasteners.
Once the screws or bolts are removed, carefully slide the old carriage off the screw drive shaft. If the carriage is stuck due to wear or rust, gently tap it with a rubber mallet to loosen it. Be careful not to damage the screw drive system during this step.
5. Inspect the Screw Drive System
Now that the old carriage is removed, take the opportunity to inspect the screw drive system. Look for signs of wear, damage, or debris buildup along the threaded shaft. Clean the shaft using a small brush or a vacuum cleaner to remove any dust, dirt, or grease that may have accumulated over time. This will help ensure smooth operation once the new carriage is installed.
6. Install the New Genie Screw Drive Carriage
With the screw drive system cleaned and ready, it’s time to install the new carriage. Slide the new carriage onto the screw drive shaft, ensuring that it aligns properly with the motor and the track. Carefully attach the carriage to the rail, making sure it moves freely along the screw.
Once the carriage is in place, secure it using the screws or bolts you previously removed. Tighten them carefully with your wrench or screwdriver to ensure they are secure but not overly tight, which could damage the carriage or screw drive system.
7. Test the New Carriage
After the new carriage is installed, it’s time to test the system. Plug the garage door opener back into the electrical outlet and reconnect the emergency release cord. Press the wall control button or use the remote to operate the door. The door should move smoothly up and down along the track. Pay attention to any unusual sounds or jerky movements, which could indicate that the carriage is not properly aligned.
8. Make Adjustments If Necessary
If the door isn’t moving as smoothly as expected, double-check the alignment of the carriage and the screw drive system. You may need to adjust the tension or alignment to ensure everything is operating correctly. Refer to your Genie garage door opener manual for specific instructions on how to make these adjustments.
9. Lubricate the Screw Drive System
After the new carriage is installed and everything is working smoothly, apply a light coating of lubricant to the screw drive system. This will help reduce friction and wear on the carriage, ensuring that your garage door operates quietly and efficiently for a long time.
10. Regular Maintenance
To extend the life of your Genie garage door opener and prevent future carriage failures, perform regular maintenance. This includes cleaning the screw drive system periodically, checking for signs of wear, and lubricating the moving parts. Regular maintenance can help you avoid unexpected repairs and keep your garage door functioning properly.
Conclusion
Replacing the Genie garage door opener screw drive carriage may seem like a daunting task, but with the right tools and a little bit of patience, it’s something that you can do yourself. By following these simple steps, you can restore smooth and quiet operation to your garage door and extend the lifespan of your opener. Regular maintenance and timely repairs will ensure that your garage door opener continues to serve you well for many years to come.
Leave a Reply