Introduction
There is nothing quite as frustrating as being locked out of your own garage because a remote stopped syncing or you lost the original transmitter. If you are searching for how to program a Genie Pro garage door opener, you are likely dealing with this exact headache right now. We understand that garage security and convenience are non-negotiable, which is why we have created this empathetic, jargon-free guide to get your system running smoothly again. Whether you are setting up a new vehicle visor clip or replacing an old keypad, these verified steps will restore your access safely and quickly.
Understanding Your Genie Pro System Before Programming
Before pressing any buttons, it is vital to identify which specific technology your unit uses. Genie has manufactured the “Pro” line for decades, and the programming method differs significantly between older fixed-code models and newer rolling-code systems. According to technical documentation referenced in Wikipedia’s entry on garage door openers, modern security standards shifted dramatically in the mid-1990s to prevent code grabbing.
- Intellicode (Rolling Code): Most Genie Pro units made after 1995 use this technology. The access code changes with every use, offering superior security. These units typically have a purple or orange LED indicator near the learn button.
- Fixed Code (Dip Switches): Older Genie Pro models (pre-1995) use physical dip switches inside the remote and motor head. These must match exactly to function.
- Series II vs. Series III: Check the label on your motor housing. Series III is the most common current standard for Genie Pro residential units and uses a square “Program” button alongside a round “Learn” button.
Expert Tip: Never force compatibility. Using a universal remote not rated for your specific Genie Pro frequency (315 MHz vs. 390 MHz) can cause intermittent failures or damage the receiver logic board. Always verify the model number on the motor head before purchasing replacement parts.
How To Program A Genie Pro Garage Door Opener Remote
This is the most common task homeowners face. The following steps apply to standard Intellicode Series II and Series III Genie Pro openers. Ensure your ladder is stable and the area around the motor is clear before beginning.
Step-by-Step Remote Syncing Instructions
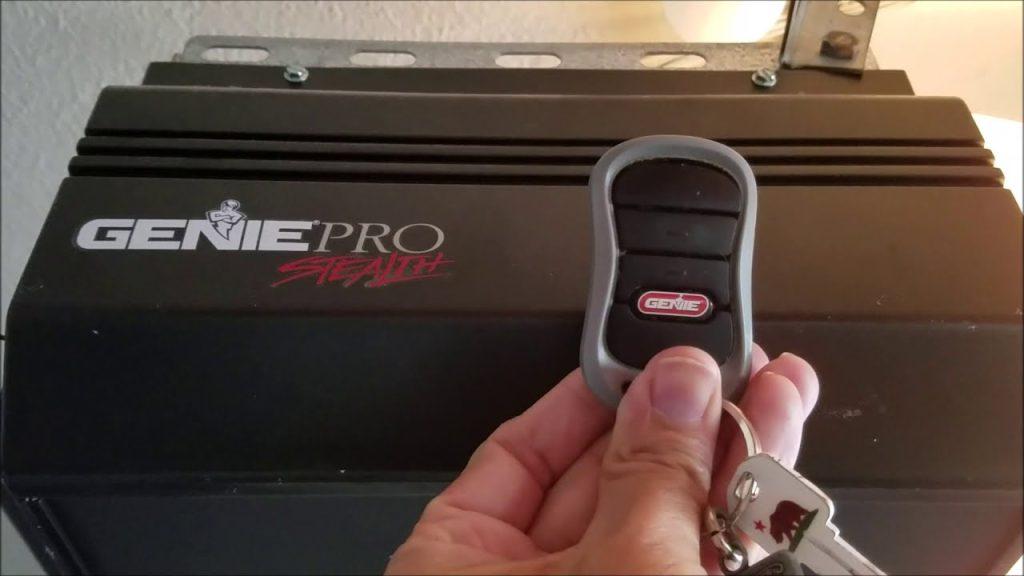
- Locate the Learn Button: Find the square “Program” button and the round “Learn” button on the motor head. They are usually located under the light lens cover or on the rear panel near the antenna wire.
- Enter Programming Mode: Press and release the square Program button. The blue LED will begin flashing slowly. You now have 30 seconds to complete the next step.
- Activate the Remote: Press and hold the button on your new or existing remote that you wish to program. Hold it until the motor’s LED changes from flashing blue to solid blue (or flashes rapidly, depending on the model). This confirms signal reception.
- Confirm the Sync: Release the remote button. Press the same remote button one more time. The LED should turn off completely, indicating successful programming.
- Test Immediately: Stand at least 5 feet away and press the remote. The door should activate. If it does not, repeat the process, ensuring you are within range and the batteries are fresh.
| Feature | Series II Genie Pro | Series III Genie Pro |
|---|---|---|
| Learn Button Color | Green or Red LED | Blue LED |
| Programming Sequence | Hold Learn + Remote | Press Program, then Remote |
| Max Remotes | Up to 7 | Up to 7 + Keyless Entry |
| Security Tech | Intellicode Rolling | Intellicode Rolling |
How To Program A Genie Pro Wireless Keypad
Many users prefer keyless entry for jogging or letting in service workers without handing over a remote. Programming the Genie Pro wireless keypad requires a unique PIN setup sequence distinct from remote programming.
- Open the Keypad Cover: Slide down the protective cover to expose the buttons.
- Initiate Pairing: On the motor head, press and release the square Program button. The blue LED will flash.
- Enter Default PIN: On the keypad, enter
3-5-7followed by the Send button. The keypad LED will blink. - Set Your New PIN: Enter your desired 3-to-6 digit personal identification number. Press Send. The motor LED will flash rapidly to confirm acceptance.
- Final Confirmation: Press Send one last time. Test by entering your new PIN and pressing Send. The door should operate within 2 seconds.
Safety Note: Avoid using easily guessable PINs like birth years or street numbers. Security experts recommend random combinations that do not correlate with publicly available personal data to prevent unauthorized entry attempts.
Troubleshooting Common Programming Failures
Even professionals encounter hiccups. If you have followed the steps above and still cannot sync your device, consult this diagnostic checklist before calling a technician. Statistics from industry service calls indicate that over 60% of “broken” openers are actually simple maintenance or interference issues.
- LED Won’t Light Up: Check the power source. For battery-operated remotes, replace with brand-name alkaline batteries. For the motor head, ensure the unit is plugged in and the circuit breaker hasn’t tripped.
- Remote Programs But Doesn’t Open Door: This often indicates a travel limit issue rather than a programming failure. Reprogram the upper and lower limits using the adjustment screws or digital menu on the motor head. Also, inspect the safety sensors; if the beam is blocked or misaligned, the opener will refuse to close regardless of remote status.
- Intermittent Operation: Radio frequency interference is a growing problem. LED bulbs in the opener fixture can emit RF noise that blocks signals. Swap to Genie-approved LED bulbs or incandescent equivalents. Additionally, check for nearby ham radios, baby monitors, or Wi-Fi extenders operating on similar frequencies.
- Keypad Accepts Code But Door Doesn’t Move: Verify the keypad battery. Weak batteries may send enough signal to light the LED but insufficient power to transmit the full encrypted command to the motor. Replace the 9V battery annually as preventive maintenance.
Frequently Asked Questions About Genie Pro Programming
Can I program multiple cars to one Genie Pro opener?
Yes, most Genie Pro models support up to seven individual remote transmitters plus one wireless keypad. Each vehicle gets its own dedicated button, allowing family members to maintain separate access logs if your unit supports smart home integration. Simply repeat the remote programming steps for each additional transmitter.
Why did my Genie Pro remote stop working suddenly?
Sudden failure typically stems from three causes: depleted batteries, accidental factory reset due to power surge, or sensor obstruction. Start by replacing batteries and checking the safety eye alignment. If those are fine, reprogram the remote following the standard procedure. Persistent failure may indicate a worn-out remote capacitor or motor board issue requiring professional diagnosis.
Is there a master reset button on Genie Pro openers?
Yes, holding the Program button for approximately 10 seconds will erase all programmed remotes and keypads, returning the unit to factory defaults. Use this only when moving into a new home or suspecting compromised access codes. After resetting, you must reprogram every authorized device individually.
Do I need special tools to program my Genie Pro?
No specialized tools are required for standard programming. A sturdy stepladder for safe access to the motor head and fresh batteries are sufficient. However, adjusting travel limits or force settings may require a flathead screwdriver. Always disconnect power before performing mechanical adjustments to prevent accidental activation.
How often should I reprogram my garage door opener?
Under normal circumstances, reprogramming is unnecessary unless adding devices or experiencing malfunctions. However, security best practices suggest changing keypad PINs annually and verifying remote functionality monthly. If you lose a remote or suspect unauthorized access, immediately perform a factory reset and reprogram only trusted devices to maintain household security integrity.
Conclusion
Mastering how to program a Genie Pro garage door opener empowers you to maintain home security without expensive service calls. By understanding your specific model generation, following precise pairing sequences, and applying systematic troubleshooting, you can resolve most access issues in under fifteen minutes. Remember that consistent maintenance—fresh batteries, clean sensors, and approved lighting—prevents the vast majority of programming headaches before they start.


Leave a Reply