Looking for an Old Craftsman 1/2 Hp Garage Door Opener Wiring Diagram? You’re likely repairing, replacing wiring, or troubleshooting a non-working opener. Older Craftsman units are durable — but wiring issues can be confusing without a clear diagram.
This detailed guide explains terminal layouts, wall control wiring, safety sensor connections, and step-by-step troubleshooting — all in simple, beginner-friendly language.
Read too: The Complete Guide to Tighten Chain On Garage Door Opener for Smooth Operation
Old Craftsman 1/2 Hp Garage Door Opener Wiring Diagram Explained

4
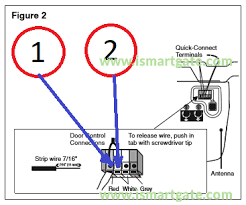
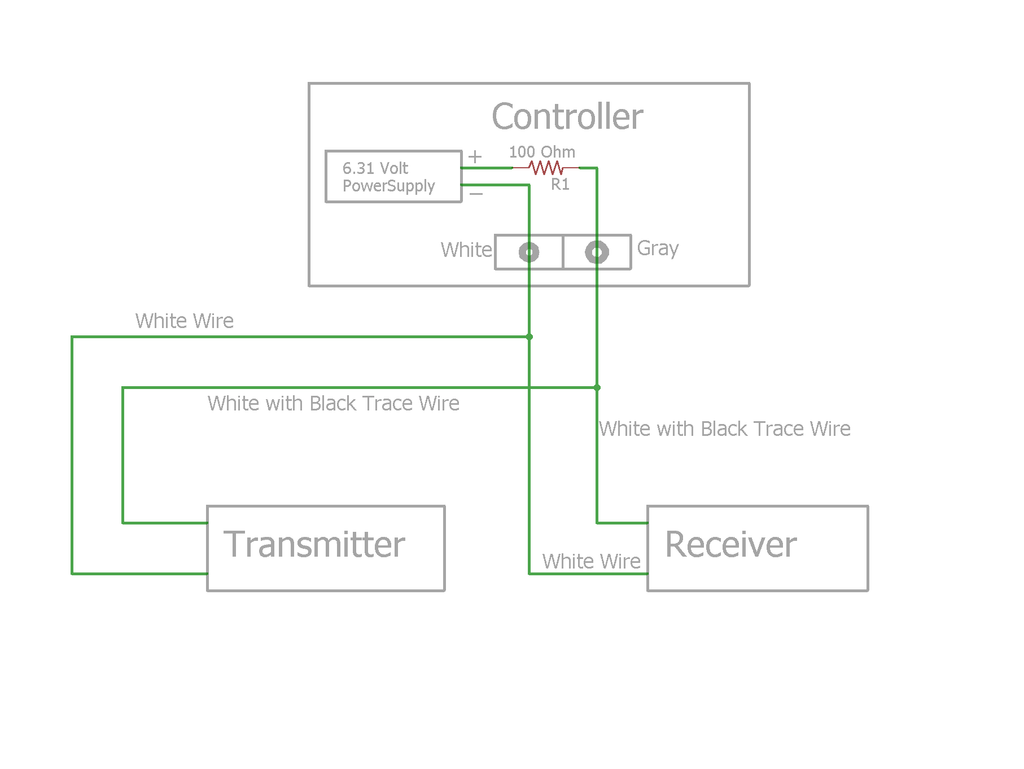
Most Old Craftsman 1/2 Hp Garage Door Opener Wiring Diagram layouts follow a similar 3 or 4 terminal system.
Typically labeled:
- Terminal 1 & 2 → Wall control
- Terminal 2 & 3 → Safety sensors
- Terminal 3 & 4 → Additional sensors (on some models)
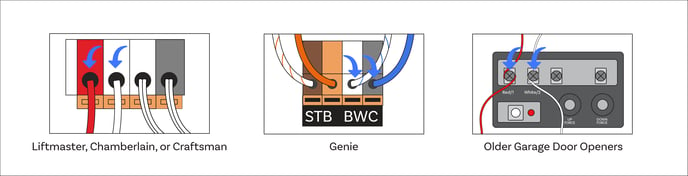
Older Craftsman openers were manufactured by Chamberlain under the Sears brand. Many share identical wiring patterns.
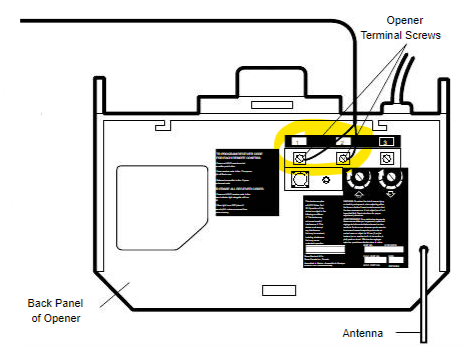
What Do the Wiring Terminals Mean?
Understanding terminal roles prevents wiring mistakes.
Common Terminal Functions
| Terminal | Function | Wire Type |
|---|---|---|
| 1 | Wall control signal | Low-voltage (usually white) |
| 2 | Common return | Low-voltage |
| 3 | Safety sensor | Low-voltage (white/black stripe) |
| 4 | Optional sensor | Model dependent |
All wall controls and sensors operate on low-voltage wiring (usually 18–22 gauge).
For background on wiring diagrams and electrical schematics, see:
https://en.wikipedia.org/wiki/Wiring_diagram
How To Wire the Wall Control (Step-by-Step)


4
The wall control is the button mounted inside the garage.
Wiring Steps:
- Turn off power to opener.
- Locate terminals 1 and 2.
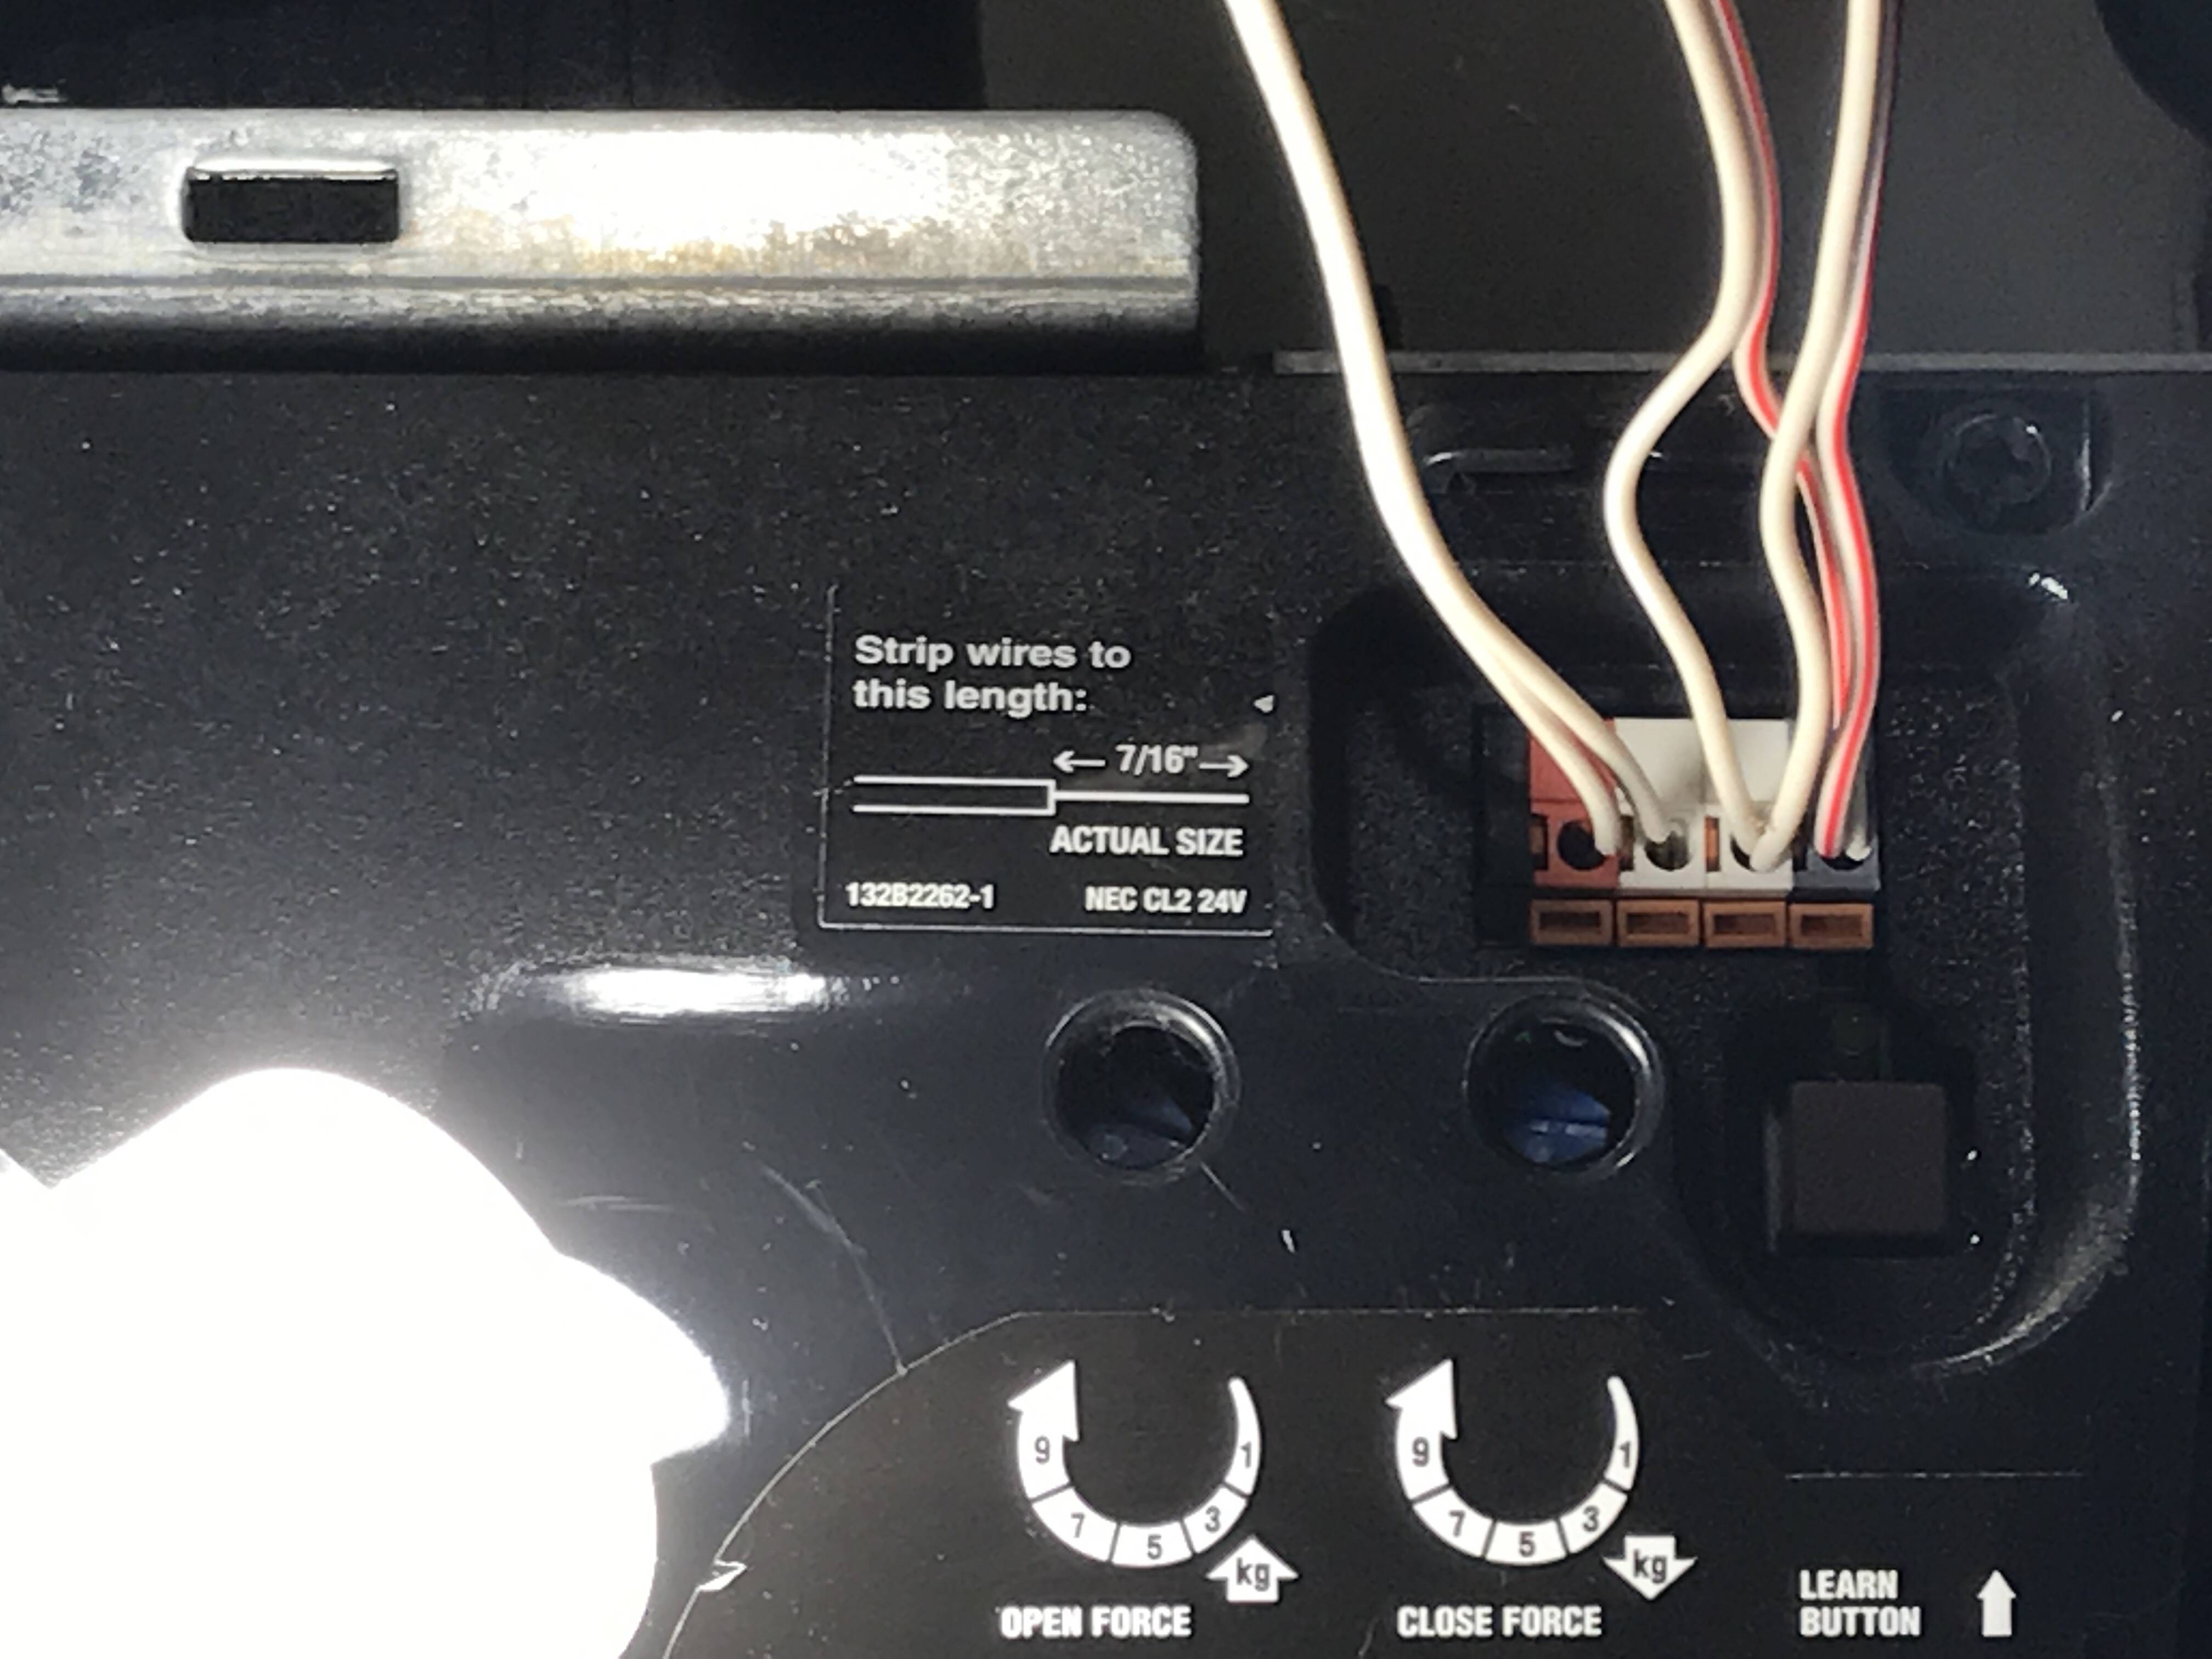
- Strip 1/4 inch of insulation from each wire.
- Insert one wire into terminal 1.
- Insert second wire into terminal 2.
- Tighten screws firmly.
- Restore power and test.
Polarity usually does not matter for basic push-button controls.
If using a multi-function wall console, follow color-coded instructions carefully.
How To Wire Safety Sensors Properly
4
Safety sensors are required on units manufactured after 1993.
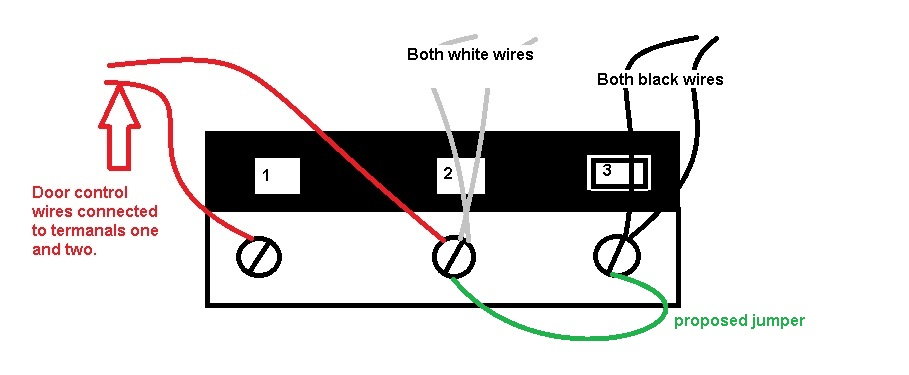
Correct Wiring:
- One sensor connects to terminal 2.
- The other connects to terminal 3.
- Match solid white to white.
- Match white/black stripe to striped terminal.
Important:
- Sensors must face each other.
- LED lights should remain solid.
- If blinking, alignment is off.
Why Isn’t My Craftsman Opener Working After Rewiring?
If your opener doesn’t respond:
Check These Common Errors:
- Wires reversed between terminals
- Loose terminal screws
- Damaged low-voltage wire
- Pinched wire along track
- Sensor misalignment
Quick Test:
- Disconnect wall control wires.
- Touch terminals 1 and 2 briefly with screwdriver.
- If door moves, wiring to wall button is faulty.
Typical Wire Colors in Old Craftsman Models
Most older units use:
- White
- White/black stripe
- Red (occasionally for wall console)
- Black
Never connect high-voltage (120V) wires to low-voltage terminals.
Troubleshooting Wiring Problems (Step-by-Step Checklist)
Follow this order:
Step 1: Disconnect Power
Always unplug unit first.
Step 2: Inspect Wire Condition
Look for:
- Fraying
- Corrosion
- Staples piercing insulation
Step 3: Test Continuity
Use a multimeter.
- Set to continuity mode.
- Check wire from opener to wall button.
- Resistance should read near 0 ohms.
Step 4: Check Sensor LEDs
Both lights must be solid.
Step 5: Reset Opener
Unplug for 60 seconds.
How Long Do These Openers Last?
Old Craftsman 1/2 HP units often last 15–20 years with proper maintenance.
However:
- Circuit boards degrade over time.
- Plastic gears wear out.
- Wiring insulation can become brittle.
If your opener is over 20 years old and repeatedly failing, upgrading may be safer.
Repair vs Replacement Comparison
| Factor | Repair | Replace |
|---|---|---|
| Cost | $50–$200 | $400–$900 |
| Safety features | Older tech | Modern auto-reverse |
| Battery backup | Rare | Common |
| Wi-Fi capability | No | Yes |
Modern units include rolling code security and battery backup.
Safety Tips When Working With Wiring
- Always unplug before touching terminals.
- Never mix high and low voltage wiring.
- Use insulated tools.
- Avoid working in wet conditions.
- Replace damaged wires entirely — don’t tape them.
Garage door systems are the largest moving mechanical object in most homes. Electrical safety matters.
FAQ – Old Craftsman 1/2 Hp Garage Door Opener Wiring Diagram
Where can I find my exact wiring diagram?
Check inside the motor cover or search by model number on manufacturer support sites.
Are all Craftsman 1/2 HP models wired the same?
Most follow similar 3–4 terminal layouts, but always confirm model-specific details.
What gauge wire should I use?
Typically 18–22 gauge low-voltage wire.
Why are my safety sensors blinking?
Likely misaligned or wired incorrectly.
Can I upgrade wall control to newer model?
Only if compatible with your opener’s circuit board.
Is it worth repairing a 20-year-old opener?
Depends on condition. Frequent wiring or motor issues may justify replacement.
Final Thoughts
Understanding the Old Craftsman 1/2 Hp Garage Door Opener Wiring Diagram makes troubleshooting much easier. Most wiring issues involve loose connections, sensor misalignment, or damaged low-voltage cables.
Start with careful inspection. Follow the terminal layout methodically. Always prioritize safety.
If this guide helped you successfully rewire or troubleshoot your Craftsman opener, consider sharing it with others working on similar garage repairs. Clear wiring knowledge can save time, money, and frustration.
Leave a Reply