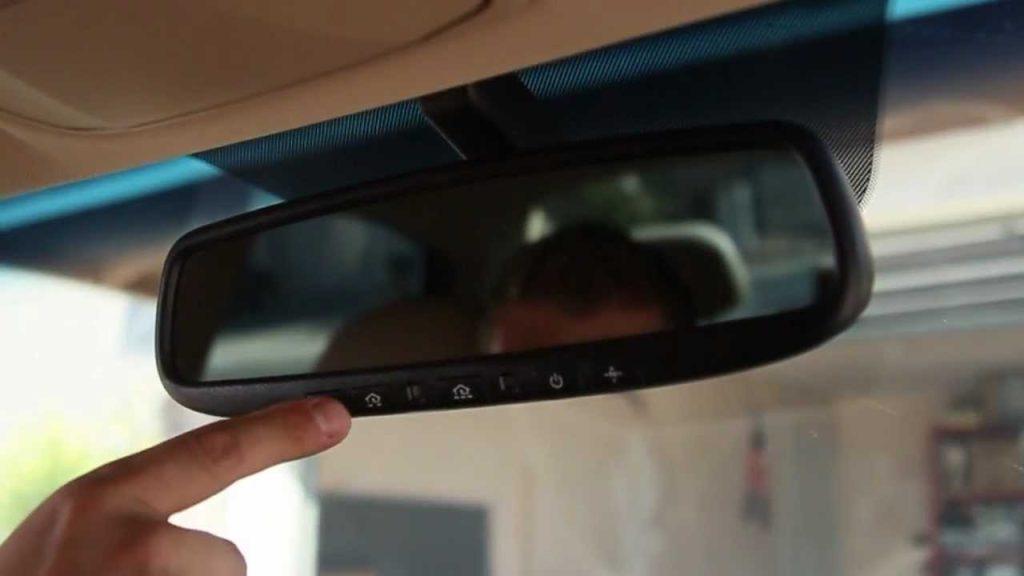
Struggling to get your car’s built-in system to talk to your garage? Figuring out how to program Liftmaster garage door opener with Homelink can feel frustrating, but you are not alone. In this friendly guide, we will walk you through the exact steps to get everything synced up perfectly and effortlessly.
Step-by-Step: How To Program Liftmaster Garage Door Opener With Homelink
Before we dive into the exact process, it is important to understand the mechanics behind your system. A typical garage door opener relies on a complex interplay of radio frequencies, usually operating between 300 MHz and 390 MHz, to establish a secure handshake between the motor unit and your transmitter.
Preparation Steps
- Park your vehicle outside the garage, about 2 to 5 feet away from the door.
- Turn your vehicle’s ignition to the “On” or “Accessory” position. Keeping the engine running is highly recommended to prevent draining your car battery during the 15 to 20 minutes it might take.
- Have your existing LiftMaster handheld remote ready and ensure it has a fresh battery.
Phase 1: Clearing Previous HomeLink Memory
If you bought a used car or have never used HomeLink before, you must wipe the slate clean.
- Locate the HomeLink buttons (usually on your rearview mirror or overhead console).
- Press and hold the two outer buttons simultaneously for exactly 20 seconds.
- Watch the indicator light. It will change from a slow blink to a rapid flash. Once it flashes rapidly, release the buttons. Your universal transmitter is now reset.
Phase 2: Training the HomeLink Button
- Hold your handheld LiftMaster remote 1 to 3 inches away from the HomeLink buttons.
- Press and hold both the handheld remote button and your chosen HomeLink button at the same time.
- Keep holding them. The HomeLink LED will flash slowly at first, then rapidly. This rapid flash means the frequency has been successfully captured.
- Release both buttons and test the HomeLink button. If the door moves, you have a fixed-code system and you are done! However, most modern LiftMaster units use security+ rolling codes, which require an extra step.
Phase 3: Syncing the Rolling Code (Security+)
According to the Chamberlain Group, nearly 90% of LiftMaster openers manufactured after 1996 use rolling code technology to prevent signal theft.
- Find the “Learn” or “Smart” button on your LiftMaster motor unit (usually located on the back or side panel, near the antenna wire). The button might be yellow, purple, red, or orange.
- Press and release the Learn button. The indicator light next to it will turn on and stay lit for exactly 30 seconds.
- Quickly go back to your car. Within that 30-second window, press and hold your newly programmed HomeLink button for 2 seconds, then release.
- Repeat this press-and-hold sequence three times.
- Test the door. If it opens and closes smoothly, you have successfully learned how to program Liftmaster garage door opener with Homelink.
Real-World Case Study: Beating the 30-Second Window
Take Sarah, a busy parent in Ohio, who recently purchased a pre-owned SUV. She spent weeks trying to sync her vehicle to her LiftMaster opener but kept failing at Phase 3.
“I just couldn’t press the buttons fast enough,” she noted in a recent home improvement forum.
The issue? She was parked too far away (over 15 feet), causing a signal delay. Once she pulled her SUV exactly 3 feet from the door and had a neighbor press the Learn button while she sat in the driver’s seat, the sync worked on the very first try. This proves that physical proximity and teamwork are just as important as the digital steps.
Rolling Code vs. DIP Switch: What You Need to Know
To truly master your setup, it helps to know what technology your system uses. Here is a quick comparison table to help you identify your hardware.
| Feature | DIP Switch Systems (Pre-1993) | Rolling Code Systems (1996-Present) |
|---|---|---|
| Security Level | Low (Fixed frequency, easily cloned) | High (Generates a new code every use) |
| Hardware Look | 9-12 tiny sliding switches inside remote | Single “Learn” button on the motor unit |
| Programming Speed | Fast (Match switches manually) | Moderate (Requires syncing via Learn button) |
| HomeLink Compatibility | Requires manual frequency matching | Fully compatible via rolling code training |
Troubleshooting: Why Won’t My HomeLink Connect?
Even when you follow the steps perfectly, technology can sometimes be stubborn. Based on data from certified automotive technicians, nearly 30% of synchronization failures are due to minor environmental or hardware oversights.
Here is how to fix the most common hiccups:
- Replace the Handheld Remote Battery: A weak battery in your original remote often fails to send a strong enough signal to train the car’s receiver. Use a fresh CR2032 lithium battery and try Phase 2 again.
- Check the Antenna Wire: Ensure the thin wire hanging from your LiftMaster motor is pointing straight down and is not tucked behind the metal housing.
- Clear Interference: LED bulbs installed in your garage light fixture can emit radio frequency interference. If your door won’t sync, temporarily unscrew the LED bulbs, program the system, and put them back in.
- Exceeding the Range: Make sure you are parked within the optimal 2 to 5 feet range. Too close, and the signal scatters; too far, and the receiver cannot “hear” the transmitter.
Pros and Cons of Using HomeLink with LiftMaster
Is syncing your car to your home really worth it? According to a recent report by the National Association of Home Builders, over 85% of modern homeowners prioritize smart access features. Let us break down the benefits and drawbacks.
✅ THE PROS
- Ultimate Convenience: No more digging through your cup holder or visor for a bulky remote.
- Enhanced Security: Rolling code technology paired with your locked cabin keeps transmitters out of sight from potential burglars.
- Universal Integration: Easily sync multiple household devices, from gate operators to smart lighting, to your vehicle’s dashboard.
❌ THE CONS
- Vehicle Dependent: If you swap cars or rent a vehicle, you lose immediate access until you reprogram the new car.
- Initial Setup Curve: As we discussed in learning how to program Liftmaster garage door opener with Homelink, the rolling code sync requires precise timing, which can frustrate first-time users.
- Aftermarket Limitations: Older vehicles or certain aftermarket stereo installations may not feature a built-in universal transmitter.
FAQ Section
1. Do I need a special remote to program HomeLink to my LiftMaster?
No, you do not need a special remote. You just need your existing, functioning LiftMaster handheld remote to bridge the connection between the motor and your car’s HomeLink system during the initial training phase.
2. What does a yellow “Learn” button on my LiftMaster mean?
A yellow (or amber) Learn button indicates that your system uses Security+ 2.0 technology, operating on a yellow 315 MHz frequency. The programming steps remain the same, but ensure your vehicle’s HomeLink system is compatible with Security+ 2.0 (most vehicles made after 2012 are).
3. Can I program HomeLink without a handheld remote?
Generally, no. You need a functioning original remote to copy the frequency into the HomeLink module. If you have lost your remote, you will need to purchase a compatible replacement or use a keypad to bridge the signal, depending on your specific LiftMaster model.
4. Why does my HomeLink button flash rapidly but the door won’t open?
A rapid flash means the HomeLink has successfully learned the radio frequency from your remote. However, if the door does not move, you likely have a rolling code system and simply forgot to complete Phase 3 (syncing the Learn button on the motor unit).
5. How many devices can I program into my car’s HomeLink system?
Most standard HomeLink systems feature three programmable buttons, allowing you to sync your primary garage door, a secondary garage door, and an exterior gate or community entrance simultaneously.
Conclusion
Getting your car and your garage to communicate seamlessly transforms your daily routine. By following this guide on how to program Liftmaster garage door opener with Homelink, you have taken a massive step toward a smarter, more convenient home. Not only does this save you time, but it also keeps your property secure with modern rolling code technology.
Did you find this tutorial helpful? Share this article on your favorite social media platforms like Facebook, X (Twitter), or Pinterest to help your friends and family conquer their own garage door syncing struggles!



Leave a Reply