Introduction
There is nothing quite as frustrating as standing in your driveway with a garage door that refuses to respond, especially when you are relying on a legacy system like the Moore-O-Matic. If you have been searching for how to program Moore O Matic garage door opener units without success, you are not alone; many homeowners struggle with these classic systems because they lack the digital displays of modern openers. This guide provides clear, empathetic, and expert-backed steps to get your vintage opener synchronized safely and efficiently, saving you the cost of an unnecessary full replacement.
Understanding Your Moore-O-Matic System Before Programming
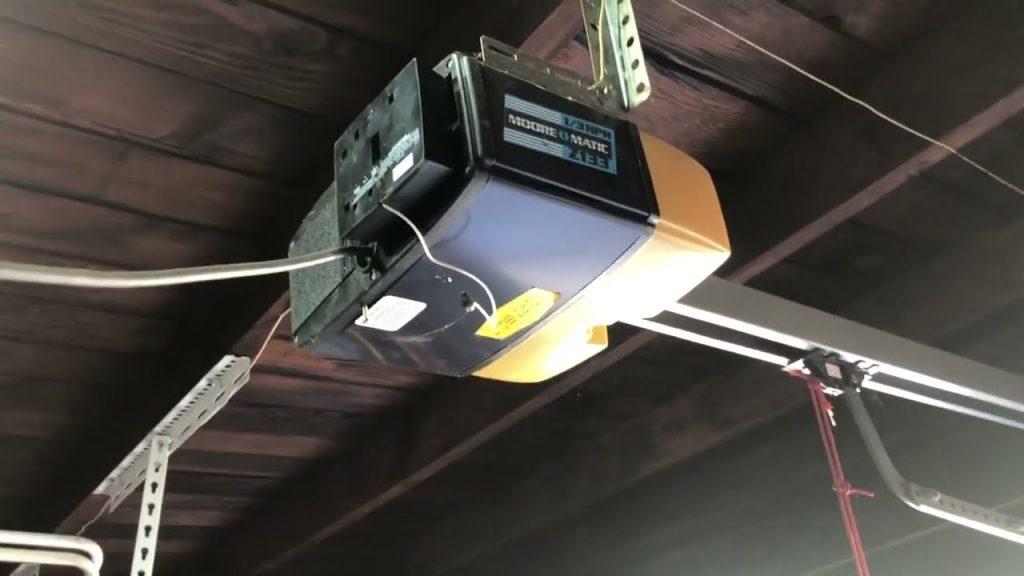
Before you grab a ladder, it is vital to understand that Moore-O-Matic (often stylized as Moore-O-Matic) operates differently than contemporary Chamberlain or LiftMaster units. These openers were predominantly manufactured between the 1960s and 1980s and typically utilize DIP switches or early fixed-code radio frequencies rather than modern rolling code technology.
According to historical documentation on Wikipedia, early automatic garage door openers relied on simple radio transmitters that required physical switch alignment between the motor unit and the remote. This means “programming” is often actually “matching.” Understanding this distinction prevents damage to the logic board and ensures you do not waste time looking for a “Learn” button that may not exist on your specific model.
Identifying Your Model Type
- DIP Switch Models (Most Common): Features a row of 8–12 tiny sliding switches inside the remote and on the motor head.
- Fixed Code / Solder Pad Models: Older units where codes were set by soldering connections or cutting traces.
- Early Digital Models: Rare late-80s units that may have a primitive learn button.
Expert Note: Always check the manufacturing date plate on the motor housing. If your unit predates 1993, it likely lacks photo-eye safety sensors. Exercise extreme caution during testing to prevent entrapment hazards.
How To Program Moore O Matic Garage Door Opener Remotes (DIP Switch)
For the vast majority of Moore-O-Matic owners, programming involves matching the DIP switch pattern. Follow these precise steps to ensure a successful sync.
Step 1: Access the Motor Unit Receiver
- Unplug the garage door opener from the power source for safety.
- Remove the light lens cover and the outer housing to expose the logic board/receiver.
- Locate the bank of DIP switches. They are usually white or blue with tiny black sliders.
- Write down the current switch configuration (e.g., Up-Down-Up-Up-Down…).
Step 2: Match the Remote Transmitter
- Open the battery compartment of your new or existing remote.
- Locate the corresponding DIP switch bank.
- Using a small flathead screwdriver or pen tip, slide each switch to exactly match the pattern on the motor unit.
- Ensure every switch is fully seated in the Up or Down position; a partially engaged switch will cause intermittent failure.
Step 3: Test and Reassemble
- Reinstall the motor housing and plug the unit back in.
- Stand at least 5 feet away and press the remote button.
- If the door activates, programming is complete. If not, re-check switch alignment and battery polarity.
| Symptom | Likely Cause | Solution |
|---|---|---|
| No response at all | Battery dead or switch mismatch | Replace battery; verify all 8-12 switches match exactly |
| Intermittent operation | Partially seated switch or weak signal | Reseat switches; check antenna wire connection |
| Door moves but stops | Limit switch misalignment | Adjust travel limit screws on motor housing |
| Works only up close | Antenna damage or receiver aging | Inspect hanging antenna wire; consider universal receiver upgrade |
Programming Universal Remotes to Moore-O-Matic Systems
If you cannot find an original replacement remote, you may need to use a universal remote compatible with vintage frequencies (typically 310 MHz or 390 MHz for Moore-O-Matic).
Critical Compatibility Check
Not all universal remotes support legacy DIP-switch openers. Before purchasing, verify the product specifications explicitly list “Moore-O-Matic” or “DIP Switch Compatible.” Modern rolling-code-only remotes will never work with these systems.
Setup Process for Universal Units
- Set the universal remote’s internal switches to match your motor’s pattern (same as OEM remotes).
- Some universal units require a frequency selector jumper; ensure it is set to the correct MHz band for your opener.
- Test range immediately after installation. Vintage receivers can be sensitive to LED bulb interference; if range drops, revert to incandescent bulbs in the opener fixture.
Troubleshooting Common Programming Failures
Even when you know how to program Moore O Matic garage door opener systems correctly, issues arise due to age-related wear.
Capacitor Degradation
Vintage openers frequently suffer from failed start capacitors. If the motor hums but does not move despite successful remote programming, the issue is mechanical/electrical, not programming-related. A multimeter test can confirm capacitor health.
Antenna Wire Issues
The single hanging wire on older units is the primary antenna. Over decades, this wire can corrode at the solder joint or break internally. Extending or replacing this wire with 18-gauge stranded copper can restore 20–30 feet of lost range.
Frequency Drift
Components in 40+ year-old receivers can drift from their original frequency. If switches match perfectly but the remote fails, the receiver may need professional recalibration or replacement with a modern universal receiver kit designed for legacy motors.
Safety Considerations for Vintage Openers
Programming success should never come at the expense of household safety. Moore-O-Matic units manufactured before 1993 lack mandatory auto-reverse mechanisms.
- Install Photo-Eyes: Consider adding aftermarket safety beam kits compatible with vintage openers.
- Test Monthly: Place a 2×4 board under the door and activate closure. The door should reverse upon contact. If it does not, adjust the force limit screw or consult a professional immediately.
- Secure Remotes: Fixed-code systems are vulnerable to code grabbing. Never leave remotes in vehicles parked outside.
Frequently Asked Questions (FAQ)
Can I use a smart WiFi controller with my Moore-O-Matic opener?
Yes, but indirectly. You cannot connect WiFi directly to a vintage DIP-switch opener. Instead, install a smart garage door controller (like Meross or Tailwind) that wires into the wall button terminals. The smart controller acts as a physical button press, bypassing the need for RF programming entirely while giving you app control.
Why does my newly programmed remote only work within 3 feet?
This typically indicates either a weak battery, antenna wire damage, or electrical interference. First, replace the battery with a fresh alkaline cell. Next, inspect the antenna wire connection on the motor board. Finally, remove any LED bulbs from the opener light socket, as cheap LEDs emit RF noise that devastates vintage receiver sensitivity.
Is it possible to convert my Moore-O-Matic to rolling code security?
You cannot convert the existing receiver to rolling code, but you can replace the receiver entirely. Universal conversion kits (such as those from Linear or Genie) include a new rolling-code receiver and matching remotes that wire into your existing Moore-O-Matic motor. This preserves the heavy-duty vintage motor while providing modern security and convenience.
How do I erase all previously programmed remotes from my Moore-O-Matic?
Unlike modern openers with a “clear memory” button, DIP-switch systems have no memory to erase. Every remote with matching switches will operate the door. To “reset” the system, simply change the DIP switch pattern on the motor unit to a new configuration, then update all authorized remotes to match. Any old remotes still set to the previous pattern will no longer function.
My Moore-O-Matic has no visible DIP switches. What now?
Some very early models used solder pads or plug-in coding modules instead of sliding switches. Look for a small rectangular module plugged into the logic board, or examine the board for labeled solder points. In these cases, programming requires either swapping the coding module or using a compatible universal remote designed for solder-pad systems. Consult the specific model number stamped on the chassis for targeted guidance.
Where can I find replacement parts for discontinued Moore-O-Matic openers?
Specialty vintage garage door suppliers and online marketplaces like eBay remain the best sources for NOS (new old stock) parts. However, for reliability, most experts recommend installing a universal receiver conversion kit rather than hunting for 50-year-old components that may fail again shortly after installation.
Conclusion
Learning how to program Moore O Matic garage door opener systems is a rewarding skill that preserves the functionality of robust, American-made machinery. Whether you are matching DIP switches, installing a universal remote, or upgrading to smart control via a wired interface, the key is understanding your specific model’s technology generation. Remember to prioritize safety above convenience, and do not hesitate to consult a certified technician if electrical components show signs of wear.
Found this guide helpful? Share it with fellow vintage home enthusiasts on Facebook, Pinterest, or your neighborhood Nextdoor group. Preserving knowledge about these classic systems helps entire communities avoid unnecessary waste and costly replacements. Have a unique Moore-O-Matic question we did not cover? Drop it in the comments below—we read every single one!



Leave a Reply