Introduction
Is your LiftMaster garage door opener making a grinding noise or failing to lift the door completely? You are likely dealing with worn-out internal components, and understanding how to replace gear on LiftMaster garage door opener systems is the most cost-effective solution to restore functionality. This common issue affects thousands of homeowners annually, but with the right guidance, you can fix it yourself without hiring an expensive technician.
Replacing these gears extends the life of your unit by years and saves hundreds of dollars in replacement costs. Below, we provide a comprehensive, safety-first tutorial designed specifically for US homeowners tackling this repair for the first time.
Why Do LiftMaster Gears Fail? Understanding the Mechanics
Before grabbing your screwdriver, it is vital to understand why this failure occurs. According to mechanical engineering principles documented on Wikipedia, gears in residential openers are often intentionally designed as “sacrificial” components. They are typically made of nylon or polymer rather than steel to protect the more expensive motor from burning out during a jam or obstruction.
Common Signs of Gear Wear
Identifying the problem early prevents secondary damage. Look for these indicators:
- Grinding or Crunching Sounds: The most universal sign of stripped teeth.
- Motor Runs, Door Doesn’t Move: The motor spins freely because the teeth no longer engage the chain/belt drive.
- Plastic Shavings: Finding white or black debris near the opener housing.
- Intermittent Operation: The door works sometimes but stalls under load.
Expert Insight: Most LiftMaster units manufactured after 2005 use a nylon worm gear and a steel sprocket. Industry data suggests these nylon gears have a functional lifespan of 10–15 years under normal use. If your unit is within this window, gear wear is expected maintenance, not a catastrophic failure.
Essential Tools and Safety Precautions
Safety must be your priority. Garage door springs store lethal amounts of energy, and electrical components pose shock risks.
Required Tool List
| Tool | Purpose |
|---|---|
| Phillips & Flathead Screwdrivers | Removing housing covers and brackets |
| 7/16” Socket/Wrench | Loosening sprocket nut and motor bolts |
| Hammer & Punch/Roll Pin Tool | Driving out the roll pin on the shaft |
| Lithium-Based Grease | Lubricating new gears (do NOT use WD-40) |
| Needle-Nose Pliers | Handling small clips and washers |
| Voltage Tester | Verifying power is disconnected |
Critical Safety Warnings
- Disconnect Power: Always unplug the opener or turn off the circuit breaker before starting.
- Secure the Door: Clamp the door to the track with locking pliers so it cannot fall when the opener is detached.
- Avoid Springs: Never attempt to adjust torsion or extension springs during this repair.
- Capacitor Discharge: Wait at least 5 minutes after unplugging to allow stored electrical charge to dissipate.
Step-by-Step: How To Replace Gear On LiftMaster Garage Door Opener
Follow this detailed process to ensure proper installation and alignment. Rushing this step is the #1 cause of premature re-failure.
Step 1: Access the Internal Assembly
Remove the outer cover of the opener by unscrewing the side panels. Take photos of the wiring layout before disconnecting anything; this serves as your reassembly reference. Carefully set aside the logic board if it obstructs access to the gear assembly.
Step 2: Remove the Old Sprocket and Gear
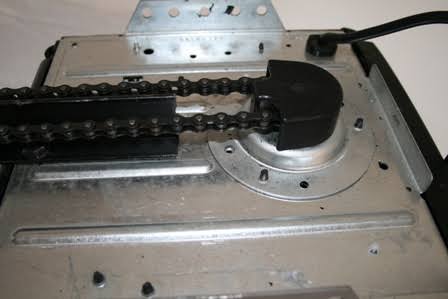
Locate the main drive shaft. Use your hammer and punch to drive out the roll pin securing the sprocket to the shaft. This requires firm, controlled strikes. Once the pin is removed, slide the old sprocket and worm gear off the shaft. Inspect the shaft for burrs or scoring; file down any rough spots to prevent damaging the new gear.
Step 3: Install the New Worm Gear
Slide the new nylon worm gear onto the shaft. Crucial Detail: Ensure the gear faces the correct direction (most have a marked “motor side”). Align the hole in the shaft with the groove in the gear, then tap in the new roll pin included in your kit. Never reuse an old roll pin, as metal fatigue compromises its grip.
Step 4: Replace the Top Sprocket
Install the new top sprocket onto the output shaft. Apply a generous amount of lithium grease to both the worm gear and sprocket teeth. Proper lubrication reduces friction heat and can double the lifespan of nylon components. Reassemble the bearing plate and secure all nuts to manufacturer torque specifications (typically hand-tight plus ¼ turn).
Step 5: Adjust Travel Limits and Force Settings
After reassembly, reconnect power and test manually. The new gear may require recalibration of the up/down travel limits and force sensitivity. Consult your specific model’s manual for adjustment screw locations. Run the door through 3–5 complete cycles while monitoring for unusual sounds.
Pros and Cons of DIY vs. Professional Replacement
Deciding whether to tackle this repair yourself depends on your comfort level and available time.
DIY Replacement
- Pros: Saves $150–$300 in labor; parts cost only $25–$45; builds home maintenance skills.
- Cons: Takes 2–4 hours for beginners; risk of improper installation; voids warranty if unit is still covered.
Professional Service
- Pros: Guaranteed workmanship; includes full system inspection; completed in under 1 hour.
- Cons: Higher cost ($200–$400 total); scheduling delays; less personal knowledge of your system.
Recommendation: If your opener is over 15 years old or shows additional issues (frayed cables, bent tracks), invest in professional service or consider full unit replacement. Gear replacement is ideal for otherwise healthy units aged 8–14 years.
Frequently Asked Questions (FAQ)
How long does it take to replace gears on a LiftMaster opener?
For a first-time DIYer, expect 2–4 hours including setup, repair, and testing. Experienced technicians typically complete the job in 30–45 minutes. Allocate extra time for troubleshooting and travel limit adjustments post-installation.
Can I replace just the nylon gear without replacing the sprocket?
While technically possible, it is strongly discouraged. The sprocket and gear wear together; installing a new gear against a worn sprocket causes accelerated wear and premature failure. Always purchase and install a complete gear-and-sprocket kit for optimal longevity.
What type of grease should I use on LiftMaster gears?
Use only white lithium grease or silicone-based garage door lubricant. Avoid petroleum-based products like WD-40, which degrade nylon and attract dust. Apply grease liberally to all tooth surfaces and the shaft bearing points during installation.
Will replacing gears fix my opener if the motor hums but doesn’t run?
Not necessarily. A humming motor with no movement can indicate stripped gears, but it may also signal a failed capacitor, burnt motor windings, or seized bearings. Test the gear condition visually first; if gears appear intact, consult a multimeter diagnostic guide before purchasing parts.
How often should I inspect my LiftMaster gears?
Perform a visual inspection every 2–3 years or whenever you notice operational changes. Proactive inspection during annual maintenance helps catch early wear signs like minor chipping or discoloration before complete failure occurs.
Is it worth repairing gears on a 20-year-old opener?
Generally, no. Openers exceeding 15–18 years lack modern safety features (photo-eye sensors, auto-reverse standards) and are less energy-efficient. Invest the repair budget toward a new unit with updated safety technology and warranty coverage instead.
Conclusion
Learning how to replace gear on LiftMaster garage door opener systems empowers you to maintain one of your home’s most-used mechanical systems confidently. By following this guide, you save significant money, extend your opener’s service life, and gain valuable DIY skills applicable to future home repairs. Remember to prioritize safety, use quality replacement kits, and never skip the lubrication step.
Found this guide helpful? Share it with fellow homeowners on Facebook, Pinterest, or Nextdoor who might be struggling with a noisy garage door! Your share could save someone hundreds in unnecessary service calls. Have questions about your specific model? Drop a comment below—we’re here to help you get that door running smoothly again.



Leave a Reply