Introduction
There are few things more frustrating than pressing your remote and hearing nothing but silence from your garage. When standard reprogramming fails, you likely need to learn how to reset logic board on garage door opener systems to clear corrupted memory or glitchy software. This comprehensive guide will walk you through safe, manufacturer-approved methods to restore your system’s functionality without immediately calling an expensive technician.
What Is a Garage Door Logic Board and Why Does It Fail?
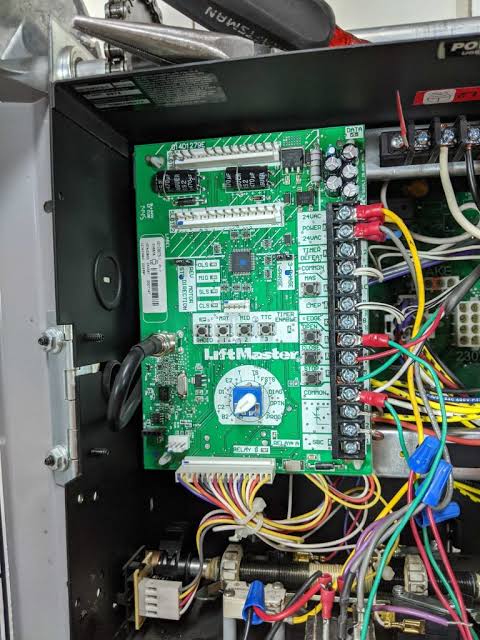
Before diving into the reset process, it is vital to understand what component you are actually troubleshooting. The logic board serves as the central processing unit of your garage door opener, interpreting signals from remotes, keypads, and safety sensors to command the motor. According to technical documentation referenced in Wikipedia articles on automated entry systems, these circuit boards have evolved from simple relay switches to complex microprocessor-based controllers that manage rolling code security and obstacle detection.
Logic boards typically fail or require resetting due to three primary causes:
- Power Surges: Lightning strikes or grid fluctuations can corrupt the EEPROM memory.
- Age-Related Capacitor Failure: Electrolytic capacitors degrade over 10–15 years, causing intermittent signal loss.
- Software Glitches: Rolling code synchronization errors between the remote and receiver create “locked” states.
Understanding the root cause helps determine if a simple reset suffices or if hardware replacement is necessary. Industry data suggests that approximately 30% of service calls for unresponsive openers are resolved through proper logic board resets rather than full unit replacements, saving homeowners an average of $150–$250 per incident.
Signs Your Logic Board Needs a Reset (Not Replacement)
Misdiagnosis leads to wasted money. Before attempting any reset procedure, verify these symptoms align with a software/memory issue rather than catastrophic hardware failure:
| Symptom | Likely Cause | Reset Recommended? |
|---|---|---|
| Remote works intermittently | Signal sync error | ✅ Yes |
| Wall button works, remotes don’t | Receiver memory corruption | ✅ Yes |
| Motor hums but doesn’t move | Capacitor/gear failure | ❌ No |
| Safety lights flash 5+ times | Sensor alignment/board fault | ⚠️ Maybe |
| Complete silence/no lights | Transformer/board death | ❌ No |
| Opens/closes randomly | RF interference/code clash | ✅ Yes |
Expert Insight: Certified garage door technicians emphasize that if your opener has zero LED indicators when powered, the logic board has likely suffered irreversible electrical damage. A reset only addresses software state issues, not physical component burnout. Always check the transformer output (should be 12–24V AC depending on model) before assuming the board is salvageable.
Safety First: Critical Precautions Before Resetting
Working with garage door openers involves electricity and heavy mechanical components. Never skip these precautions:
- Disconnect Power: Unplug the opener or turn off the dedicated circuit breaker. Wait 60 seconds minimum to allow residual capacitor charge to dissipate.
- Secure the Door: Manually lower the door completely and engage the manual lock if present. This prevents accidental movement during troubleshooting.
- Use Insulated Tools: If accessing internal components, use VDE-certified insulated screwdrivers rated for 1,000V.
- Document Settings: Photograph wiring connections and DIP switch positions before disassembly. Factory resets erase all programmed remotes and travel limits.
- Check Warranty Status: Opening certain models may void warranties. Verify coverage first; many manufacturers provide free tech support for reset procedures.
⚠️ Warning: Garage door springs store lethal energy. Never attempt to adjust springs, cables, or pulleys during logic board work. Limit your scope strictly to electronic diagnostics and reset procedures.
Step-by-Step: How To Reset Logic Board On Garage Door Opener
Reset procedures vary significantly by brand and era. Below are validated methods for the most common U.S. residential openers. Always consult your specific model’s manual first, as incorrect sequences can permanently lock the board.
Method 1: Soft Reset via Learn Button (Most Modern Units)
This clears remote/keypad memory without erasing travel limits or force settings. Ideal for sync issues.
- Locate the “Learn” or “Smart” button on the back/side of the motor unit (typically yellow, orange, purple, or red).
- Press and hold the Learn button for exactly 6–10 seconds until the adjacent LED turns off. Release immediately after LED extinguishes.
- Wait 30 seconds for the board to complete its internal reboot cycle.
- Test the wall control panel. If functional, proceed to reprogram remotes by briefly pressing Learn once (LED illuminates), then pressing your remote button within 30 seconds.
- Reprogram all wireless accessories (keypads, vehicle Homelink, etc.) as they were erased during reset.
Applicable Brands: LiftMaster/Chamberlain/Craftsman (Security+ 2.0 & MyQ), Genie Intellicode Series II/III, Overhead Door CodeDodger.
Method 2: Hard Factory Reset (Persistent Issues Only)
Use this when soft resets fail or after power surge events. Note: This erases ALL settings including travel limits, force adjustments, and Wi-Fi credentials.
- Disconnect power for full 2 minutes.
- While unplugged, press and hold the Learn button for 15 seconds to drain residual board capacitance.
- Restore power while continuing to hold Learn for another 10 seconds post-power-up.
- Release button. LED should flash rapidly indicating factory default state.
- Recalibrate Travel Limits Immediately:
- Press and hold the UP button until door fully opens, release.
- Press and hold DOWN button until door seals floor, release.
- Test auto-reverse safety feature with a 2×4 block on floor. Door must reverse within 2 seconds of contact.
- Adjust force settings per manufacturer specs (usually ¼-turn increments on adjustment screws). Excessive force damages doors; insufficient force causes reversal failures.
Critical Note: Some newer MyQ-enabled units require app-based factory resets via the myQ smartphone application under Device Settings > Advanced > Factory Reset. Physical button sequences alone may not fully clear cloud-linked configurations.
Method 3: Legacy DIP Switch Openers (Pre-1997 Models)
Older fixed-code units lack learn buttons. Resetting requires matching transmitter/receiver switch patterns:
- Open both remote and motor unit covers to expose 8–12 position DIP switches.
- Set all switches to a new unique pattern (avoid all-up/all-down defaults prone to neighbor interference).
- Ensure remote and receiver patterns match exactly.
- Test operation. Change pattern again if neighboring openers trigger yours (common in dense housing).
These units lack modern safety features. Strongly consider upgrading to current UL 325-compliant models with photoelectric eyes and auto-reverse mechanisms.
Troubleshooting Failed Resets: When to Call a Professional
If multiple reset attempts yield no improvement, deeper issues exist:
- Multimeter Testing: Check logic board DC voltage at test points (refer to service manual). Readings outside ±10% spec indicate regulator failure.
- Capacitor Inspection: Bulging, leaking, or crusty capacitors require soldering skills and ESD-safe handling. DIY replacement costs ~$15 in parts but risks further damage if done incorrectly.
- RF Interference: Use an SDR dongle or spectrum analyzer to identify conflicting frequencies. LED bulbs, solar inverters, and amateur radio equipment commonly jam 315/390 MHz bands.
- Board-Level Diagnostics: Professionals use proprietary diagnostic tools (e.g., LiftMaster 880LM Tester) to isolate failed ICs or traces beyond consumer capability.
Industry benchmarks show that 15–20% of “unresettable” boards have repairable cold solder joints or trace corrosion. However, labor costs often exceed new board pricing ($80–$180). Factor in age: openers over 15 years old rarely justify board-level repairs given improved safety standards and energy efficiency of modern units.
Frequently Asked Questions (FAQ)
Q1: Will resetting my garage door opener delete my programmed remotes?
Yes, nearly all reset procedures erase stored remote codes as a security measure. You must reprogram every wireless device afterward. Keep spare remotes handy and note that vehicle-integrated systems (Homelink/Car2U) require separate reprogramming steps detailed in your car’s owner manual. Budget 15–20 minutes for complete re-pairing.
Q2: How often should I reset my garage door logic board as maintenance?
Routine resets are unnecessary and potentially counterproductive. Only reset when experiencing documented symptoms like unresponsiveness or erratic behavior. Preventive maintenance should focus on monthly sensor cleaning, annual lubrication of rollers/hinges, and biannual safety reversal testing. Proactive resets offer no benefit and risk introducing configuration errors.
Q3: Can a power surge damage the logic board even with a surge protector?
Absolutely. Standard power strips provide inadequate protection against direct lightning-induced surges exceeding 1,000 volts. Dedicated garage door surge suppressors (rated ≥50kA let-through) clamp transients before reaching sensitive electronics. Even with protection, nearby strikes can induce currents through antenna wiring or ground paths. Post-storm testing is always recommended regardless of visible damage.
Q4: My opener resets successfully but stops working again within days. What’s wrong?
Recurring failures point to underlying hardware degradation rather than software glitches. Common culprits include failing electrolytic capacitors (symptoms worsen with temperature), cracked solder joints expanding/contracting thermally, or water intrusion corroding traces. Document failure timing relative to weather/usage patterns. Intermittent issues are diagnostically challenging; professional evaluation with oscilloscope testing is usually warranted after two recurrences.
Q5: Is it safe to buy a used logic board as a cheaper replacement?
Generally discouraged. Used boards carry unknown stress history, potential latent defects, and zero warranty. More critically, firmware versions must match your exact motor assembly revision; mismatched boards cause communication failures or disabled safety features. New OEM boards cost $80–$180 with warranties spanning 1–5 years. Third-party compatibles exist but verify UL listing and return policies. Savings rarely justify reliability risks for safety-critical systems.
Q6: Do smart/Wi-Fi garage openers require different reset procedures?
Yes. Connected openers integrate cloud authentication and local network credentials absent in legacy units. Physical button resets may restore basic RF functionality but leave Wi-Fi modules in orphaned states requiring app-based reprovisioning. Some brands mandate account unlinking via mobile app before physical resets take effect. Always update firmware to latest version post-reset; outdated firmware contains known bugs causing repeat failures. Consult manufacturer-specific IoT documentation rather than generic guides.
Conclusion: Restoring Peace of Mind Safely
Learning how to reset logic board on garage door opener systems empowers homeowners to resolve common electronic glitches confidently and economically. By following methodical diagnostics, respecting safety protocols, and understanding when professional intervention is necessary, you extend equipment life while maintaining household security. Remember that successful resets address software states—not hardware failures—and recurring issues demand deeper investigation.
Modern garage door systems blend convenience with critical safety functions. When in doubt, prioritize certified technician evaluation over repeated DIY attempts. Your family’s safety outweighs any potential savings from improper repairs.
Found this guide helpful? Share it with neighbors, friends, or community groups who might be battling silent garage doors! Tag us on social media with your success stories or lingering questions—we love seeing our readers regain reliable access to their homes. Safe troubleshooting! 🔧🏡



Leave a Reply