Introduction
There are few things more frustrating than a garage door that stops halfway, reverses unexpectedly, or slams into the floor when you’re rushing to leave for work. If your door is acting up, knowing how to reset limits on Chamberlain garage door opener models is the first step toward restoring safety and convenience to your daily routine. This common issue usually stems from misaligned travel sensors rather than mechanical failure, and with the right guidance, you can resolve it quickly without calling a technician.
Why Do Chamberlain Garage Door Limits Need Resetting?
Before diving into the adjustment process, it helps to understand why these limits drift out of calibration. Garage door openers rely on electronic travel limits to determine exactly where the “fully open” and “fully closed” positions are. Over time, several factors can disrupt this precision:
- Seasonal Temperature Changes: Metal tracks expand in summer and contract in winter, altering the physical distance the door travels.
- Wear and Tear on Components: Springs lose tension, rollers wear down, and lubrication dries up, changing the resistance the motor encounters.
- Power Interruptions: Sudden power surges or outages can sometimes corrupt the logic board’s stored memory regarding travel distance.
- Physical Obstructions: If the door previously hit an object and triggered the auto-reverse safety sensor, the system may have recalibrated incorrectly.
According to industry maintenance standards, garage door systems should be inspected and tested at least twice a year. Neglecting this can lead to premature motor burnout because the opener works harder against incorrect limit settings. Understanding the mechanics behind garage door automation provides valuable context for why these electronic adjustments are so critical for both safety and longevity.
Safety First: Pre-Adjustment Checklist
Before you touch any buttons or climb a ladder, complete this safety protocol. Working with garage doors involves high-tension springs and heavy moving parts.
- Clear the Area: Remove all vehicles, bicycles, trash cans, and pets from the door’s path.
- Disconnect the Lock: Ensure any manual slide lock or floor lock is fully disengaged. Forcing the opener against a locked door will strip gears.
- Inspect Hardware: Visually check cables for fraying and springs for gaps. Do not proceed if you see damaged cables; call a professional immediately.
- Locate Your Model Number: Find the label on the motor unit. Chamberlain has different adjustment methods for belt-drive, chain-drive, and smart (MyQ) models.
- Have a Helper: It is significantly safer and easier to adjust limits while someone else operates the remote or watches the door’s movement from a safe distance.
Step-by-Step: How to Reset Travel Limits
The following instructions apply to most modern Chamberlain and LiftMaster units manufactured after 2000. Always defer to your specific owner’s manual if these steps differ from your model’s requirements.
Step 1: Enter Programming Mode
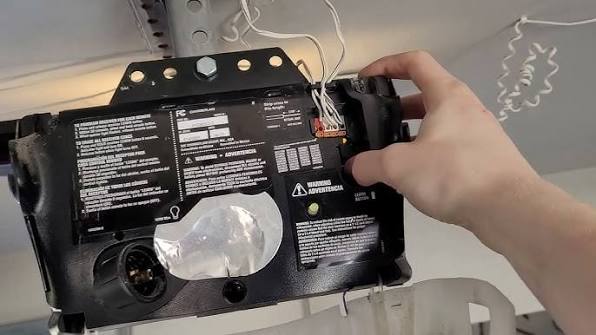
Locate the adjustment buttons on the back or side panel of the motor unit. You will typically see three buttons labeled UP, DOWN, and SET/PROGRAM. Press and hold the SET/PROGRAM button until the LED indicator light begins to flash or you hear a confirmation beep. This signals that the unit is ready to accept new limit data.
Step 2: Set the UP Limit
Press and hold the UP button. The door will begin to rise. Release the button once the door reaches your desired fully-open position.
- Critical Detail: Leave at least 2 inches of clearance between the top of the door and the header bracket or ceiling. This prevents the door from binding at the apex of travel.
- Once positioned, press the SET/PROGRAM button once to lock in the upper limit. The LED should change color or flash differently to confirm.
Step 3: Set the DOWN Limit
Press and hold the DOWN button. Watch carefully as the door descends. Release the button when the bottom seal makes full, even contact with the garage floor.
- Avoid Over-Travel: Do NOT let the door compress excessively against the concrete. Excessive downward pressure triggers the safety reverse mechanism and strains the motor.
- Press SET/PROGRAM again to save the lower limit.
Step 4: Test the Force Settings
Resetting limits often requires re-verifying force sensitivity. Operate the door through one complete cycle using your wall console. Place a 2×4 piece of wood flat on the floor under the center of the door and close it. The door must stop and reverse within 2 seconds of contacting the wood. If it doesn’t, adjust the force dial slightly downward and retest. This test ensures compliance with federal safety standards.
Step 5: Final Cycle Verification
Run the door through three consecutive open-close cycles without interruption. Listen for unusual grinding, hesitation, or jerking. Smooth, consistent operation confirms successful calibration.
Troubleshooting: When Limits Won’t Save
Even experienced DIYers encounter stubborn units. Use this diagnostic table if your reset attempt fails:
| Symptom | Likely Cause | Recommended Fix |
|---|---|---|
| Door reverses before hitting floor | Down force too low OR obstructed track | Increase down force by 1 increment; clean/lubricate tracks |
| Door won’t stay closed (pops back up) | Down limit set too far | Reprogram down limit with less compression |
| Motor hums but door doesn’t move | Stripped gear or broken spring | STOP. Professional repair required |
| Limits reset after power loss | Failing capacitor or logic board | Replace capacitor ($15–$25 part); consider board replacement if recurring |
| Remote works but wall button doesn’t | Wiring short or bad button | Check wire connections at motor head and wall station |
Expert Insight: “Ninety percent of ‘limit’ problems we service are actually lubrication or alignment issues masquerading as electronic failures. Always grease rollers and check track plumb before reprogramming.” — Certified Garage Door Technician, International Door Association training materials.
Maintaining Your Settings Long-Term
Prevention reduces future resets. Implement this biannual maintenance schedule:
- Spring & Fall Lubrication: Apply white lithium grease to rollers, hinges, and bearings. Avoid WD-40, which attracts dust and gums up mechanisms.
- Balance Test Quarterly: Disconnect the opener via the emergency release cord. Manually lift the door halfway. A properly balanced door stays in place; if it falls or rises, your springs need professional adjustment. Unbalanced doors destroy limit calibrations rapidly.
- Sensor Alignment Check: Wipe photo-eye lenses monthly and verify indicator lights are solid green. Misaligned sensors mimic limit failures.
- Track Inspection: Look for dents, loose bolts, or debris. Even minor track damage creates variable resistance that confuses electronic limits.
Frequently Asked Questions
How often should I reset my Chamberlain garage door limits?
Under normal conditions, you should only need to reset limits once every 2–3 years or after significant hardware changes like spring replacement. Frequent resetting indicates underlying mechanical problems that require professional diagnosis.
Can I reset limits using the MyQ smartphone app?
No. Travel limit adjustments are hardware-level functions that must be performed directly at the motor unit. The MyQ app controls scheduling, monitoring, and user permissions but cannot modify core safety parameters like travel endpoints.
What happens if I set the down limit too tight against the floor?
Excessive downward pressure causes the safety reverse sensor to activate repeatedly, leading to incomplete closing cycles. More seriously, it accelerates wear on the drive gear, motor windings, and bottom weather seal. Replacement of stripped plastic drive gears costs $80–$150 in parts alone.
Will disconnecting power erase my limit settings?
Modern Chamberlain units use non-volatile memory that retains limit data during power outages. However, older models (pre-2005) or units with failing capacitors may lose calibration after extended outages. Using a surge protector rated for garage door openers ($20–$30 investment) protects both memory and electronics.
My door opens fine but won’t close completely. Is this a limit issue?
This is frequently a photo-eye sensor problem rather than a limit issue. Check for sunlight interference, spider webs on lenses, or misalignment. If sensors show solid indicator lights and the problem persists, then proceed with down-limit adjustment as described above.
Should I hire a professional instead of doing this myself?
If you are uncomfortable working near high-tension springs, lack a helper, or your door shows signs of cable damage, absolutely hire a certified technician. Garage door repairs account for thousands of emergency room visits annually. Professional limit adjustment typically costs $75–$125 and includes a comprehensive safety inspection—a worthwhile investment for peace of mind.
Conclusion
Mastering how to reset limits on Chamberlain garage door opener systems empowers you to maintain one of your home’s most-used mechanical systems safely and efficiently. By following the step-by-step process outlined above, prioritizing safety checks, and committing to regular maintenance, you’ll extend your opener’s lifespan and prevent inconvenient breakdowns. Remember: when in doubt, professional help is always the smarter choice over risking injury or costly damage.
Found this guide helpful? Share it with fellow homeowners on Facebook, Pinterest, or your neighborhood Nextdoor group! Someone in your community is probably struggling with a misbehaving garage door right now. Tag us in your posts—we love seeing your DIY wins and answering follow-up questions. Safe lifting! 🏠🔧



Leave a Reply