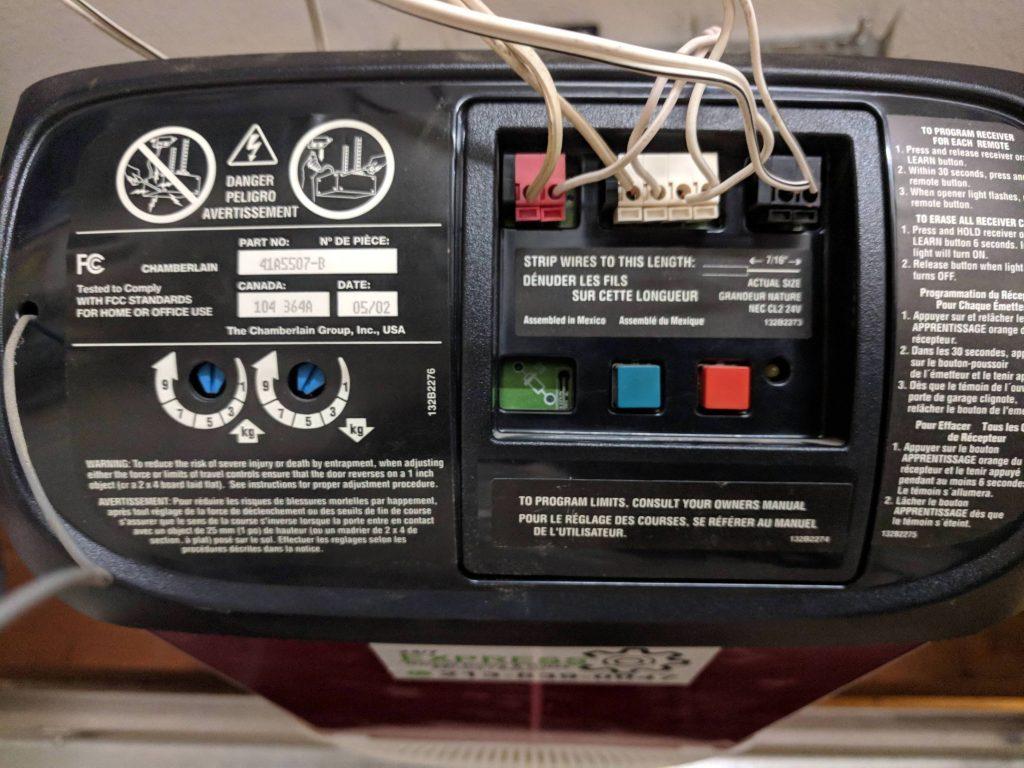
Dealing with a garage door that stops prematurely, reverses unexpectedly, or crashes into the concrete is undeniably stressful and poses a major security risk to your home. If you are searching for exactly how to set travel on Chamberlain garage door opener, you have found the ultimate beginner-friendly guide to solving this issue. Let’s walk through the adjustments together so you can restore smooth, safe, and secure operation in just a few minutes!
How To Set Travel On Chamberlain Garage Door Opener: A Complete Guide
Before we grab our tools, it is crucial to understand what travel limits actually do. Essentially, the travel limits tell your Chamberlain motor exactly how far to move the door up and down. When you push the button on your remote, the motor does not actually “see” the floor or the ceiling. Instead, it relies on an internal counter or physical limit switches to know when to stop pulling the heavy trolley.
When these limits are out of sync, your door might stop halfway up, leaving your home exposed to the elements. Or worse, it might push too hard against the floor, damaging the door panels or burning out the motor. According to industry repair statistics, improper limit settings account for nearly 30% of premature garage door opener motor failures. By learning the proper adjustment techniques, you can easily save hundreds of dollars in replacement costs.
For a broader understanding of how these mechanical systems work, you can read about the history and core mechanics of the garage door opener on Wikipedia. Understanding the basic engineering makes the physical adjustment process much less intimidating for beginners.
Essential Tools for Adjusting Chamberlain Travel Limits
You do not need a massive toolbox to fix this issue. Most Chamberlain models use a simple dial or screw system that requires minimal equipment. Here is what you should gather before climbing the ladder:
- Stepladder: Ensure it is stable and tall enough to comfortably reach the motor unit mounted on your ceiling.
- Flathead Screwdriver: Most older and standard Chamberlain models use slotted screws for the up and down limit adjustments.
- Tape Measure: This helps you measure the exact gap between the bottom of the door and the floor for precise adjustments.
- Safety Glasses: Always protect your eyes from dust and debris that might fall from the ceiling track.
- Work Gloves: To protect your hands when manually testing the heavy door.
Step-by-Step Instructions to Set Your Travel Limits
Now, let us get to the practical part. Safety first: ensure the area around the door is completely clear of people, pets, and objects before beginning.
Step 1: Locate the Limit Adjustment Screws
Grab your stepladder and safely position it beneath the Chamberlain motor unit. Look at the side or back of the unit. You will see two distinct screws or dials clearly labeled “Up” and “Down” (or “Open” and “Close”).
Note: On some newer, smart Chamberlain models, these adjustments are done via the MyQ app or a digital menu on the motor itself. If you have a digital model, consult your specific user manual for the digital interface steps.
Step 2: Measure the Current Gap
Close the garage door using your remote or wall button. If the door stops before touching the floor, use your tape measure to check the gap in the center of the door. Let us say there is a 4-inch gap between the bottom weather seal and the concrete. This is your baseline for adjustment.
Step 3: Adjust the Down Travel Limit
This is where the magic happens. The general rule of thumb for most Chamberlain screw-drive and chain-drive models is that one full turn (360 degrees) of the limit screw equals roughly 2 to 3 inches of door travel.
Since we have a 4-inch gap, you will want to turn the “Down” screw clockwise to increase the downward travel distance.
- Insert your flathead screwdriver into the “Down” limit screw.
- Turn it clockwise for about one and a half full rotations.
- Keep track of your turns so you can reverse them if you accidentally over-adjust.
Step 4: Test the Door Movement
Step down from the ladder and use your remote to open the door completely, then close it again. Watch the door closely as it reaches the bottom.
Did it seal perfectly against the floor? If there is still a 1-inch gap, simply go back and give the “Down” screw one more half-turn clockwise.
Warning: Do not over-tighten the down limit! If the door presses too hard against the floor, the motor will think it hit an obstacle and automatically reverse back up to prevent crushing.
Step 5: Adjust the Up Travel Limit
Now check the open position. When fully open, the bottom of the door should be clear of the header bracket but high enough for your tallest vehicle to enter safely.
If the door stops too low, locate the “Up” limit screw. Turn it clockwise to increase the upward travel distance. Again, remember that one full turn equals about 2 to 3 inches of vertical movement. Test it until the clearance is perfect.
Travel Limits vs. Force Settings: What is the Difference?
Many beginners confuse travel limits with force settings. Mixing these up can lead to a damaged door or a serious safety hazard. Let us break down the differences using a simple comparison table.
| Feature | Travel Limits | Force Settings |
|---|---|---|
| Primary Function | Dictates how far the door moves up and down. | Dictates how much power the motor uses to move the door. |
| Common Symptoms of Error | Door stops short of the floor or ceiling. | Door reverses suddenly or struggles to lift the weight. |
| Adjustment Mechanism | Usually plastic screws on the side/back of the motor. | Usually dials or digital settings controlling motor torque. |
| Safety Risk | Door might leave a gap (security risk). | Door might crush objects or people (extreme danger). |
Expert Insight: According to certified garage door technicians, you should always adjust the travel limits first. Only if the door is struggling to lift or pushing too hard into the ground after the limits are set should you slightly tweak the force settings. Never increase the force to overcome a bad travel limit!
Troubleshooting Common Adjustment Issues
Even after following the steps, you might run into minor hiccups. Here is a quick troubleshooting guide to help you solve the most frequent problems.
The Door Reverses Immediately Upon Touching the Floor
This means your “Down” travel limit is set too far. The motor senses resistance against the concrete and triggers the safety auto-reverse feature. Simply adjust the down limit screw counter-clockwise by a quarter turn to fix this.
The Door Stops Halfway Up
Your “Up” limit is too short, or there is physical resistance in the tracks. Before adjusting the screw, manually pull the emergency release cord and lift the door by hand. It should move smoothly. If it sticks, you need to lubricate your tracks and rollers before adjusting the motor limits.
Real-World Case Study: The Winter Weather Effect
Consider a homeowner in Minnesota who noticed their garage door reversing every winter. Instead of calling a $150 repair service, they realized the freezing temperatures caused the metal tracks to contract slightly. By simply adjusting the down limit screw by just a quarter turn during the colder months, they completely resolved the issue without spending a dime.
Frequently Asked Questions (FAQ)
Q1: Why does my Chamberlain garage door reverse before hitting the floor?
A: This is almost always caused by the “Down” travel limit being set too far. The motor senses resistance against the concrete and triggers the safety auto-reverse feature. Simply adjust the down limit screw counter-clockwise by a quarter turn to fix this.
Q2: How often should I reset the travel limits on my opener?
A: Under normal conditions, you only need to adjust the limits when you notice a problem or after replacing a broken spring or cable. However, extreme seasonal temperature changes can cause metal tracks to expand or contract, so checking your limits once a year in the spring is a great preventative habit.
Q3: Can I adjust the travel limits without a ladder?
A: It is highly discouraged. The limit screws are located directly on the motor unit, which is mounted near the ceiling. Attempting to reach them from a chair or unstable surface is a major fall hazard. Always use a properly rated, stable stepladder.
Q4: Do newer Chamberlain smart models have manual travel limit screws?
A: Many of the newest Chamberlain models equipped with Wi-Fi and the MyQ app do not have physical adjustment screws. Instead, the travel limits are calibrated digitally through the MyQ mobile app or via the smart control panel on your garage wall. Check your specific model number online to see if yours is a digital calibration model.
Q5: What happens if I turn the limit screw too many times?
A: If you over-adjust the “Up” limit, the door might try to pull past the physical track, bending the metal arm or stripping the internal carriage gear. If you over-adjust the “Down” limit, the door will buckle under pressure and reverse. Always make small adjustments (a quarter turn at a time) and test the door between each turn.
Q6: Is it safe to bypass the safety sensors to test the travel limits?
A: Absolutely not. The photo-eye safety sensors located near the floor are legally mandated to prevent the door from closing on children, pets, or objects. Never tape them down or bypass the wiring while testing your travel limits.
Conclusion
Mastering how to set travel on Chamberlain garage door opener is one of the most rewarding DIY maintenance tasks you can perform. By taking just ten minutes to adjust these simple screws, you protect your vehicle, secure your home, and extend the lifespan of your expensive garage door motor. Remember to make small adjustments, test the door frequently, and always prioritize your safety.
Did you find this guide helpful? Share this article with your friends and neighbors on Facebook, Pinterest, or Twitter so they can fix their garage doors too! Drop a comment below if you have any lingering questions, and happy fixing!



Leave a Reply