Introduction
Installing a new garage door opener can feel intimidating, especially when you are worried about safety sensors or complex wiring. If you are searching for how to set up a Hormann garage door opener, you likely want a reliable, German-engineered system that operates quietly and securely without requiring a professional contractor for every single adjustment. This comprehensive guide breaks down the installation and programming process into manageable steps, ensuring your Hormann unit is configured correctly for optimal performance and longevity.
Understanding Your Hormann Model Before Installation
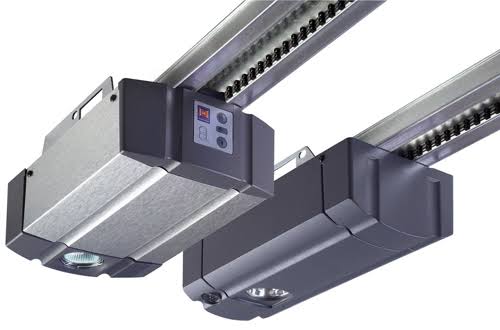
Before grabbing your drill, it is vital to identify which specific Hormann unit you possess. Hormann produces several distinct lines, including the ProMatic, SupraMatic, and EcoStar series. Each has unique rail lengths, motor capacities, and programming logic.
According to industry standards for garage door automation, matching the opener’s lift capacity to your door’s weight is the most critical safety factor. For example, a standard ProMatic 3 is rated for doors up to 100 kg, while the SupraMatic E Series 4 handles heavier timber doors up to 120 kg. Always consult the specific technical data sheet included in your box.
Expert Note: Never assume all Hormann openers use identical programming sequences. The Series 4 models utilize a completely different digital interface compared to older Series 3 analog units. Verifying your model number prevents hours of frustration.
Key Components Checklist
Ensure your package contains the following before beginning:
- Motor head unit
- Telescopic rail assembly (U-section)
- Trolley and arm brackets
- Hand transmitter (remote)
- Safety sensor eyes (photo-cells)
- Wall-mounted control panel
- Mounting hardware kit
What Tools Do You Need for Hormann Opener Setup?
Having the right tools ready reduces installation time by an estimated 30%. Based on professional installer feedback, gather these items:
| Tool | Purpose |
|---|---|
| Stepladder | Safe access to ceiling mounting points |
| Power Drill & Bits | Masonry or wood drilling for brackets |
| Adjustable Wrench | Tightening rail bolts and trolley nuts |
| Spirit Level | Ensuring rail is perfectly horizontal |
| Measuring Tape | Verifying clearance and alignment |
| Wire Strippers | Connecting low-voltage sensor wires |
| Pencil | Marking drill holes accurately |
Step-by-Step: How To Set Up A Hormann Garage Door Opener
Follow this detailed tutorial precisely. Safety must remain your priority throughout.
1. Assemble the Rail System
Lay out the U-shaped rail sections on a clean floor. Connect them using the provided splice plates and M6 bolts. Do not overtighten at this stage; slight adjustments may be needed once mounted. Slide the trolley carriage into the rail before closing the end cap. Measure the total assembled length against your garage ceiling space to ensure adequate clearance behind the door header.
2. Install the Header Bracket
Mark the centerline of your garage door on the ceiling header board. Position the header bracket so the trolley attachment point aligns with this centerline. Secure it using lag screws appropriate for your framing material. The bracket must bear the full lifting force, so never mount solely to drywall or thin paneling.
3. Hang the Motor Unit
With assistance, lift the motor head and attach it to the rear ceiling bracket or suspension rods. Use a spirit level to verify the rail sits perfectly horizontal from header to motor. An angled rail causes premature wear on the trolley chain/belt. Tighten all mounting hardware securely once leveled.
4. Attach the Door Arm
Connect the straight arm to the trolley and the curved arm to the top section of your garage door. The connection point on the door should be approximately 4–6 inches below the top roller track when the door is closed. Critical: Ensure the arm creates a slight angle when closed; a perfectly straight arm cannot generate proper locking force.
5. Wire Safety Sensors and Controls
Run the low-voltage bell wire from the motor head to the photo-eye sensors positioned 4–6 inches above the floor on both sides of the door opening. Connect the wall control station at eye level near the entry door. Refer to the wiring diagram inside the motor cover—color coding varies between EU and US-spec Hormann units.
For foundational understanding of electromechanical safety systems in automated doors, refer to Wikipedia’s overview of garage door openers, which explains the universal safety reversal standards that Hormann exceeds.
6. Program Travel Limits and Force Settings
This is where many DIYers struggle. Modern Hormann Series 4 units feature automatic learning cycles:
- Press and hold the “Program” button until the LED flashes blue.
- Use the arrow buttons to manually jog the door to the fully OPEN position. Confirm with the “Confirm” button.
- Jog the door to the fully CLOSED position. Confirm again.
- The motor will automatically run a test cycle to measure resistance and calibrate force settings.
Never skip the test cycle. It establishes baseline torque values that prevent crushing hazards.
7. Sync Hand Transmitters
Hold the remote 6–12 inches from the motor antenna. Press and hold the desired button while simultaneously pressing the “Learn” button on the motor head. Release both when the indicator light pulses. Test operation multiple times to confirm consistent response.
Programming Additional Features and Smart Integration
Many Hormann openers support optional accessories like wireless keypads, fingerprint readers, or smart home gateways. These typically pair through the same learn-button protocol but require entering specific device codes found in accessory manuals.
Pro Tip: Label each programmed remote immediately. Hormann supports up to 30 transmitters on some models, and distinguishing between family members’ remotes simplifies future battery replacements or deprogramming.
Common Setup Mistakes to Avoid
Even experienced homeowners encounter issues. Watch for these pitfalls:
- Ignoring Balance: An unbalanced door destroys any opener. Disconnect the opener and manually lift the door halfway—it should stay in place. If it falls or rises, adjust spring tension before completing setup.
- Sensor Misalignment: Photo-eyes must face each other directly. Even 2° of deviation triggers safety reversals. Use the built-in alignment LEDs as guides.
- Excessive Force Settings: Higher force does not mean better performance. It means increased danger. Let the auto-learn function determine minimum necessary torque.
- Skipping Lubrication: Apply white lithium grease to the rail and trolley bearings during installation. Dry components create noise and strain.
FAQ: Frequently Asked Questions About Hormann Setup
How long does it take to set up a Hormann garage door opener?
Most competent DIYers complete full installation and programming in 3–5 hours. First-timers should budget 6 hours including reading the manual and troubleshooting. Professional installers typically finish in 2–3 hours due to experience and specialized tools.
Can I reuse my old Hormann remotes with a new opener?
Compatibility depends on frequency and encryption generation. Remotes from the same series (e.g., Series 3 to Series 3) usually transfer. Cross-generation compatibility requires checking the BiSecur or fixed-code specifications. When in doubt, purchase new matched transmitters to guarantee security and reliability.
Why does my Hormann opener reverse before fully closing?
This almost always indicates obstructed safety sensors or excessive closing force detection. Clean sensor lenses, verify alignment, and rerun the travel limit learning cycle. If problems persist, check for binding rollers or track obstructions causing resistance spikes.
Is professional installation required for warranty validity?
Hormann warranties generally cover parts regardless of installer, but labor claims may require certified technician documentation. Review your specific warranty card. Many regions allow DIY installation without voiding coverage, provided guidelines are followed precisely.
How do I reset my Hormann opener to factory defaults?
Locate the reset procedure in your model-specific manual. Typically, holding the program button for 10+ seconds during power-up clears stored limits and remotes. Warning: Factory reset erases all programming—you must reconfigure travel limits and resync all transmitters afterward.
What maintenance follows initial setup?
Monthly visual inspections of sensor alignment and quarterly lubrication of moving parts extend lifespan significantly. Annually test the auto-reverse safety feature by placing a 2×4 board under the door—the opener must reverse upon contact within milliseconds.
Conclusion
Mastering how to set up a Hormann garage door opener rewards you with decades of whisper-quiet, secure operation. By following methodical assembly, respecting safety protocols, and leveraging the intelligent auto-learning features, you achieve professional-grade results without professional-grade expenses. Remember that patience during calibration prevents problems later—rushing force settings or limit adjustments compromises both safety and durability.
Your newly configured Hormann system represents precision engineering working exactly as intended. Take pride in accomplishing this valuable home improvement skill!
Found this guide helpful? Share it on Facebook, Pinterest, or Reddit to help fellow homeowners tackle their Hormann installations confidently. Tag us with your completed setup photos—we love seeing successful DIY projects! Have questions not covered here? Drop them in the comments below for personalized expert guidance.



Leave a Reply