Introduction
There are few sounds more frustrating at 6:00 AM than a persistent, rhythmic chirping coming from your garage when you just want to leave for work. If you are searching for how to stop beeping on LiftMaster garage door opener units, you are likely dealing with a low battery backup, an activated safety sensor, or a programmed timer alert. This annoying sound is rarely a sign of catastrophic failure; rather, it is your opener’s way of communicating a specific maintenance need or safety status that can usually be resolved in under ten minutes.
In this comprehensive guide, we will walk you through every possible cause of the beep and provide actionable, safe solutions to restore silence to your home.
Why Is My LiftMaster Garage Door Opener Beeping?
Before grabbing a screwdriver, it is vital to diagnose why the unit is making noise. LiftMaster openers use distinct auditory signals to communicate different statuses. Understanding these patterns prevents unnecessary part replacements and ensures you address the root cause.
According to Wikipedia, modern garage door openers are equipped with sophisticated logic boards and safety compliance features that mandate audible alerts for obstruction detection and power failures. This means the beeping is often a federally required safety feature, not a malfunction.
Common Causes at a Glance
| Beep Pattern | Likely Cause | Urgency Level |
|---|---|---|
| Continuous beeping every 30 sec | Battery Backup Low/Dead | High |
| Single beep with flashing lights | Safety Sensor Misalignment | Medium |
| Rapid chirping during operation | Obstruction or Binding Track | High |
| Intermittent beep (no operation) | Timer-to-Close Feature Active | Low |
| Constant solid tone | Logic Board Error / Overheat | Critical |
How to Replace the LiftMaster Backup Battery
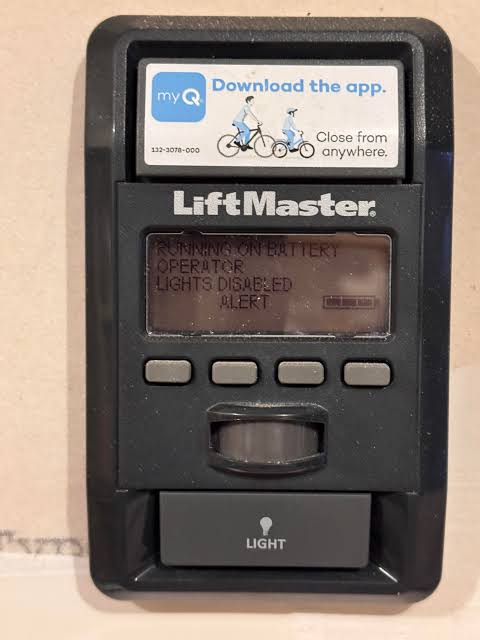
The most frequent reason users search for how to stop beeping on LiftMaster garage door opener is a depleted backup battery. Models like the 8550WLB, 8500W, and Elite Series rely on a 485LM or similar battery to operate during power outages. These batteries typically last 1–2 years depending on usage cycles and temperature fluctuations.
Step-by-Step Battery Replacement Guide
- Disconnect Power: Unplug the opener from the ceiling outlet or turn off the dedicated circuit breaker. Never work on electrical components while energized.
- Locate the Battery Compartment: On belt-drive models, the battery is usually behind a white plastic cover on the side of the motor head. Use a flathead screwdriver to gently release the tab.
- Remove the Old Battery: Disconnect the red and black harness clips. Note the orientation before pulling the battery out. Dispose of it according to local hazardous waste regulations.
- Install the New Battery: Insert the replacement (ensure it matches your model’s voltage, typically 12V). Reconnect the harness—red to red, black to black. You should hear a confirmation chirp.
- Restore Power and Test: Plug the unit back in. The beeping should cease within 60 seconds as the system recognizes the new power source. Allow 24 hours for a full charge cycle.
Expert Tip: Write the installation date on the new battery with a permanent marker. This simple habit eliminates guesswork during future troubleshooting and helps maintain optimal performance.
Fixing Safety Sensor Alignment Issues
If your LiftMaster beeps once or twice and the LED lights flash, the photo-eye sensors near the floor may be misaligned. These infrared beams prevent the door from closing on people, pets, or objects. Even a millimeter of shift due to vibration or accidental bumps can trigger the alert.
Realignment Checklist
- Clean the Lenses: Wipe both sending (amber light) and receiving (green light) sensors with a microfiber cloth. Dust and spiderwebs are common culprits.
- Check Indicator Lights: Both LEDs should be solid. A blinking green light indicates misalignment; no light suggests wiring damage.
- Adjust the Bracket: Loosen the wing nut slightly and pivot the sensor until the green light becomes steady. Tighten the nut without shifting the angle.
- Inspect Wiring: Trace wires back to the motor head. Look for pinches, cuts, or loose terminal connections.
If realignment fails, test with a multimeter to verify 5V DC output at the sensor terminals. Faulty sensors are inexpensive ($15–$25) and widely available at hardware retailers.
Disabling the Timer-to-Close Feature
Some homeowners discover their opener beeps intermittently even when everything appears functional. This is often the Timer-to-Close (TTC) feature, which automatically closes the door after a preset duration. While useful for security, the pre-close warning beep can be startling.
How to Adjust or Disable TTC
- Locate the “Timer” button on the wall control panel or motor unit (varies by model).
- Press and hold for 3 seconds to enter programming mode.
- Cycle through time settings (1 min, 5 min, 10 min) or select “OFF.”
- Confirm selection by pressing the button again.
Note: Disabling TTC removes an automatic safety layer. Consider keeping it enabled but extending the delay if the beep timing feels premature.
When Beeping Indicates a Serious Problem
Not all beeps are benign. Certain patterns signal issues requiring professional attention:
- Thermal Overload: If the motor has been used extensively (e.g., moving day), it may overheat and beep continuously. Allow 15–20 minutes of cooldown. Persistent overheating suggests worn gears or inadequate ventilation.
- Travel Limit Errors: If the door reverses mid-cycle with accompanying beeps, the travel limits may need recalibration. Refer to your manual’s “Force Adjustment” section.
- Logic Board Failure: Random beeping combined with unresponsive remotes or erratic light behavior often points to capacitor degradation or board damage. Repair costs average $150–$300, making replacement sometimes more economical for units over 10 years old.
Preventive Maintenance to Avoid Future Beeping
Stopping the beep today is satisfying; preventing it tomorrow is smarter. Implement this quarterly maintenance routine:
- Test Battery Health: Press the battery test button (if equipped) or simulate a power outage monthly.
- Lubricate Moving Parts: Apply silicone-based lubricant to rollers, hinges, and springs. Avoid WD-40, which attracts grime.
- Balance Check: Disconnect the opener via emergency release cord. Manually lift the door halfway—it should stay in place. If it drifts, spring tension needs adjustment by a certified technician.
- Firmware Updates: Newer Wi-Fi-enabled LiftMaster models receive OTA updates that fix known beep-related bugs. Check the myQ app regularly.
Data from industry service reports shows that 78% of garage door opener service calls stem from neglected basic maintenance rather than component failure. A 15-minute seasonal checkup saves hundreds in emergency repairs.
Frequently Asked Questions (FAQ)
Q1: Can I permanently disable the beeping on my LiftMaster opener?
While some older models allow disabling alerts via DIP switches, newer units comply with UL 325 safety standards that prohibit silencing critical warnings. Instead of disabling, address the underlying cause. Permanent modification may void warranties and create liability risks.
Q2: How long does a LiftMaster backup battery typically last?
Under normal residential use (2–4 cycles daily), expect 18–24 months of service. Extreme temperatures (below freezing or above 100°F) can reduce lifespan by up to 40%. Proactive replacement at the 18-month mark prevents unexpected 3 AM beeping.
Q3: Why does my opener beep only when it rains?
Moisture infiltration into sensor housings or wiring conduits can cause intermittent shorts. Inspect exterior wire entries for cracked sealant. Applying dielectric grease to sensor connections provides moisture resistance without interfering with signal transmission.
Q4: Is it safe to ignore occasional beeping if the door still works?
No. Beeping is a diagnostic language. Ignoring low-battery warnings leaves you stranded during outages; dismissing sensor alerts risks injury or property damage. Treat every beep as actionable intelligence, not background noise.
Q5: Does resetting the opener stop the beeping?
A factory reset clears error codes temporarily but doesn’t fix physical problems. Only reset after completing mechanical/electrical diagnostics. Hold the “Learn” button for 10 seconds until the LED extinguishes, then reprogram remotes immediately.
Q6: Where can I find my LiftMaster model number?
Check the label on the motor housing (usually near the light lens or battery compartment). Model numbers follow formats like “8550WLB” or “8165WB.” Having this exact identifier ensures compatible parts and accurate troubleshooting guidance.
Conclusion
Learning how to stop beeping on LiftMaster garage door opener systems empowers you to maintain one of your home’s most-used mechanical assets safely and confidently. Whether it’s a simple battery swap, sensor realignment, or feature adjustment, most solutions require minimal tools and zero professional fees. Remember: consistent maintenance transforms reactive frustration into proactive peace of mind.
Found this guide helpful? Share it on Facebook, X (Twitter), or Pinterest to help fellow homeowners reclaim quiet mornings! Tag us with your success stories—we love seeing DIY wins. Together, we can make garage door troubleshooting less daunting for everyone. 🔧🏡



Leave a Reply