Introduction
Is your Chamberlain garage door opener making strange noises, refusing to respond, or showing signs of wear that you just can’t ignore? Before you call an expensive technician or rush out to buy a brand-new unit, you might be surprised at what a simple teardown and inspection can reveal. In this comprehensive guide, we’ll walk you through how to take apart a Chamberlain garage door opener safely and methodically — even if you’ve never picked up a screwdriver for a home repair project before. Whether you’re dealing with a faulty logic board, a worn-out gear assembly, or a burned-out motor capacitor, understanding the inner workings of your opener is the first step toward fixing it yourself and saving hundreds of dollars in the process.
Why Would You Need to Disassemble Your Chamberlain Garage Door Opener?
Before diving into the nuts and bolts (literally), let’s talk about why you’d want to open up your garage door opener in the first place. Most homeowners only consider disassembly when something goes wrong, and that’s perfectly understandable. Here are the most common reasons:
- Unusual grinding or clicking noises coming from the motor housing
- The door opens partially then reverses without any obstruction
- The remote works intermittently, suggesting a logic board issue
- The motor hums but doesn’t move the chain or belt drive
- Burnt smell or visible scorch marks near the electrical components
- Routine maintenance after 7–10 years of continuous use
According to the International Door Association (IDA), the average lifespan of a residential garage door opener is approximately 10 to 15 years, depending on usage frequency and environmental conditions. If your Chamberlain unit is approaching that window, a proactive teardown can help you identify failing parts before they leave you stranded with a stuck garage door on a Monday morning.
Safety First: Essential Precautions Before You Begin
This cannot be overstated — garage door openers involve high-tension springs, live electrical wiring, and heavy moving components. Skipping safety steps isn’t just risky; it can be life-threatening.
What You’ll Need
| Tool / Item | Purpose |
|---|---|
| Phillips-head screwdriver (#2) | Removing housing screws |
| Flathead screwdriver | Prying clips and covers |
| Needle-nose pliers | Handling small wires and connectors |
| Socket wrench set (metric & SAE) | Loosening mounting bolts |
| Multimeter | Testing electrical continuity |
| Work gloves (cut-resistant) | Protecting hands from sharp edges |
| Safety goggles | Shielding eyes from debris |
| Step ladder (stable, non-conductive) | Reaching the ceiling-mounted unit |
| Smartphone camera | Documenting wire connections |
Critical Safety Steps
- Disconnect the power. Unplug the opener from the ceiling outlet or flip the dedicated circuit breaker in your electrical panel. Do not rely solely on the wall switch.
- Release the emergency cord. Pull the red release handle to disengage the trolley from the door carriage. This prevents the door from dropping unexpectedly.
- Secure the garage door manually. Lower the door completely and clamp locking pliers onto the track just below the bottom roller on each side.
- Wait at least 5 minutes after disconnecting power. The internal capacitors can retain a dangerous charge even when unplugged.
- Take photos of every connection before disconnecting anything. Trust us — reassembly will be infinitely easier.
⚠️ Warning: Never attempt to disassemble the torsion spring system above your garage door. That job requires specialized tools and professional training. We’re focusing exclusively on the opener unit itself.
Step-by-Step: How To Take Apart A Chamberlain Garage Door Opener
Now that you’re prepped and protected, let’s get into the actual disassembly process. This guide applies to most popular Chamberlain models, including the B970, B750, C870, and WD962KEV series. Minor variations may exist, so keep your model-specific manual handy if possible. For broader technical context on how these electromechanical systems function, you can refer to the garage door opener entry on Wikipedia.
Step 1: Remove the Outer Housing Cover
Most Chamberlain openers feature a two-piece plastic or metal housing held together by 6 to 10 Phillips-head screws located along the perimeter and underside of the unit.
- Position your step ladder directly beneath the opener.
- Using your #2 Phillips screwdriver, remove all visible screws. Place them in a small magnetic tray or ziplock bag labeled “housing.”
- Gently pry the lower cover downward. Some models have plastic snap clips along the edges — use your flathead screwdriver to carefully release them without cracking the housing.
- Set the cover aside in a safe location where it won’t get scratched or stepped on.
Pro tip: If your model has a built-in LED light panel, you may need to disconnect a small ribbon cable before fully removing the top half of the housing. Note its orientation with a quick photo.
Step 2: Disconnect the Wiring Harness
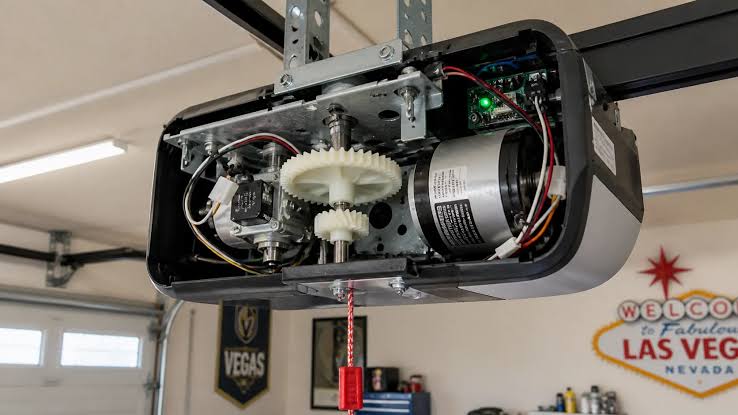
Once the housing is off, you’ll see the main circuit board (logic board) and a bundle of color-coded wires leading to the motor, sensors, and wall console.
- Identify the main wiring harness connector — usually a white or gray multi-pin plug near the center of the board.
- Press the small release tab on the connector and pull it straight out. Do not yank the wires themselves.
- If your unit has a backup battery (common in newer Chamberlain models with MyQ technology), disconnect the battery leads by sliding the spade connectors off their terminals.
- Use your multimeter set to DC voltage to confirm there is zero residual current across the board’s main terminals.
Step 3: Remove the Logic Board Assembly
The logic board is the “brain” of your Chamberlain opener, responsible for processing remote signals, managing safety sensor inputs, and controlling motor direction.
- Locate the 4 to 6 mounting screws securing the board to the chassis. These are typically smaller than the housing screws.
- Carefully lift the board out, supporting it from underneath to avoid bending any soldered components.
- Inspect the board for obvious signs of damage: bulging capacitors, charred traces, corroded contacts, or cracked solder joints. These are the most common culprits behind erratic opener behavior.
Step 4: Access the Motor and Gear Assembly
This is where things get mechanical. The motor and gear assembly is the heaviest component inside the unit, often weighing between 8 and 15 pounds depending on the model.
- Remove the chain or belt tensioner bolt using your socket wrench. This releases tension on the drive mechanism.
- Slide the drive sprocket off the motor shaft. On belt-drive models, you’ll need to unthread the belt from the pulley groove first.
- Unscrew the motor mounting brackets (usually 4 bolts, ⅜-inch or 10mm). Support the motor with one hand as you remove the final bolt to prevent it from dropping.
- Once free, you’ll see the nylon gear and sprocket assembly pressed onto the motor shaft. This is the part that strips most frequently after years of use — especially if your garage door is heavier than the opener’s rated capacity.
Step 5: Inspect and Remove the Capacitor
The start/run capacitor gives your motor the initial jolt of energy it needs to begin turning. A failed capacitor is one of the most common — and most affordable — repairs you can make.
- The capacitor is a cylindrical component, usually silver or black, mounted near the motor with a metal bracket.
- Discharge the capacitor safely by bridging its two terminals with an insulated screwdriver. You may hear a small pop — that’s normal.
- Disconnect the two spade connectors and unscrew the mounting bracket.
- Check the label for the microfarad (µF) rating. Replacement capacitors typically cost $8 to $20 at hardware stores.
Step 6: Examine the Limit Switch and Force Adjustment Mechanisms
These small but critical components tell the opener when to stop opening and closing. If misadjusted, your door may reverse prematurely or slam shut with excessive force.
- The limit switches are usually small plastic cams attached to threaded rods on either side of the chassis.
- Use your flathead screwdriver to gently rotate each cam and observe whether the contact points are clean and properly aligned.
- The force adjustment knobs (often labeled “Open Force” and “Close Force”) should turn smoothly. If they feel gritty or stuck, the internal potentiometer may need cleaning or replacement.
Common Problems You Might Discover During Disassembly
| Problem | Likely Cause | Estimated Repair Cost |
|---|---|---|
| Stripped nylon gear | Normal wear after 5–8 years | $15–$35 (gear kit) |
| Burned logic board | Power surge or moisture damage | $40–$90 (replacement board) |
| Failed capacitor | Age-related degradation | $8–$20 |
| Worn drive belt/chain | Friction and tension fatigue | $20–$50 |
| Corroded sensor wiring | Humidity exposure | $5–$15 (wire splice kit) |
Reassembly Tips for a Smooth Finish
Taking your Chamberlain opener apart is only half the battle. Putting it back together correctly ensures reliable operation for years to come.
- Reverse the disassembly order. Start with the capacitor, then the motor and gear assembly, followed by the logic board, wiring harness, and finally the housing cover.
- Double-check every connector. A single loose wire can cause the entire system to malfunction or create a fire hazard.
- Re-tension the drive chain or belt according to the specifications in your owner’s manual. A properly tensioned chain should have approximately ¼ to ½ inch of vertical play at the midpoint.
- Restore power and test incrementally. First, test the wall button. Then the remote. Finally, verify that the safety sensors stop the door when an object breaks the beam.
- Reprogram your remotes and keypad if the logic board was replaced. Most Chamberlain models use the “Learn” button on the back of the motor housing.
Frequently Asked Questions (FAQ)
Q1: Can I take apart my Chamberlain garage door opener without voiding the warranty?
If your unit is still under the manufacturer’s warranty (typically 1 to 5 years depending on the model and component), opening the housing may void coverage. Check your warranty documentation or contact Chamberlain customer support at 1-800-528-9131 before proceeding. If the warranty has expired, you have nothing to lose.
Q2: How long does it take to fully disassemble a Chamberlain opener?
For a first-time DIYer following this guide, expect the full teardown to take 45 to 90 minutes. Experienced homeowners with the right tools can complete it in under 30 minutes. Reassembly generally takes about the same amount of time.
Q3: Do I need to take the entire opener down from the ceiling?
No. In most cases, you can perform a complete disassembly while the unit remains mounted to the ceiling bracket. However, if you need to replace the motor or rail assembly, removing the entire unit from the mounting hardware will give you better access and a safer working position.
Q4: What should I do if I find a stripped gear inside my opener?
A stripped nylon drive gear is one of the easiest and most cost-effective repairs you can make. Purchase a Chamberlain-compatible gear and sprocket kit (part number varies by model — check your owner’s manual), press the new gear onto the motor shaft, and reassemble. The entire fix usually takes less than an hour and costs under $30.
Q5: Is it safe to work on the opener if I have no electrical experience?
As long as you completely disconnect the power source and verify zero voltage with a multimeter before touching any internal components, the risk is minimal. The internal voltages in a residential garage door opener are relatively low (120V AC input, 12–24V DC on the logic board). That said, if you ever feel uncomfortable, there is absolutely no shame in calling a licensed technician.
Q6: How often should I inspect the inside of my garage door opener?
We recommend a visual inspection once every 2 to 3 years for units under 10 years old, and annually for older models. Listen for changes in operating noise and pay attention to any delays in response time — these are early warning signs that internal components may be wearing out.
Conclusion
Learning how to take apart a Chamberlain garage door opener is one of the most empowering DIY skills a homeowner can develop. Not only does it save you the $150–$300 service call fee that most technicians charge for a basic diagnostic visit, but it also gives you a deeper understanding of how your home’s most-used mechanical system actually works. From identifying a $12 capacitor that’s been silently failing to spotting a worn gear before it strands your car inside the garage, the knowledge you gain from a simple teardown pays for itself many times over.
Remember: safety always comes first, patience beats speed, and a smartphone camera is your best friend during reassembly. Take your time, follow the steps, and don’t hesitate to consult your model-specific manual when in doubt.
Found this guide helpful? Share it with a friend, neighbor, or family member who’s been battling a stubborn garage door opener! Tag us on social media and let us know which Chamberlain model you successfully took apart — we’d love to hear your success story. 💪🔧
Happy repairing!



Leave a Reply