Are you planning to install a new garage door? Master the essential skill of framing a rough opening with our detailed guide. Follow step-by-step instructions and expert tips to ensure a seamless Framing Rough Opening For Garage Door process and achieve professional results.
Understanding the Importance of Proper Framing
Framing a rough opening for a garage door is a crucial step in the installation process. Proper framing ensures structural integrity, smooth operation of the door, and a secure fit. Here’s why it’s essential:
- Structural Support: The framing provides support for the garage door tracks, springs, and opener mechanism.
- Weatherproofing: Well-framed openings help seal the garage against drafts, moisture, and pests.
- Safety: Properly framed openings reduce the risk of accidents and ensure the garage door operates safely.
Step-by-Step Guide: Framing Rough Opening For Garage Door
Follow these steps to frame a rough opening for your garage door:
1. Gather Materials and Tools
Collect the necessary materials, including lumber, nails, screws, and a level. You’ll also need a circular saw, tape measure, framing square, and hammer.
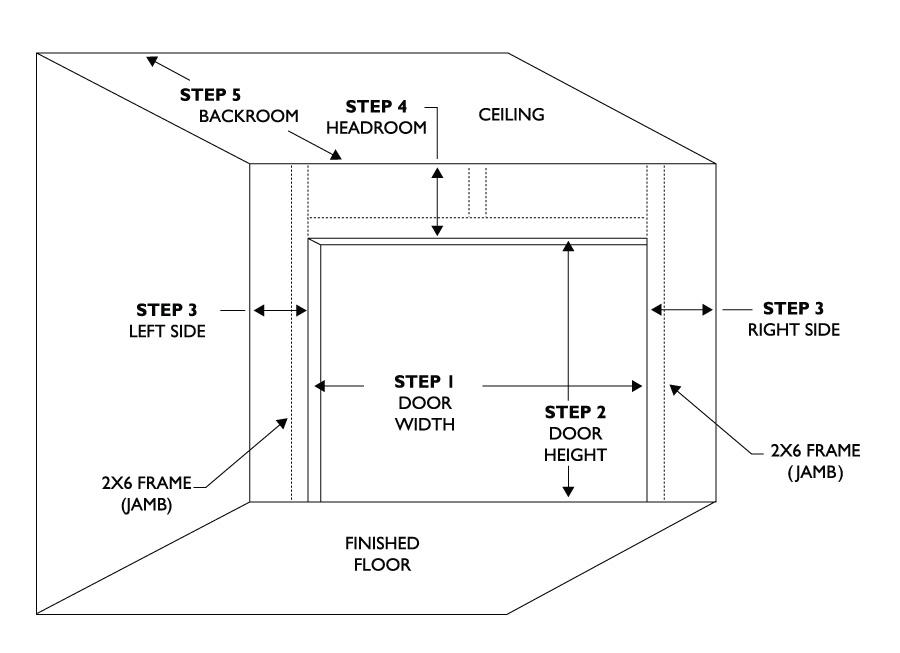
2. Measure and Mark
Measure the width and height of the garage door, adding a few inches for clearance. Mark the dimensions on the wall above the garage door opening, ensuring they are level and square.
3. Cut the Lumber
Using a circular saw, cut the lumber to the appropriate lengths for the header, jambs, and cripple studs. Remember to account for the width of the door and any additional framing materials.
4. Assemble the Frame
Position the header between the side jambs and secure them together with nails or screws. Attach the cripple studs between the header and the top plate of the wall framing.
5. Install the Frame
Position the assembled frame in the rough opening, ensuring it is plumb and level. Secure the frame to the surrounding wall framing using nails or screws, making sure it is securely anchored.
6. Check for Square
Use a framing square to check that the corners of the frame are square. Make any necessary adjustments before proceeding.
Read too: No Power to Genie Garage Door Opener – Resolving the Issue with Ease: Troubleshooting Guide
7. Add Bracing (Optional)
For additional support, consider adding diagonal bracing between the frame and the wall framing. This helps prevent sagging and ensures the door operates smoothly.
Expert Tips for Successful Framing
- Use pressure-treated lumber for the bottom plate to resist moisture and rot.
- Install a sill pan beneath the bottom plate to prevent water infiltration.
- Ensure the frame is plumb, level, and square for optimal door operation.
- Follow local building codes and manufacturer guidelines for framing specifications.
Conclusion
Framing a rough opening for a garage door is a fundamental skill for any homeowner or contractor. By following the step-by-step guide and expert tips provided in this article, you can achieve professional results and ensure the success of your garage door installation project.


Leave a Reply