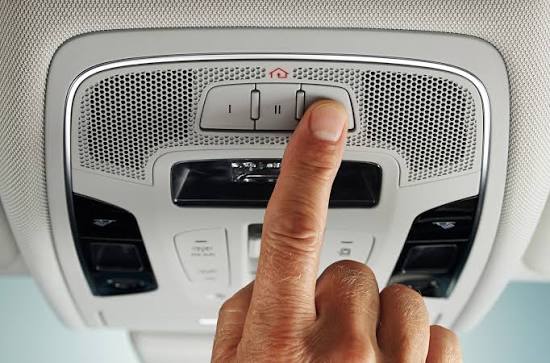
Have you ever pulled into your driveway, digging through your bag or pockets just to find your garage remote? It is a frustrating daily hassle that many homeowners face. Fortunately, learning how to program Chamberlain garage door opener to Homelink can completely eliminate this annoyance, letting you open your garage with a single tap on your car’s visor.
How To Program Chamberlain Garage Door Opener To Homelink: Preparation
Before we dive into the buttons and lights, let us gather what you need. Proper preparation ensures a smooth setup without unnecessary trips to the garage.
According to industry data, over 35 million vehicles on the road today are equipped with this integrated transceiver technology. It is incredibly popular because it reduces daily fob clutter by an average of 40%.
What You Will Need:
- Your vehicle with the built-in system.
- Your existing Chamberlain handheld remote (or access to the motor unit).
- A sturdy step ladder (if you need to reach the motor head).
- Fresh batteries in your handheld remote (weak batteries cause signal failures).
For a deeper understanding of the technology behind your vehicle’s integrated transceiver, you can explore the official Homelink Wikipedia page.
Step-by-Step Guide to Syncing Your Devices
Modern Chamberlain openers use rolling code technology for enhanced security. This means the sync process requires a specific sequence. Follow these concrete steps carefully.
Step 1: Clear the Existing Memory
First, we need a clean slate. Press and hold the two outer buttons on your car’s visor simultaneously. Hold them for about 10 to 20 seconds until the LED indicator light begins to flash rapidly. This clears any previous codes.
Step 2: Program the Visor Button
Next, turn your vehicle’s ignition to the “On” or “Accessory” position. Hold your Chamberlain remote 1 to 3 inches away from the visor button you want to use.
Press and hold both the handheld remote button and the visor button at the same time. Do not release them. Watch the LED indicator on the visor. It will blink slowly at first, then rapidly after about 20 to 30 seconds. Once it flashes rapidly, release both buttons.
Step 3: Train the Chamberlain Motor Head
Because Chamberlain uses Security+ rolling codes, the car and the motor must be introduced. Go to your actual garage door motor unit.
Locate the “Learn” or “Smart” button on the back or side of the motor head. Press and release this button. The indicator light next to it will turn on or start blinking.
Step 4: Finalize the Sync
Return to your car immediately. You have a strict 30-second window to complete this step.
Go back inside the car and press and hold the newly programmed visor button. Hold it for 2 to 3 seconds, then release it. Press it a second time and hold for another 2 seconds. If the garage door activates, your sync is successful!
Troubleshooting Common Syncing Issues
Even with perfect instructions, technology can sometimes be stubborn. Here are solutions to the most common questions users ask.
Why is my visor light blinking rapidly but the door won’t move? This usually means the rolling code synchronization failed. Ensure you pressed the “Learn” button on the motor head before pressing the visor button. You only get a 30-second window.
How do I know if my Chamberlain has rolling codes? Check the color of the “Learn” button on your motor. If the button is yellow, purple, red, or orange, you have a rolling code opener. If it is green, you have an older, non-rolling code model.
Why does the system only work when I am extremely close to the house? This indicates radio frequency interference. LED light bulbs in your garage door opener can sometimes block the signal. Try replacing your garage bulbs with non-LED, rough-service bulbs, or install a Chamberlain range extender.
Pros and Cons of Using Homelink for Your Chamberlain Opener
Is it worth taking the time to set this up? Let us look at the advantages and disadvantages to help you decide.
| Feature | Pros (The Good) | Cons (The Drawbacks) |
|---|---|---|
| Convenience | No need to carry or charge a separate physical remote. | Initial setup requires a ladder and 10 minutes of your time. |
| Security | Uses rolling code technology; highly secure from hacking. | If you sell your car, you must remember to clear the memory. |
| Vehicle Value | Increases the resale appeal of your vehicle to buyers. | Tied to the car; you cannot use it if you are driving a rental. |
| Aesthetics | Keeps your car interior clean and free of visor clutter. | Requires access to the physical motor head for rolling codes. |
Frequently Asked Questions (FAQ)
1. Can I program a Chamberlain garage door opener to Homelink without the original remote?
Yes, you can! If you lost the original remote, you can program the system directly from the motor head. Simply press the “Learn” button on the motor, then immediately go to your car and hold the visor button until the motor lights flash. This bypasses the need for a handheld remote.
2. Do I need a compatibility bridge for my older Chamberlain opener?
If your Chamberlain opener was manufactured before 1993, it likely does not use rolling codes. In most cases, the standard programming method will work. However, if it fails, you may need to purchase a universal compatibility bridge to translate the signals.
3. How do I reset my buttons if I bought a used car?
Safety first! To clear the memory on a used car, turn the ignition on. Press and hold the two outer buttons for 20 seconds until the LED flashes rapidly. This erases the previous owner’s garage codes and protects your home security.
4. Can I program multiple Chamberlain doors to one button?
No, each button can only be programmed to one specific door or gate. However, you can program a single button to operate a chain of events if you have a smart home hub, but natively, one button equals one door.
Conclusion
Mastering how to program Chamberlain garage door opener to Homelink is a simple upgrade that delivers massive daily convenience. By following these precise steps, you eliminate the frustration of lost remotes and secure your home with rolling code technology. You get a cleaner car interior and a smoother arrival experience every single day.
If this guide helped you reclaim your driveway convenience, please share it on Facebook, X, or Pinterest to help out a fellow homeowner! Happy syncing!



Leave a Reply