Introduction
Are you struggling to sync your Chamberlain garage door opener with a Liftmaster remote? You’re not alone. Many homeowners face confusion when trying to how to program Chamberlain garage door opener to Liftmaster systems, especially since both brands share similar technology but have distinct programming procedures. This comprehensive guide will walk you through every step, ensuring your garage door responds perfectly to your Liftmaster remote control.
Understanding Chamberlain and Liftmaster Compatibility
Are Chamberlain and Liftmaster the Same Company?
Before diving into programming steps, it’s essential to understand the relationship between these two brands. Chamberlain Group owns both Chamberlain and Liftmaster brands, which means they share underlying technology and frequency protocols. According to Wikipedia’s entry on Chamberlain Group, the company manufactures garage door openers under multiple brand names, including Chamberlain, LiftMaster, and Craftsman.
This shared ownership explains why many Chamberlain openers can work with Liftmaster remotes and vice versa. However, compatibility depends on several factors:
- Frequency matching: Both devices must operate on the same frequency (typically 315 MHz or 390 MHz)
- Security code type: Older fixed-code systems versus newer rolling-code technology
- Manufacturing year: Units produced after 2011 generally have better cross-compatibility
Quick Compatibility Check Table
| Chamberlain Model Series | Liftmaster Remote Compatibility | Programming Method |
|---|---|---|
| WD832 (Wall Mount) | Yes (Model 371LM, 373LM) | Learn Button |
| B970 (Belt Drive) | Yes (Most 3-button remotes) | Smart Panel/Learn Button |
| C4738 (Chain Drive) | Limited (Pre-2011 models only) | DIP Switches |
| Elite Series | Yes (All modern Liftmaster remotes) | MyQ App/Learn Button |
Step-by-Step Programming Instructions
Method 1: Using the Learn Button (Most Common)
The learn button method works for most Chamberlain openers manufactured after 1997. Follow these precise steps:
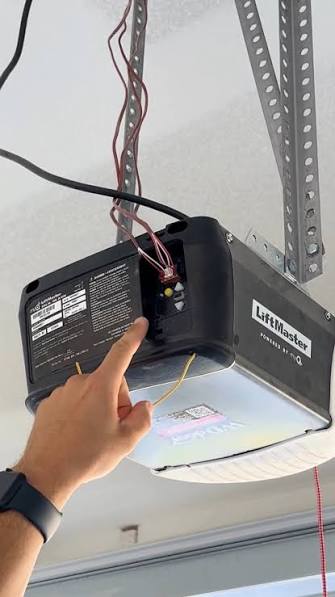
Step 1: Locate the Learn Button Find the learn button on your Chamberlain garage door opener motor unit. It’s typically located on the back panel near the antenna wire and appears as a small square button in yellow, purple, red, or green.
Step 2: Clear Existing Codes (Optional) If you want to remove all previously programmed remotes, press and hold the learn button for 6 seconds until the indicator light turns off. This step ensures no interference from old codes.
Step 3: Initiate Programming Mode Press and release the learn button once. The indicator light will illuminate or blink, signaling that the opener is ready to receive a new code. You have 30 seconds to complete the next step.
Step 4: Program the Liftmaster Remote Within 30 seconds, press and hold the desired button on your Liftmaster remote. Keep holding until the opener’s lights flash or you hear two clicks. This confirms successful programming.
Step 5: Test the Connection Stand within 20 feet of the garage door and press the programmed button on your Liftmaster remote. The door should respond immediately. If it doesn’t, repeat steps 3-4, ensuring you’re close enough during programming.
Method 2: Using DIP Switches (Older Models)
For Chamberlain openers manufactured before 1997, you’ll need to match DIP switches:
Step 1: Access DIP Switches Open both the Chamberlain opener’s receiver compartment and the Liftmaster remote’s battery compartment to reveal the DIP switches.
Step 2: Match Switch Positions Set each switch on the Liftmaster remote to match the exact position (up or down) of the corresponding switch on the Chamberlain opener. There are typically 8-12 switches total.
Step 3: Secure and Test Close both compartments securely and test the remote from various distances. Ensure all switches remain in their matched positions.
Method 3: Smart Panel Programming (Elite Series)
For newer Chamberlain Elite series openers with smart panels:
Step 1: Access the Menu Press the “Program” or “Settings” button on your wall-mounted smart panel.
Step 2: Navigate to Remote Setup Use arrow keys to select “Add Remote” or “Program Remote” from the menu options.
Step 3: Follow On-Screen Prompts The panel will display instructions. Press the desired button on your Liftmaster remote when prompted.
Step 4: Confirm Addition The system will confirm successful programming with a beep or visual indicator.
Troubleshooting Common Issues
Remote Not Responding After Programming
If your Liftmaster remote fails to operate the Chamberlain opener after following the steps above, consider these solutions:
- Check battery strength: Weak batteries cause intermittent failures. Replace with fresh alkaline batteries.
- Verify frequency match: Ensure both devices operate on the same frequency (check labels on both units).
- Distance limitations: Stay within 20-30 feet during initial programming for optimal signal reception.
- Interference issues: Metal objects, LED bulbs, or other wireless devices can interfere with signals.
Multiple Remotes Not Working Simultaneously
When programming multiple Liftmaster remotes to one Chamberlain opener:
- Program each remote individually, waiting 5 seconds between each addition
- Avoid holding multiple buttons simultaneously during programming
- Ensure the opener hasn’t reached its maximum remote capacity (typically 8-10 remotes)
Intermittent Operation Problems
If the remote works inconsistently:
- Reprogram the remote following Method 1 above
- Check for physical obstructions blocking the signal path
- Verify the antenna wire on the opener hangs freely and isn’t coiled
- Consider replacing the remote if it’s more than 5 years old
Advanced Tips for Optimal Performance
Maximizing Signal Range
To ensure your Liftmaster remote works reliably with your Chamberlain opener:
- Position the antenna correctly: The wire antenna should hang vertically without touching metal surfaces
- Upgrade to a universal remote: Modern Liftmaster universal remotes (like model 890MAX) offer enhanced range and reliability
- Install a signal repeater: For large garages or detached structures, consider adding a Liftmaster range extender
Security Best Practices
Protect your garage door system with these security measures:
- Regularly update codes: Reprogram all remotes annually to prevent unauthorized access
- Use rolling code technology: Ensure both your Chamberlain opener and Liftmaster remote use rolling codes (manufactured after 1997)
- Monitor activity: If using MyQ-enabled models, check the app for unusual activity patterns
Maintenance Schedule
Keep your system running smoothly with regular maintenance:
| Task | Frequency | Importance |
|---|---|---|
| Battery replacement | Every 12 months | High |
| Antenna inspection | Every 6 months | Medium |
| Full reprogramming | Every 24 months | High |
| Physical cleaning | Every 3 months | Low |
FAQ Section
Q: Can I program any Liftmaster remote to any Chamberlain opener?
A: Not all combinations work. Generally, Liftmaster remotes manufactured after 2011 will work with Chamberlain openers from the same period. Check both devices for frequency compatibility (315 MHz or 390 MHz) and ensure they use the same security code type (rolling code preferred).
Q: How many Liftmaster remotes can I program to one Chamberlain opener?
A: Most Chamberlain openers can store 8-10 remote codes simultaneously. Some newer models with MyQ technology can handle up to 15 devices, including remotes, keypads, and smartphone connections.
Q: What should I do if the learn button doesn’t respond?
A: First, ensure the opener has power and the safety sensors are properly aligned. If the learn button still doesn’t activate, try resetting the opener by unplugging it for 30 seconds, then plugging it back in. If problems persist, consult your owner’s manual or contact Chamberlain customer support.
Q: Will programming a new remote erase my existing remotes?
A: No, pressing the learn button briefly (1-2 seconds) adds new remotes without affecting existing ones. Only holding the learn button for 6+ seconds will clear all programmed devices.
Q: Can I use my smartphone instead of a Liftmaster remote?
A: If your Chamberlain opener has MyQ technology, you can control it via the MyQ smartphone app. This eliminates the need for physical remotes and allows remote access from anywhere with internet connectivity.
Q: Why does my Liftmaster remote work sometimes but not others?
A: Intermittent operation usually indicates weak batteries, signal interference, or distance issues. Replace batteries first, then ensure you’re within range (typically 100-150 feet line-of-sight). Check for new sources of interference like LED garage lights or nearby wireless devices.
Conclusion
Learning how to program Chamberlain garage door opener to Liftmaster remotes doesn’t have to be complicated. By understanding the compatibility factors and following the appropriate method for your specific models, you can achieve seamless integration between these two trusted brands. Remember to keep your system updated, maintain good battery health, and prioritize security best practices.
Did this guide help you successfully program your devices? Share your experience on social media and help other homeowners solve their garage door programming challenges! Don’t forget to bookmark this page for future reference when you need to add more remotes or troubleshoot issues



Leave a Reply