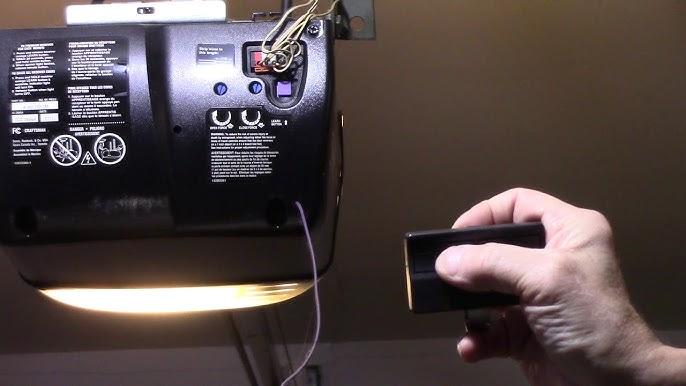
How To Program Two Remotes For Garage Door Opener Easily
Juggling multiple vehicles but dealing with only one working clicker can be incredibly frustrating for a busy household. If you are searching for exactly how to program two remotes for garage door opener systems, you have found the perfect solution to end this daily hassle. Let’s get your entire family fully synced, secure, and ready to hit the road!
How To Program Two Remotes For Garage Door Opener Step-by-Step
Getting your devices to communicate with your motor unit does not require an engineering degree. In fact, the process is surprisingly straightforward once you know where to look.
Before we begin, grab a sturdy step ladder and ensure you have fresh batteries in both clickers. Safety first!
Step 1: Locate the “Learn” Button
Walk over to your garage door motor unit hanging from the ceiling. You need to find the “Learn” or “Smart” button.
This button is usually located on the back or side panel of the unit. Depending on your brand, the button color will vary. Common colors include yellow, purple, red, orange, or green.
Note: If your unit is older, you might see a row of tiny switches instead. Those are dip switches, which require a different manual matching process.
Step 2: Clear the Old Memory (Optional but Recommended)
If your system is acting glitchy, a factory reset is a great first step.
Press and hold the “Learn” button for exactly 6 to 10 seconds. Wait until the LED indicator light turns off completely. This wipes all previously paired devices, giving you a clean slate to program two remotes for your garage door opener successfully.
Step 3: Program the First Remote
Now, press the “Learn” button briefly for exactly 1 second. The indicator LED will turn on solid or start blinking. You now have a 30-second window to pair your device.
Take your first remote and press the main button. Hold it for 2 to 3 seconds, then release.
Watch the motor unit’s lights. They will usually flash twice or emit a distinct clicking sound. This confirms your first remote is successfully synced!
Step 4: Program the Second Remote
You must repeat the process for the second clicker.
Press the “Learn” button on the motor unit again for 1 second. The LED light will activate once more.
Within 30 seconds, press and hold the button on your second remote for 2 to 3 seconds. Release the button and wait for the confirmation flash.
Congratulations! You have just successfully completed the tutorial on how to program two remotes for garage door opener units. Test them both from the driveway to ensure perfect synchronization.
Understanding Your Opener Technology
To truly master your home’s entry system, it helps to understand the technology keeping you secure.
Modern openers use rolling code technology to prevent signal interception. This is a massive leap from the old fixed-code systems used in the 1980s and 90s. If you want a deeper technical dive into the history and mechanics of these garage door openers, Wikipedia offers an excellent breakdown.
The Power of Rolling Codes
Every time you press your remote, the system generates a brand new, randomized code.
Even if a thief records your signal, that specific code becomes useless immediately after use. According to the National Crime Prevention Council, securing secondary home entry points like garages reduces overall burglary risks by up to 15%.
Troubleshooting: Why Won’t My Second Remote Program?
Sometimes, technology refuses to cooperate. If your second remote fails to sync, do not panic.
Here is a quick checklist to diagnose the issue quickly.
1. Check the Battery Type
Are you using heavy-duty carbon batteries? Stop right there. Garage door remotes require high-quality alkaline batteries to send a strong enough radio frequency. Weak signals simply will not reach the motor unit.
2. Mind Your Distance
Are you trying to program the remote from inside your car? That is too far.
Stand exactly 3 to 5 feet away from the motor unit during the programming phase. Once successfully paired, you can test the range from the end of your driveway.
3. Check the Memory Limit
Most modern motor units have a maximum memory capacity. Typically, they can hold up to 5 to 8 remotes at once.
If the memory is completely full, the system will reject new devices. Simply perform the factory reset mentioned in Step 2 and reprogram your essential devices.
OEM vs. Universal Remotes: What Should You Buy?
When replacing a lost clicker, you have two distinct choices. Should you buy an Original Equipment Manufacturer (OEM) replacement, or opt for a universal model?
Here is a detailed comparison table to help you decide.
| Feature | OEM Brand Remotes | Universal Remotes |
|---|---|---|
| Compatibility | 100% Guaranteed | Varies (Requires checking lists) |
| Average Price | Higher ($30 – $50) | Lower ($15 – $25) |
| Programming Setup | Very Simple | Slightly Complex (DIP switches) |
| Build Quality | Excellent | Good / Average |
| Best For… | Direct, stress-free replacement | Budget shoppers & multi-brand homes |
Expert Tips for Maintaining Your Garage Door System
Pairing your devices is only half the battle. Proper maintenance ensures your family’s safety year-round.
Mark Henderson, a certified home security specialist with over 15 years of field experience, shares a crucial piece of advice.
“Always test the auto-reverse safety sensors after programming new remotes,” Henderson advises. “Place a roll of paper towels under the door and press your newly synced remote. If the door does not immediately reverse upon hitting the object, your sensors need realignment.”
Keep the Tracks Clean
Dust and spiderwebs can block the infrared safety sensors located near the floor.
Take a soft microfiber cloth and wipe the sensor lenses once a month. This simple habit prevents the door from mysteriously reversing halfway down.
Frequently Asked Questions
Do I need to clear the old memory before programming new remotes?
Not always. If you are simply adding new devices to an existing system, you can just use the 1-second “Learn” button press. However, if you recently moved into a new home, clearing the memory is a vital security step. It ensures previous owners or tenants can no longer access your property.
How far away should I be from the motor when programming?
You should stand within 3 to 5 feet of the motor unit during the pairing process. Proximity ensures the remote’s signal is strong enough to register with the logic board. Once successfully programmed, test the range from your driveway, which should easily work from 100 feet away.
What happens if the LED light doesn’t blink when I press the Learn button?
If the LED fails to illuminate, the logic board may not be receiving power. Check the power cord plugged into the ceiling outlet. Ensure the outlet has not been tripped by a GFCI fault. If power is confirmed but the light remains dead, the internal capacitor or logic board may need professional replacement.
Can a universal remote work with my specific opener brand?
Yes, in most cases. Universal remotes are designed to mimic the radio frequencies of major brands like LiftMaster, Chamberlain, Genie, and Craftsman. Just ensure the packaging explicitly lists your opener’s brand and color of the “Learn” button before purchasing.
How often should I replace the batteries in my remotes?
For optimal performance, you should replace the batteries every 12 to 18 months. Do not wait for the remote to completely die. A weakening battery sends a weaker signal, which can cause intermittent failures or require you to press the button multiple times.
Conclusion
Mastering how to program two remotes for garage door opener systems is a fantastic DIY win. Not only does it save you the expense of a professional service call, but it also guarantees that every driver in your household enjoys seamless, secure access to their home.
By following the concrete steps outlined above, you have eliminated the annoyance of sharing a single clicker. You have also taken a proactive step in maintaining your home’s perimeter security.
Did this guide help you get your family back on the road hassle-free? Share this article on your favorite social media platforms to help your friends and neighbors conquer their own garage door glitches!



Leave a Reply