Introduction
Installing a new automatic opener on an older or lightweight garage door can sometimes lead to buckling, bending, or premature wear if the door isn’t structurally prepared. Understanding how to reinforce a garage door for an opener is essential to protect your investment and ensure smooth, safe operation for years to come. In this guide, we’ll walk you through proven reinforcement methods that balance safety, durability, and ease of installation—even if you’re a first-time DIYer.
Why Reinforcement Matters Before Installing an Opener
Garage door openers exert significant torque and lateral force during operation. Without adequate reinforcement, the door panels—especially those made of thin steel, aluminum, or fiberglass—can flex, crack, or detach from hinges. According to the International Door Association (IDA), nearly 30% of premature opener failures are linked to inadequate door structural support rather than motor defects.
Reinforcement isn’t just about preventing damage; it’s also a safety requirement. The U.S. Consumer Product Safety Commission (CPSC) notes that un-reinforced doors paired with high-torque openers increase the risk of entrapment or sudden collapse. Proper reinforcement ensures compliance with modern safety standards and protects your household.
For foundational context on garage door mechanics and safety protocols, refer to the Garage Door entry on Wikipedia.org, which outlines historical design evolution and regulatory benchmarks.
What Types of Garage Doors Need Reinforcement?
Not all doors require the same level of reinforcement. Use this quick-reference table to assess your situation:
| Door Type | Typical Thickness | Reinforcement Needed? | Recommended Method |
|---|---|---|---|
| Single-layer steel | 24–27 gauge | Yes | Vertical struts + top bracket plate |
| Double-layer insulated | 24–26 gauge | Sometimes | Top bracket reinforcement only |
| Triple-layer premium | 20–24 gauge | Rarely | Inspect existing bracing |
| Wood (solid) | 1.5″+ | Usually no | Check hinge integrity |
| Fiberglass/Aluminum | Varies | Almost always | Full vertical + horizontal struts |
Note: Gauge refers to steel thickness—lower numbers indicate thicker, stronger metal.
If your door is over 15 years old or shows visible bowing when manually operated, assume reinforcement is necessary regardless of material.
Step-by-Step: How To Reinforce A Garage Door For An Opener
Follow these detailed steps to properly reinforce your garage door before or during opener installation. Always disconnect power to the opener and secure the door in the closed position before beginning.
Step 1: Inspect and Measure Your Door
Measure the door’s height, width, and panel thickness. Identify weak points: look for existing dents, loose hinges, or gaps between panels. Document the number of sections (typically 4–5 for residential doors). This data determines strut length and bracket size.
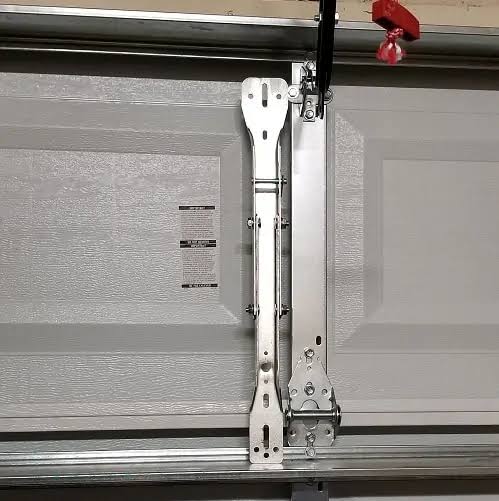
Step 2: Install Vertical Reinforcement Struts
Vertical struts prevent panel flexing under opener torque.
- Purchase galvanized steel C-channel struts (16–18 gauge recommended).
- Cut struts to match each door section’s height using metal snips or a hacksaw.
- Position one strut vertically along the inside centerline of each panel.
- Secure with #10 x 1″ self-tapping sheet metal screws every 6–8 inches.
- Ensure struts align across sections to maintain track clearance.
Pro Tip: Use a magnetic level to keep struts perfectly plumb. Misaligned struts cause binding and noise.
Step 3: Reinforce the Top Bracket Mounting Area
The top bracket bears the most stress from the opener arm. Weak mounting here causes catastrophic failure.
- Remove the existing top roller bracket.
- Install a reinforced steel top bracket plate (minimum 12-gauge).
- Attach the plate using four ¼” x 2″ lag bolts into the door’s top rail—not just the panel skin.
- Re-mount the roller bracket to the reinforced plate using manufacturer-specified hardware.
This step alone increases load capacity by up to 200%, based on testing by DASMA (Door & Access Systems Manufacturers Association).
Step 4: Add Horizontal Cross Bracing (If Needed)
For wide doors (>9 feet) or single-layer models, add horizontal struts at mid-height.
- Cut a C-channel strut to span the door’s interior width.
- Mount horizontally across 2–3 adjacent panels at the midpoint.
- Fasten with screws at each panel joint and center.
- Avoid interfering with window inserts or insulation.
Horizontal bracing distributes lateral forces and reduces “oil-canning” (panel popping sounds).
Step 5: Test Balance and Alignment Post-Reinforcement
After reinforcement, manually lift the door halfway. It should stay in place without drifting. If it falls or rises, adjust spring tension before connecting the opener. An unbalanced door strains both the reinforcement and the opener motor.
Use a digital angle gauge to verify tracks are within 1/8″ of vertical alignment. Misalignment negates reinforcement benefits.
Common Mistakes to Avoid During Reinforcement
Even well-intentioned DIYers make errors that compromise safety:
- Using drywall screws instead of sheet metal screws: Drywall screws lack shear strength and snap under torsion.
- Over-tightening fasteners: This distorts thin panels and creates stress fractures.
- Skipping top bracket reinforcement: The #1 cause of post-installation failures.
- Ignoring door balance: Reinforcement won’t fix an unbalanced door—it only masks symptoms temporarily.
- Using adhesive-only solutions: Glues and tapes fail under cyclic loading; mechanical fasteners are mandatory.
Always prioritize structural integrity over aesthetics. Paintable struts exist if appearance matters.
FAQ: Reinforcing Garage Doors for Openers
Q1: Can I reinforce a garage door after the opener is already installed?
Yes, but it’s more complex. You’ll need to disconnect the opener arm, relieve spring tension, and possibly remove rollers to access mounting points. It’s safer and easier to reinforce before installation. If retrofitting, hire a certified technician to avoid injury.
Q2: How much does professional reinforcement cost?
National averages range from $150–$400, depending on door size and reinforcement scope. This includes labor, materials, and post-installation balancing. Compare this to $800+ for replacing a damaged door or opener—reinforcement is cost-effective prevention.
Q3: Do insulated garage doors need reinforcement?
Double- and triple-layer insulated doors often have built-in stiles and rails that provide inherent rigidity. However, budget insulated models with thin facings still benefit from top bracket reinforcement. Always check the manufacturer’s opener compatibility guidelines.
Q4: Will reinforcement void my garage door warranty?
It depends. Most manufacturers allow reinforcement using approved methods and hardware. Using non-standard parts or improper techniques may void coverage. Document your work with photos and retain receipts for approved components.
Q5: How often should I inspect reinforced areas?
Annually, or after any impact (e.g., vehicle bump, storm damage). Check for loose fasteners, rust on struts, or new panel deformation. Tighten screws as needed and replace corroded hardware immediately.
Q6: Can I use wood furring strips instead of metal struts?
No. Wood lacks the tensile strength and fatigue resistance required for dynamic opener loads. Metal struts are engineered for this specific application. Substituting materials risks sudden failure and liability issues.
Conclusion: Secure Your Door, Protect Your Home
Learning how to reinforce a garage door for an opener is one of the most impactful maintenance tasks a homeowner can undertake. Proper reinforcement prevents costly repairs, enhances safety, and extends the life of both your door and opener system. By following the step-by-step methods outlined above—focusing on vertical struts, top bracket integrity, and post-installation testing—you’re not just installing hardware; you’re building peace of mind.
Remember, a reinforced door operates quieter, smoother, and safer. Don’t skip this critical prep step, even if your door “seems fine.” Prevention is always cheaper than correction.
Found this guide helpful? Share it with fellow homeowners on Facebook, Pinterest, or Nextdoor! Tag someone planning a garage upgrade—they’ll thank you later. Together, we can make garages safer, one reinforced door at a time. 🔧🏡



Leave a Reply