Introduction
Is your Craftsman garage door opener wall control malfunctioning, outdated, or simply in the way of a new renovation? You are not alone; many homeowners face this exact dilemma when upgrading their smart home systems or troubleshooting electrical issues. Understanding how to remove Craftsman garage door opener wall control properly is essential to avoid damaging your existing wiring or voiding your warranty. In this comprehensive guide, we will walk you through the safe, efficient removal process while ensuring your garage remains secure throughout the project.
Safety First: Preparing for Electrical Work
Before you even pick up a screwdriver, it is critical to understand that garage door openers operate on household electricity. While the wall control itself typically runs on low-voltage DC current derived from the main motor unit, the proximity to high-voltage components demands respect and caution. According to general electrical safety standards outlined by organizations referenced on Wikipedia, working on any wired fixture requires verifying that power sources are isolated to prevent shock or short circuits.
Essential Tools and Materials
Gathering the right tools before starting ensures a smooth workflow and prevents mid-project delays. Here is what you will need:
- Flathead and Phillips Screwdrivers: Size #2 is standard for most Craftsman mounting screws.
- Voltage Tester/Multimeter: To confirm zero voltage at the terminals.
- Wire Cutters/Strippers: For cleanly disconnecting or capping wires.
- Electrical Tape or Wire Nuts: For securing exposed wire ends if not immediately replacing.
- Flashlight or Headlamp: Garage lighting can be inadequate once power is cut.
- Ladder: If your wall control is mounted higher than standard reach.
- Camera or Smartphone: To photograph wiring configurations before disconnection.
⚠️ Critical Safety Warning: Never assume the wires are dead just because the wall button does not light up. Always test with a multimeter. If you are uncomfortable working with electrical wiring, hire a licensed electrician or certified garage door technician.
Step-by-Step: How To Remove Craftsman Garage Door Opener Wall Control
This tutorial provides concrete, actionable steps designed for the DIY homeowner. Follow these instructions precisely to ensure a clean removal without compromising your garage door system’s integrity.
Step 1: Disconnect Power to the Opener Unit
Locate the main Craftsman garage door opener motor unit mounted on your ceiling. Unplug the power cord from the electrical outlet or switch off the dedicated circuit breaker in your electrical panel. Wait at least 60 seconds to allow internal capacitors to discharge fully. This pause is non-negotiable for safety.
Step 2: Document the Existing Wiring Configuration
Remove the wall control’s cover plate gently using a flathead screwdriver in the designated pry slot (usually at the bottom). Before touching any wires, take a clear, well-lit photograph of the terminal connections. Note which color wire connects to which terminal (typically red and white, but verify your specific model). This documentation is invaluable if you plan to install a replacement unit later.
Step 3: Test for Voltage
Set your multimeter to DC voltage (typically 0–30V range for wall controls). Place one probe on each terminal screw. The reading should be 0V. If you detect any voltage, stop immediately and re-verify that the correct breaker is off or that the opener is fully unplugged. Do not proceed until you have confirmed zero voltage.
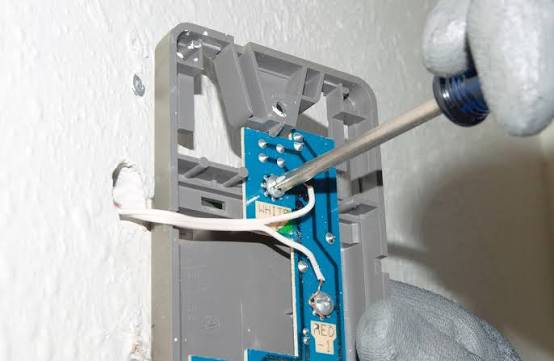
Step 4: Loosen Terminal Screws and Disconnect Wires
Using your Phillips screwdriver, loosen the terminal screws counterclockwise. Gently pull the wires free from the terminals. Avoid yanking, as old insulation can be brittle and may crack, exposing copper that could cause future shorts. If wires are soldered (rare in modern Craftsman units but possible in vintage models), use wire cutters to snip them cleanly, leaving enough length for reconnection if needed.
Step 5: Remove Mounting Hardware
With wires disconnected, locate the mounting screws securing the wall control bracket to the wall. These are typically found behind the faceplate or accessible from the sides depending on your Craftsman model year. Unscrew them completely and set aside in a small container to prevent loss. Carefully lift the unit away from the wall.
Step 6: Secure Exposed Wires
If you are not immediately installing a replacement, you must secure the exposed wire ends. Twist each wire end individually and cap with a wire nut, then wrap with electrical tape for added protection. Alternatively, push the wires back into the wall cavity if they are long enough and the opening will be patched. Never leave bare wires exposed, as residual charge or accidental re-energizing could create a fire hazard.
Step 7: Patch and Clean the Wall Surface
Once the unit is removed, inspect the wall for damage. Fill screw holes with spackle, sand smooth when dry, and touch up paint to match surrounding surfaces. This final step restores your garage’s appearance and prevents moisture or pests from entering through abandoned openings.
Troubleshooting Common Removal Challenges
Even straightforward projects can present unexpected obstacles. Below are solutions to frequently encountered issues based on real-world service data.
| Challenge | Likely Cause | Recommended Solution |
|---|---|---|
| Stripped mounting screws | Overtightening during original install | Use rubber band trick or screw extractor bit |
| Wires stuck in terminals | Corrosion or overtightened screws | Apply penetrating oil, wait 5 min, retry |
| Hidden wiring behind drywall | Previous owner modifications | Use stud finder/wire tracer before cutting |
| Unit won’t detach after screw removal | Paint seal or adhesive caulk | Score perimeter with utility knife carefully |
| Multimeter shows phantom voltage | Induced voltage from adjacent wiring | Verify with non-contact tester; consult electrician |
Understanding Your Craftsman Model Variations
Not all Craftsman wall controls are identical. Models manufactured before 2010 often use simple two-wire mechanical switches, while newer Smart Garage-enabled consoles integrate digital communication protocols. Identifying your model number (usually printed on the back of the unit or inside the battery compartment) helps determine whether special reset procedures or proprietary connectors are involved. Older units are generally simpler to remove, whereas smart consoles may require app-based deactivation before physical removal to prevent system errors.
FAQ Section
Can I remove the wall control without disconnecting the garage door opener power?
Technically, the wall control operates on low-voltage DC, making shock risk minimal. However, best practice and manufacturer guidelines strongly recommend disconnecting main power to eliminate any possibility of accidental activation during removal, which could cause injury or damage. Safety should never be compromised for convenience.
Will removing the wall control disable my garage door opener entirely?
No. The wall control is merely an input device; the opener’s core functionality remains intact. You can still operate the door via remote controls, keypad entry, or smart app integration (if equipped). However, some security features like vacation mode may default to off when the wall console is absent.
What should I do with the old wall control after removal?
If the unit is functional, consider keeping it as a spare or selling it online. Non-functional units should be recycled as e-waste due to internal circuit boards and batteries. Check your local municipality’s electronics recycling program for proper disposal guidelines. Never discard lithium battery-equipped consoles in regular trash.
How long does the removal process typically take?
For most homeowners with basic tools and moderate DIY experience, complete removal takes between 15 and 30 minutes. This includes power disconnection, documentation, physical removal, wire securing, and cleanup. First-timers should budget 45 minutes to account for learning curve and extra caution.
Do I need to reprogram my remotes after removing the wall control?
Generally, no. Remote programming is stored in the motor unit’s memory independently of the wall console. However, if your system uses rolling code technology linked to the wall control’s security settings, consult your owner’s manual. A factory reset may be advisable if you suspect compromised access codes.
Can I install a universal wall control to replace my Craftsman unit?
Compatibility varies significantly. Universal controls work with many older Craftsman models but often fail with newer Security+ 2.0 or myQ-enabled systems due to proprietary encryption. Always verify compatibility using your opener’s model number before purchasing. When in doubt, OEM replacements guarantee full functionality.
Conclusion
Mastering how to remove Craftsman garage door opener wall control empowers you to maintain, upgrade, or troubleshoot your garage system confidently and safely. By following the structured steps outlined above—prioritizing electrical safety, documenting wiring, and securing exposed connections—you protect both yourself and your property from preventable hazards. Remember that patience and preparation yield better results than speed alone.
We hope this guide has demystified the removal process and given you the confidence to tackle this project head-on. If you found this article helpful, please share it on social media to assist fellow homeowners navigating similar upgrades. Tag us in your project photos—we’d love to see your successful transformations! Safe wrenching, and may your garage door always open smoothly.



Leave a Reply