Introduction
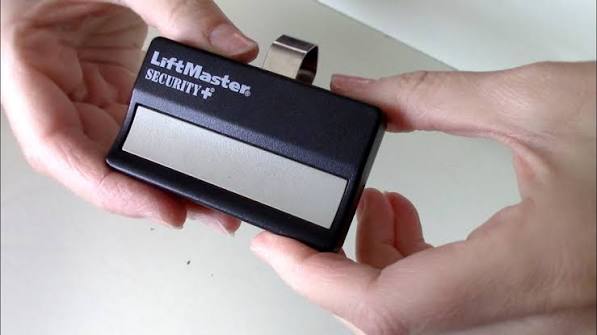
Is your garage door remote suddenly unresponsive, or does the range seem significantly shorter than usual? You are not alone; a dead battery is the most common reason for Liftmaster remote failures, causing unnecessary stress when you just want to get home. Learning how to replace battery for Liftmaster garage door opener remotes is a simple, five-minute task that can save you the cost of buying a new unit or calling a technician.
In this guide, we will walk you through the exact steps to identify the correct battery type, open your specific remote model, and ensure it is programmed correctly after the swap. Whether you have a classic clicker or a modern MyQ-enabled device, we have you covered.
Identifying Your Liftmaster Remote Model
Before rushing to the hardware store, it is crucial to identify which remote you own. Liftmaster has produced dozens of remote models over the years, and they do not all use the same battery. Using the wrong battery size can damage the contacts or simply not fit.
Most Liftmaster remotes fall into three main categories:
- Standard Visor Clips: These are the rectangular remotes with one to four buttons, often clipped to a car sun visor.
- Mini Remotes: Compact, keychain-sized units with fewer buttons.
- MyQ Smart Remotes: Newer models that connect to Wi-Fi and may have a rechargeable internal battery or a standard coin cell.
Look at the back of your remote. You should see a model number (e.g., 893LM, 890LT, or 373UT). If the label is worn off, check the original packaging or the manual. If neither is available, we will cover how to determine the battery type by opening the casing safely in the next section.
Tools and Materials Needed
Gathering the right tools before you start prevents frustration. For most Liftmaster battery replacements, you will need:
- Replacement Battery: Typically a CR2032 or CR2016 3V lithium coin cell. Note: Always check your specific model requirements.
- Small Flathead Screwdriver: Or a plastic prying tool to avoid scratching the casing.
- Clean Cloth: To wipe away any dust or corrosion from the battery contacts.
- Patience: Rushing can break the plastic clips holding the remote together.
Pro Tip: Buy high-quality brand-name batteries (like Energizer or Duracell). Cheap generic batteries often have lower voltage stability and may die within weeks, leading to repeated replacements.
Step-by-Step Guide: How To Replace Battery For Liftmaster Garage Door Opener
Follow these precise steps to ensure a successful replacement. We will focus on the most common “Visor Clip” style remotes, but the logic applies to most models.
Step 1: Open the Remote Casing
Locate the seam where the two halves of the remote meet. On many Liftmaster models, there is no screw; instead, the case is held together by plastic clips.
- Insert your small flathead screwdriver into the seam near the bottom or side of the remote.
- Gently twist the screwdriver to pry the case open. Do not force it. If it feels stuck, try a different angle.
- Once the clips release, separate the two halves carefully. Be mindful of any rubber button pads that might fall out.
Step 2: Remove the Old Battery
Observe the battery compartment. The battery is usually held in place by a metal clip or sits in a shallow tray.
- Note the orientation of the old battery. Look for the + (positive) and – (negative) signs. In most Liftmaster remotes, the positive side faces up.
- Use your fingernail or the tip of the screwdriver to gently lift the battery out.
- Inspect the battery contacts. If you see white or green corrosion, clean it with a dry cloth or a cotton swab dipped in a tiny amount of rubbing alcohol. Corrosion can prevent the new battery from making a good connection.
Step 3: Insert the New Battery
Take your new CR2032 (or specified) battery.
- Ensure the positive (+) side is facing the same direction as the old battery (usually up).
- Slide the battery under the metal contact clip first, then press down until it snaps into place.
- Give it a gentle wiggle to ensure it is secure. It should not slide around loosely.
Step 4: Reassemble the Remote
- Place the rubber button pad back into position if it was removed.
- Align the two halves of the remote casing.
- Press firmly around the edges until you hear a “click,” indicating the plastic locks have engaged. Ensure there are no gaps.
Step 5: Test the Remote
Stand within 10 feet of your garage door opener motor unit. Press the button.
- If the light on the remote blinks and the door moves: Success! You are done.
- If the light blinks but the door does not move: The battery is good, but the remote may have lost its programming. See the troubleshooting section below.
- If the light does not blink: The battery may be inserted incorrectly, or the contacts are dirty. Reopen and check.
Understanding Battery Types: CR2032 vs. CR2016
One common confusion among homeowners is the difference between similar-looking coin cells. Here is a quick comparison to help you choose the right one.
| Feature | CR2032 | CR2016 |
|---|---|---|
| Diameter | 20mm | 20mm |
| Thickness | 3.2mm | 1.6mm |
| Capacity | ~220-240 mAh | ~90-100 mAh |
| Lifespan | 3–5 Years | 1–2 Years |
| Common Use | Most Liftmaster Visor Remotes | Older Mini Remotes |
Key Takeaway: While both have the same diameter, the CR2032 is twice as thick. Forcing a CR2032 into a slot designed for a CR2016 can crack the remote’s casing. Conversely, a CR2016 in a CR2032 slot will be loose and fail to make contact. Always verify your model’s requirement.
Troubleshooting Common Issues
Even after replacing the battery, issues can persist. Here are solutions to frequent problems.
Remote Light Blinks But Door Doesn’t Move
This indicates the remote has power but is not communicating with the opener. This often happens if the battery was dead for a long time, causing the remote to reset.
- Solution: Reprogram the remote. Locate the “Learn” button on your garage door motor unit (usually yellow, purple, or red). Press it once, then immediately press the button on your remote. The motor lights should flash to confirm pairing.
Remote Range Is Still Short
If the new battery doesn’t restore full range, interference might be the culprit.
- Solution: LED light bulbs in your garage can emit frequency interference. Try turning off the garage lights and testing the remote. If it works better, consider switching to shielded LED bulbs or incandescent bulbs for the opener fixture.
Battery Drains Quickly
If you find yourself replacing the battery every few months, there may be a short circuit.
- Solution: Check for debris inside the remote. Also, ensure you are not accidentally pressing the button while it is in your pocket or bag. Some older remotes have worn-out buttons that stay partially depressed.
When to Seek Professional Help
While DIY battery replacement is straightforward, there are times when professional assistance is warranted. According to industry standards, if your remote shows physical damage, such as cracked circuit boards or water damage, a battery swap will not fix it.
Furthermore, if you are dealing with a complex smart home integration issue involving Liftmaster MyQ technology, where the remote fails to sync with the app despite fresh batteries, contacting Liftmaster support or a certified technician is advisable. They can diagnose whether the issue lies with the remote, the internet gateway, or the motor unit itself.
FAQ Section
Q1: How often should I replace the battery in my Liftmaster remote?
A: On average, a high-quality lithium battery in a Liftmaster remote lasts between 3 to 5 years with normal daily use. However, extreme temperatures (very hot or cold garages) can shorten this lifespan.
Q2: Can I use a rechargeable battery in my Liftmaster remote?
A: It is not recommended. Standard coin-cell rechargeables often have a lower voltage (1.2V vs 3V) or different discharge curves that can cause erratic behavior in garage door remotes. Stick to non-rechargeable 3V lithium cells like the CR2032.
Q3: What do I do if I don’t know which battery my remote uses?
A: Open the remote carefully as described in Step 1. The battery type is almost always printed on the old battery itself (e.g., “CR2032”). If the printing is faded, take the old battery to an electronics store; they can measure it and identify it instantly.
Q4: Will replacing the battery erase my remote’s programming?
A: Generally, no. Most Liftmaster remotes retain their memory even when the battery is removed. However, if the battery was completely dead for an extended period, or if you press buttons while the battery is out, it might lose sync. Be prepared to reprogram it just in case.
Q5: Why is my new battery dead already?
A: This is rare but can happen if the battery was old stock when purchased, or if there is a manufacturing defect. It can also occur if the remote’s internal switch is stuck “on,” draining the power continuously. Test the remote with another known-good battery to rule out a defective new battery.
Conclusion
Knowing how to replace battery for Liftmaster garage door opener remotes empowers you to handle minor maintenance tasks confidently, saving time and money. By identifying the correct battery type, handling the components with care, and understanding basic troubleshooting, you can ensure your garage access remains seamless.
Remember, a simple battery swap resolves the majority of remote issues. If you found this guide helpful, please share it with friends or family who might be struggling with their own garage door remotes. A quick fix today means no being locked out tomorrow!



Leave a Reply